
Transfer data over the network with TLS/SSL
Several NXLog Agent network modules support secure data transfer with TLS/SSL. In this tutorial, you will configure two NXLog Agent instances, one on Linux and another on Windows, to securely transfer data between each other.
Prerequisites
To complete this tutorial, you will need:
-
A Linux computer with OpenSSL and NXLog Agent installed.
-
A Windows computer with NXLog Agent installed.
-
A text editor of your choice, such as Notepad++, to edit the NXLog Agent configuration file.
Step 1: Create self-signed certificates
In its most basic form, securing network communication with TLS/SSL requires three certificates for each node:
-
A Certificate Authority (CA) certificate.
-
A certificate for NXLog Agent.
-
The private key of the NXLog Agent certificate.
In production scenarios, you will likely use digital certificates issued by a trusted provider, such as DigiCert and GlobalSign. However, as we’ll do in this tutorial, you can generate self-signed certificates for testing.
-
Log in to your Linux computer and execute the following command to verify that OpenSSL is installed.
$ openssl versionIf the command does not return the version, install OpenSSL according to your operating system’s instructions.
-
Generate the private root key for your Certification Authority (CA).
$ openssl genrsa -out rootCA.key 2048 -
Create a self-signed CA certificate using the key created in the previous step.
$ openssl req -x509 -new -nodes -key rootCA.key -sha256 -days 730 -out rootCA.pem -
Execute the following steps to create a certificate for each NXLog Agent instance. Replace
server-namewith each machine’s name. In our configuration examples below, we uselinux-serverandwindows-server.-
Generate a private key for the server.
$ openssl genrsa -out server-name.key 2048 -
Generate the CA Certificate Signing Request (CSR). When prompted for the Common Name, enter the server’s name or IP address. This value must match the machine’s DNS name.
$ openssl req -new -key server-name.key -out server-name.csr -
Sign the request and create the server certificate.
$ openssl x509 -req -in server-name.csr -CA rootCA.pem -CAkey rootCA.key \
          -CAcreateserial -out server-name.pem -days 500 -sha256
-
After completing these steps, you should have one CA certificate (rootCA.pem), two server certificates (server-name.pem), and two corresponding private keys (server-name.key).
Step 2: Configure NXLog Agent to receive data with TLS
Next, we will configure NXLog Agent on Linux to receive data over TCP with TLS.
-
Open the NXLog Agent configuration file at
/opt/nxlog/etc/nxlog.confwith a text editor. -
Ensure that your configuration defines the
INSTALLDIRandCERTDIRconstants. If not, add them.define INSTALLDIR /opt/nxlog define CERTDIR %INSTALLDIR%/var/lib/nxlog/cert -
Copy the CA certificate, Linux server certificate, and corresponding private key to the certificates folder.
-
We will use an NXLog Transport input instance to receive logs from another NXLog Agent instance and save them to a file with the File output module. Add the following to your configuration file, replacing the certificate filenames accordingly.
<Input nxlog_agent>
    Module         im_batchcompress
    ListenAddr     0.0.0.0:2514
    CAFile         %CERTDIR%/rootCA.pem  (1)
    CertFile       %CERTDIR%/linux-server.pem  (2)
    CertKeyFile    %CERTDIR%/linux-server.key  (3)
    KeyPass        secret  (4)
</Input>

<Output output_file>
    Module         om_file
    File           '%INSTALLDIR%/var/log/nxlog-output.log'
</Output>

<Route r1>
    Path           nxlog_agent => output_file
</Route>
1 The CAFile directive specifies the path of the Certificate Authority (CA) certificate. 2 The CertFile directive specifies the path of the local server’s certificate. In this example, we named the file linux-server.pem.3 The CertKeyFile directive specifies the path of the server’s certificate private key. In this example, we named the file linux-server.key.4 If you set a private key password, specify it in the KeyPass directive. -
Restart the NXLog Agent service.
$ sudo systemctl restart nxlog -
Open the NXLog Agent log file at
/opt/nxlog/var/log/nxlog/nxlog.logand verify that the input instance started successfully. You should see a log line similar to the following.2024-05-28 16:49:23 INFO [im_batchcompress|nxlog_agent] listening on 0.0.0.0:2514
Step 3: Configure NXLog Agent to send data with TLS
Configure NXLog Agent on the Windows machine to send data to the Linux machine you just configured.
-
Open the NXLog Agent configuration at
C:\Program Files\nxlog\conf\nxlog.confwith a text editor. -
Ensure that your configuration defines the
INSTALLDIRandCERTDIRconstants. If not, add them.define INSTALLDIR C:\Program Files\nxlog define CERTDIR %INSTALLDIR%\cert -
Copy the CA certificate, server certificate, and private key to the certificates folder.
-
We will collect Windows events with the Event Log for Windows module and forward them to the NXLog Agent instance on Linux with an NXLog Transport output module instance. Add the following to your configuration file, replacing the certificate filenames accordingly.
<Input eventlog>
    Module         im_msvistalog
    <QueryXML>
        <QueryList>
            <Query Id='0'>
                <Select Path='Security'>*</Select>
            </Query>
        </QueryList>
    </QueryXML>
</Input>

<Output nxlog_agent>
    Module         om_batchcompress
    Host           192.168.1.123:2514
    UseSSL         TRUE
    CAFile         %CERTDIR%\rootCA.pem  (1)
    CertFile       %CERTDIR%\win-server.pem  (2)
    CertKeyFile    %CERTDIR%\win-server.key  (3)
    KeyPass        secret  (4)
</Output>

<Route r1>
    Path           eventlog => nxlog_agent
</Route>
1 The CAFile directive specifies the path of the Certificate Authority (CA) certificate. 2 The CertFile directive specifies the path of the local server’s certificate. In this example, we named the file windows-server.pem.3 The CertKeyFile directive specifies the path of the server’s certificate private key. In this example, we named the file windows-server.key.4 If you set a private key password, specify it in the KeyPass directive.
Step 4: Test your configuration
Finally, we will verify that the communication between the NXLog Agent instances works correctly. However, we’ll make one more modification to the configuration to see instant results.
By default, the im_msvistalog module collects new events logged after the agent starts for the first time.
From then on, it will save the position it read last and collect all logs from that position on subsequent restarts.
This is usually the desired behavior in production environments.
However, we will change it to collect all available events before we restart the NXLog Agent instance on Windows by setting the ReadFromLast and SavePos directives to FALSE.
Add the following lines to your eventlog instance.
ReadFromLast    FALSE
SavePos         FALSE
This is how the complete instance should look like:
<Input eventlog>
    Module          im_msvistalog
    ReadFromLast    FALSE
    SavePos         FALSE
    <QueryXML>
        <QueryList>
            <Query Id='0'>
                <Select Path='Security'>*</Select>
            </Query>
        </QueryList>
    </QueryXML>
</Input>
You are now ready to test your configuration.
-
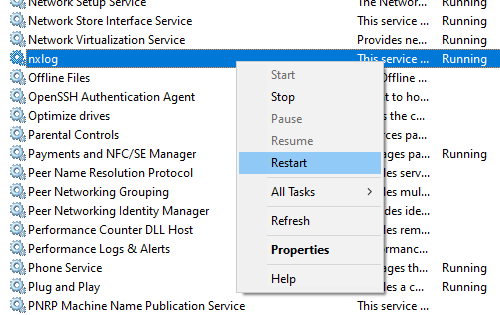
On the Windows machine, open the Services console (services.msc).
-
Locate the nxlog service and right-click on it.
-
Choose Restart.
As a result, you should start seeing events in the output file on the Linux machine.
Summary
This tutorial introduced you to the basic TLS/SSL certificate requirements and guided you in generating self-signed certificates with OpenSSL. You then configured an NXLog Agent instance on Windows to send events to another agent instance on Linux via TCP with TLS/SSL.
Check out more TLS/SSL resources:
-
Read about TLS/SSL log transfer with NXLog Agent.
-
The TLS/SSL how-to provides examples for forwarding and receiving data over a secure channel.