
Create your first configuration with a configuration file
NXLog Agent uses an Apache-style configuration file.
It utilizes blocks similar to XML tags containing several directives.
Open the configuration file from the default location, C:\Program Files\nxlog\conf\nxlog.conf on Windows, to get started with this tutorial.
Prerequisites
To complete this tutorial, you will need:
-
A basic understanding of NXLog Agent telemetry data processing.
-
A Windows computer with NXLog Agent installed.
-
A text editor of your choice, such as Notepad++, to edit the NXLog Agent configuration file.
Step 1: Define constants
You typically use constant values for directory paths, filenames, hostnames, regular expressions, or any values you will reference more than once within the configuration. You can define constants throughout the configuration.
Use the following syntax to define a constant:
define <KEY> <VALUE>Start by adding the following constants to your configuration file. These three constants define the NXLog Agent installation and logging directories and the agent log file path.
define      INSTALLDIR    C:\Program Files\nxlog
define      LOGDIR        %INSTALLDIR%\data
define      MYLOGFILE     %LOGDIR%\nxlog.log
Step 2: Set global directives
Global directives control the overall behavior of NXLog Agent. These include logging, batching, caching, and date format settings. In this case, you will define the log level and file.
The following is the syntax for defining a global directive:
<DIRECTIVE> <VALUE>Continue building your configuration by adding the following two directives to configure the NXLog Agent LogLevel and LogFile path.
LogLevel    INFO
LogFile     %MYLOGFILE%
Step 3: Add extensions
Extension modules are required to process logs, such as parse or output log records in a specific format. In this tutorial, we will use the xm_json extension to convert Windows Event Log records to JSON format.
You add module instances to your configuration using a module block directive.
A module block must include at least one directive specifying the module name.
In our example, the first line specifies the module type (Extension) and the instance name (json).
The latter can be any name you desire.
The second line sets the Module name (xm_json), and the last line terminates the block.
Now that you understand the basic structure of module blocks add the following to your configuration.
<Extension json>
    Module    xm_json
</Extension>
Step 4: Configure your log source
Input module instances define the sources from which to collect or receive logs. Since we want to collect Windows events, we will use the im_msvistalog input module. To further narrow down the events, we will configure the QueryXML directive of this module to collect security event IDs 4624 (successful logon) and 4625 (failed logon attempt) only.
You can learn more about filtering Windows logs in our Windows Event Log integration guide.
Go ahead and add the following log source to your configuration.
<Input eventlog>
    Module    im_msvistalog
    <QueryXML>
        <QueryList>
            <Query Id="0" Path="Security">
            <Select Path="Security">*[System[(EventID=4624 or EventID=4625)]]</Select>
            </Query>
        </QueryList>
    </QueryXML>
</Input>
Step 5: Configure the output
The next step is to configure the destination of your logs with an output module instance. Destinations may include a file, a syslog server, or NXLog Platform. For simplicity and to see results immediately, we’ll use the om_file output module to save the Windows Event Log records in a file. We will also use the to_json() procedure of the xm_json instance we added earlier to convert them to JSON format.
So, add the following output instance to your configuration. The File directive must point to an existing folder. If the file does not exist, NXLog Agent will create it.
<Output output_file>
    Module    om_file
    File      'C:\logs\windows_events.log'
    Exec      to_json();
</Output>
Step 6: Define the route
Finally, you need to define the flow and processing order of your logs. A route can include multiple input, processor, and output module instances. You can also add multiple routes.
You use your module instance names to define your log’s path.
This means eventlog for the input module instance and output_file for the output module instance in the configuration we just created.
Our route is straightforward: we collect Windows events and save them to a file. Add the following to your configuration to complete it.
<Route r1>
    Path      eventlog => output_file
</Route>
Your configuration is now ready to use!
Step 7: Test your configuration
In this step, you will see NXLog Agent in action. However, we’ll do one more modification to the configuration to see instant results.
By default, the im_msvistalog module collects new events logged after the agent starts for the first time.
From then on, it will save the position it read last and collect all logs from that position on subsequent restarts.
This is usually the desired behavior in production environments. However, we will change it to collect all available events before we restart it by setting the ReadFromLast and SavePos directives to FALSE.
Add the following lines to your eventlog instance.
ReadFromLast    FALSE
SavePos         FALSE
This is what the complete configuration file looks like:
define      INSTALLDIR    C:\Program Files\nxlog
define      LOGDIR        %INSTALLDIR%\data
define      MYLOGFILE     %LOGDIR%\nxlog.log

LogLevel    INFO
LogFile     %MYLOGFILE%

<Extension json>
    Module          xm_json
</Extension>

<Input eventlog>
    Module          im_msvistalog
    ReadFromLast    FALSE
    SavePos         FALSE
    <QueryXML>
        <QueryList>
            <Query Id="0" Path="Security">
            <Select Path="Security">*[System[(EventID=4624 or EventID=4625)]]</Select>
            </Query>
        </QueryList>
    </QueryXML>
</Input>

<Output output_file>
    Module          om_file
    File            'C:\logs\windows_events.log'
    Exec            to_json();
</Output>

<Route r1>
    Path            eventlog => output_file
</Route>
You are now ready to test your configuration.
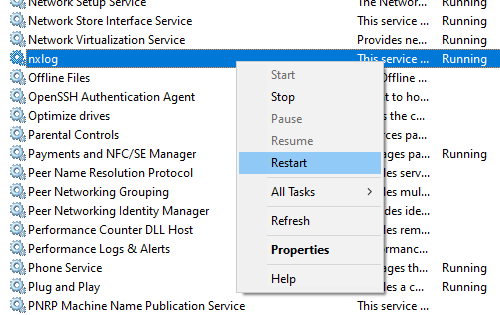
-
Open the Services console (services.msc).
-
Locate the nxlog service and right-click on it.
-
Choose Restart.
As a result, you should start seeing logs in your output file. NXLog Agent will write logs one record per line in JSON format (newline delimited JSON).
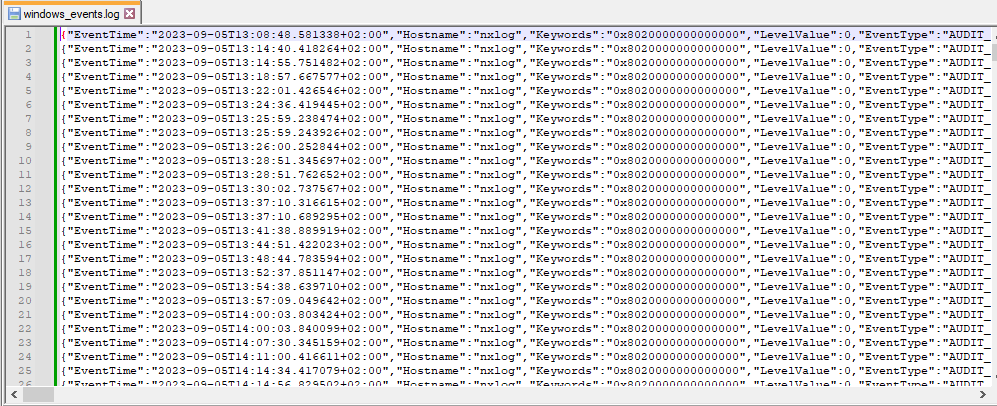
The logs are intended to be processed by other software. However, it’s worth verifying that the events contain all the information you expect. The following is a single, pretty-printed log event:
{
  "EventTime":"2023-09-05T13:08:48.581338+02:00",
  "Hostname":"nxlog",
  "Keywords":"0x8020000000000000",
  "LevelValue":0,
  "EventType":"AUDIT_SUCCESS",
  "SeverityValue":2,
  "Severity":"INFO",
  "EventID":4624,
  "SourceName":"Microsoft-Windows-Security-Auditing",
  "ProviderGuid":"{54849625-5478-4994-A5BA-3E3B0328C30D}",
  "Version":2,
  "TaskValue":12544,
  "OpcodeValue":0,
  "RecordNumber":228402,
  "ActivityID":"{20D420BC-CF7E-000A-D320-D4207ECFD901}",
  "ExecutionProcessID":1164,
  "ExecutionThreadID":10632,
  "Channel":"Security",
  "Message":"An account was successfully logged on.\r\n\r\nSubject:\r\n\tSecurity ID:\t\tS-1-5-18\r\n\tAccount Name:\t\tNXLOG$\r\n\tAccount Domain:\t\tWORKGROUP\r\n\tLogon ID:\t\t0x3e7\r\n\r\nLogon Information:\r\n\tLogon Type:\t\t5\r\n\tRestricted Admin Mode:\t-\r\n\tVirtual Account:\t\tNo\r\n\tElevated Token:\t\tYes\r\n\r\nImpersonation Level:\t\tImpersonation\r\n\r\nNew Logon:\r\n\tSecurity ID:\t\tS-1-5-18\r\n\tAccount Name:\t\tSYSTEM\r\n\tAccount Domain:\t\tNT AUTHORITY\r\n\tLogon ID:\t\t0x3e7\r\n\tLinked Logon ID:\t\t0x0\r\n\tNetwork Account Name:\t-\r\n\tNetwork Account Domain:\t-\r\n\tLogon GUID:\t\t{00000000-0000-0000-0000-000000000000}\r\n\r\nProcess Information:\r\n\tProcess ID:\t\t0x46c\r\n\tProcess Name:\t\tC:\\Windows\\System32\\services.exe\r\n\r\nNetwork Information:\r\n\tWorkstation Name:\t-\r\n\tSource Network Address:\t-\r\n\tSource Port:\t\t-\r\n\r\nDetailed Authentication Information:\r\n\tLogon Process:\t\tAdvapi  \r\n\tAuthentication Package:\tNegotiate\r\n\tTransited Services:\t-\r\n\tPackage Name (NTLM only):\t-\r\n\tKey Length:\t\t0\r\n\r\nThis event is generated when a logon session is created. It is generated on the computer that was accessed.\r\n\r\nThe subject fields indicate the account on the local system which requested the logon. This is most commonly a service such as the Server service,
   or a local process such as Winlogon.exe or Services.exe.\r\n\r\nThe logon type field indicates the kind of logon that occurred. The most common types are 2 (interactive) and 3 (network).\r\n\r\nThe New Logon fields indicate the account for whom the new logon was created,
   i.e. the account that was logged on.\r\n\r\nThe network fields indicate where a remote logon request originated. Workstation name is not always available and may be left blank in some cases.\r\n\r\nThe impersonation level field indicates the extent to which a process in the logon session can impersonate.\r\n\r\nThe authentication information fields provide detailed information about this specific logon request.\r\n\t- Logon GUID is a unique identifier that can be used to correlate this event with a KDC event.\r\n\t- Transited services indicate which intermediate services have participated in this logon request.\r\n\t- Package name indicates which sub-protocol was used among the NTLM protocols.\r\n\t- Key length indicates the length of the generated session key. This will be 0 if no session key was requested.",
  "Category":"Logon",
  "Opcode":"Info",
  "Level":"Information",
  "SubjectUserSid":"S-1-5-18",
  "SubjectUserName":"NXLOG$",
  "SubjectDomainName":"WORKGROUP",
  "SubjectLogonId":"0x3e7",
  "TargetUserSid":"S-1-5-18",
  "TargetUserName":"SYSTEM",
  "TargetDomainName":"NT AUTHORITY",
  "TargetLogonId":"0x3e7",
  "LogonType":5,
  "LogonProcessName":"Advapi  ",
  "AuthenticationPackageName":"Negotiate",
  "WorkstationName":"-",
  "LogonGuid":"{00000000-0000-0000-0000-000000000000}",
  "TransmittedServices":"-",
  "LmPackageName":"-",
  "KeyLength":0,
  "ProcessId":"0x46c",
  "ProcessName":"C:\\Windows\\System32\\services.exe",
  "IpAddress":"-",
  "IpPort":"-",
  "ImpersonationLevel":"%%1833",
  "ImpersonationLevelResolved":"Impersonation",
  "RestrictedAdminMode":"-",
  "TargetOutboundUserName":"-",
  "TargetOutboundDomainName":"-",
  "VirtualAccount":"%%1843",
  "VirtualAccountResolved":"No",
  "TargetLinkedLogonId":"0x0",
  "ElevatedToken":"%%1842",
  "ElevatedTokenResolved":"Yes",
  "EventReceivedTime":"2023-09-29T12:55:09.728932+02:00",
  "SourceModuleName":"eventlog",
  "SourceModuleType":"im_msvistalog"
  }
Excellent! You have successfully created your first NXLog Agent configuration, collected Windows events, and saved them to a file.
Summary
In this tutorial, you created your first NXLog Agent configuration. You were introduced to the basic structure and components of the configuration and learned how to join the blocks with a route. Now that you have mastered the basics, you could try:
-
Learning about NXLog Agent data collection modes
-
Exploring NXLog Platform