Configure an NXLog Agent relay
The purpose of a relay is to gather telemetry data from multiple sources and forward it to the final destination, such as NXLog Platform. See Centralized telemetry data collection for more information.
Below, we provide examples of configuring NXLog Agent as a relay and collecting data from agentless sources and other NXLog Agent instances.
Collect data from agentless sources
You can configure an NXLog Agent relay to collect data from different sources, such as network devices that can only send events over UDP or software applications that send metrics over TCP.
NXLog Platform provides a pre-built configuration to collect data from such sources. You can view and edit the configuration settings by navigating to Agents > Configurations and clicking on the Agentless Network Input Relay configuration.
Follow these steps to apply the configuration to your agent relay:
-
Log in to NXLog Platform, navigate to Agents and switch to the Agents view.
-
Find the agent you want to assign the configuration to. You can use the search bar to help you find the agent.
See Enroll an agent manually if you have not enrolled the agent relay to NXLog Platform yet. -
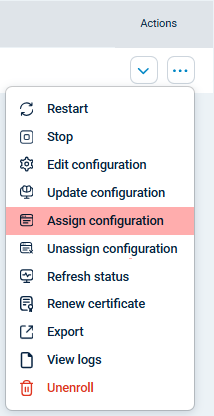
Click the Actions menu for the agent and choose Assign configuration.

-
Choose the Agentless Network Input Relay configuration and click Save to push the configuration to the agent.
Transfer data between NXLog Agent instances
The NXLog Transport modules efficiently transport compressed data between NXLog Agent instances. These modules preserve all the event fields, so you don’t need to parse the data again on the relay.
First, configure an NXLog Agent relay to receive telemetry data using the im_batchcompress input module.
<Input nxlog_transport>
    Module         im_batchcompress
    ListenAddr     0.0.0.0:2514
    CAFile         /opt/nxlog/cert/rootCA.pem  (1)
    CertFile       /opt/nxlog/cert/agent-cert.pem  (2)
    CertKeyFile    /opt/nxlog/cert/agent-key.pem  (3)
</Input>| 1 | The CAFile directive specifies the path to the CA certificate to verify the remote agent’s certificate. |
| 2 | The CertFile directive specifies the path to the relay server’s certificate. |
| 3 | The CertKeyFile directive specifies the public key that was used to sign the relay server’s certificate. |
Once your relay is up and running, configure your other NXLog Agent instances to send data to it with the om_batchcompress output module.
<Output agent_relay>
    Module         om_batchcompress
    Host           192.168.1.101:2514
    UseSSL         TRUE
    CAFile         /opt/nxlog/cert/rootCA.pem  (1)
    CertFile       /opt/nxlog/cert/agent-cert.pem  (2)
    CertKeyFile    /opt/nxlog/cert/agent-key.pem  (3)
</Output>| 1 | The CAFile directive specifies the path to the CA certificate to verify the remote agent’s certificate. |
| 2 | The CertFile directive specifies the path to the local server’s certificate. |
| 3 | The CertKeyFile directive specifies the public key that was used to sign the local server’s certificate. |
Configure a relay cluster in failover mode
Network-based NXLog Agent modules provide failover capabilities, allowing you to configure an NXLog Agent cluster for High Availability (HA). Refer to NXLog Agent modules that support failover for a complete list, and see Failover for more information.
First, configure your NXLog Agent cluster nodes to receive data. Each agent should have an identical configuration. We will use the im_batchcompress input module in our example.
<Input nxlog_transport>
    Module        im_batchcompress
    ListenAddr    0.0.0.0:2514
</Input>
Once your relay cluster is up and running, configure your other NXLog Agent instances to send data to it. We will use the corresponding om_batchcompress output module in this example.
<Output agent_relay>
    Module    om_batchcompress
    Host      192.168.1.51:1514 (1)
    Host      192.168.1.52:1514
    Host      192.168.1.53:1514
</Output>| 1 | Specify the IP address and port of your cluster nodes in the order in which you want them to be used. If the first Host becomes unavailable, the module automatically tries the next one. |
