Windows Security audit
Windows security auditing can provide visibility into actions performed on your servers. It allows you to track who is accessing the server and making changes to files, registry keys, and processes. This is especially important on file servers, or servers where sensitive data is stored. Auditing may be required to meet compliance regulations like PCI DSS, SOX, and HIPAA. It also helps you to mitigate potential threats and reduce the risk of a data breach.
Audit policies can be configured on all versions of Windows. Starting with Windows 2008 R2 and Windows 7, advanced audit policies were introduced, providing more granular control and detailed information. They are also supported on Windows Server 2008 and Windows Vista with the correct service packs installed. When audit policies are enabled, audit events are generated in the security event log.
In this guide we provide the steps to enable audit policies, configure users and actions to audit, and collect audit events with NXLog.
| Sysmon is a system service that can also track and provide information about processes, files, registry keys, and network connections. It can be used in addition to the built-in Windows security auditing to supplement and enhance audit logging. Although logging created by the two systems may sometimes overlap, it is not recommended to replace the native logging with Sysmon since it is easier to turn off or bypass. See our Sysmon guide for more information on how to configure and collect Sysmon logs with NXLog. |
Configuring Windows auditing
Auditing policies on Windows can be applied through a Group Policy Object (GPO). Nine basic auditing policies are available on all Windows versions. On Windows 2018 R2 and newer operating systems, advanced audit policies are also available, providing more granular policies that allow you to be more selective in the types of events to audit.
The following steps guide you to configure advanced audit policies on a server with the Group Policy Management feature installed. In these steps we enable file auditing. Other policies for auditing registry access, account logon, account management, and privilege use can be configured in a similar way. See the Microsoft documentation for a complete list of Advanced security audit policy settings.
-
Open Server Manager and go to Tools > Group Policy Management.
-
From the Group Policy Management MMC, expand Forest: [name] > Domains and select your domain name.
-
Right-click on the relevant group policy and select Edit….
-
From the Group Policy Management Editor expand Computer Configuration > Policies > Windows Settings > Security Settings > Advanced Audit Policy Configuration > Audit Policies.
-
Click on Object Access.
-
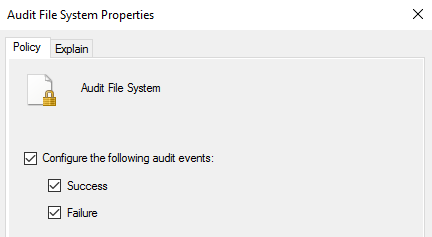
Double-click on Audit File System to edit the policy.
-
Enable Configure the following audit events and select both Success and Failure.

-
Click the Apply button.
-
Repeat the last four steps for any other policies you need to enable.
-
Optionally, to enable Global Object Access Auditing, under Audit Policies select Global Object Access Auditing.
-
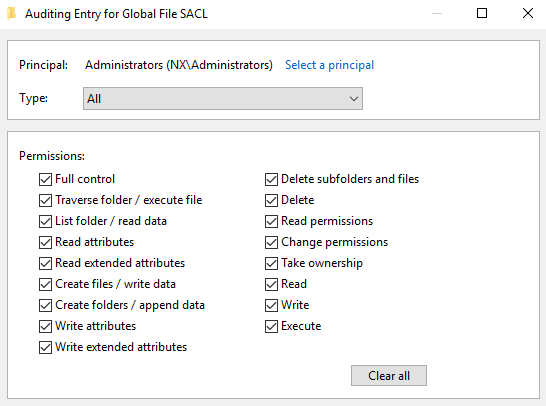
Double-click on File system, enable Define this policy setting and then click the Configure button to add the users and permissions you want to audit.

-
Repeat the previous step for Registry if required.
Once you have configured advanced audit policies, the next step is to make sure that they are enforced. Follow these steps to force audit policy subcategory settings so that they are applied even on machines that have basic audit policies configured.
-
From the Group Policy Management Editor expand Policies > Windows Settings > Security Settings > Local Policies.
-
Click on Security Options.
-
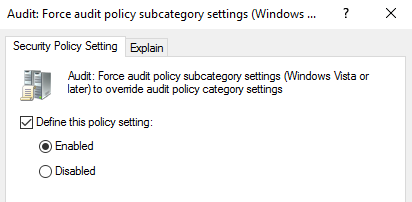
Double-click on Audit: Force audit policy subcategory settings (Windows Vista or later) to override audit policy category settings.
-
Enable Define this policy setting and select Enabled.

-
Click the Apply button.
For auditing object access, if you have not enabled Global Object Access Auditing above, you will need to enable auditing for specific files, folders, and registry keys. To enable auditing for a file/folder:
-
Locate the file or folder in Windows Explorer, right-click on it, and select Properties.
-
On the Security tab, click the Advanced button.
-
On the Auditing tab, click the Add button to add the users and permissions to audit.
To enable auditing for a registry key:
-
Open Registry Editor (regedit).
-
Right-click on the registry key and select Permissions….
-
Click the Advanced button.
-
On the Auditing tab, click the Add button to add the users and permissions to audit.
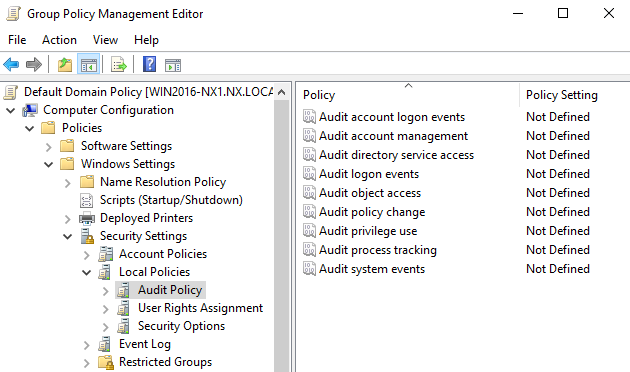
On older operating systems where advanced audit policies are not available, basic audit policies can be enabled. These will generate similar Security events, however you have less granular control on what to audit, and some events may provide less information. Basic audit policies can be configured from the Group Policy Management Editor in the same way as described above, but are found under Computer Configuration > Policies > Windows Settings > Security Settings > Local Policies > Audit Policy. See the Microsoft documentation for a complete list of Basic security audit policy settings.

| Advanced audit policies can also be configured with the auditpol command line tool, while basic audit policies can be configured with the secedit command line tool. These can be useful when you need to automate the configuration of audit policies on Windows machines that are not part of an Active Directory domain. An example batch script is available in our public git repository. |
Collecting Windows audit events
Windows audit events are logged in the Windows Security event log. NXLog can collect these events using the im_msvistalog input module. Many events are logged in the Security event log, however with this module you can collect events selectively and tag events according to their type, making them easier to identify when filtering events in a SIEM or log analytics platform.
This configuration uses the im_msvistalog module to collect event IDs
generated by the
Audit File System
and Audit Registry
advanced policies. The instance name is set to object_access_audit, which will
be used to automatically populate the $SourceModuleName field, and can be used
to identify the events later on.
Before they are sent to their destination, events are converted to JSON using the to_json() procedure of the xm_json module.
<Extension json>
    Module    xm_json
</Extension>

<Input object_access_audit>
    Module    im_msvistalog
    <QueryXML>
        <QueryList>
            <Query Id="0" Path="Security">
                <Select Path="Security">*[System[(EventID=4656 or EventID=4657
                    or EventID=4658 or EventID=4660 or EventID=4663
                    or EventID=4664 or EventID=4670 or EventID=4985
                    or EventID=5039 or EventID=5051)]]
                </Select>
            </Query>
        </QueryList>
    </QueryXML>
    Exec      to_json();
</Input>{
"EventTime": "2021-09-30T13:18:30.544688+02:00",
"Hostname": "WIN2016-1.nx.local",
"Keywords": "9232379236109516800",
"EventType": "AUDIT_SUCCESS",
"SeverityValue": 2,
"Severity": "INFO",
"EventID": 4663,
"SourceName": "Microsoft-Windows-Security-Auditing",
"ProviderGuid": "{54849625-5478-4994-A5BA-3E3B0328C30D}",
"Version": 1,
"TaskValue": 12800,
"OpcodeValue": 0,
"RecordNumber": 244496,
"ExecutionProcessID": 4,
"ExecutionThreadID": 2692,
"Channel": "Security",
"Message": "An attempt was made to access an object.\r\n\r\nSubject:\r\n\tSecurity ID:\t\tS-1-5-21-3309588957-2002815810-1100576919-1103\r\n\tAccount Name:\t\tjdoe\r\n\tAccount Domain:\t\tNX\r\n\tLogon ID:\t\t0x1EB3B\r\n\r\nObject:\r\n\tObject Server:\t\tSecurity\r\n\tObject Type:\t\tFile\r\n\tObject Name:\t\tC:\\audit\\test.txt\r\n\tHandle ID:\t\t0x20d4\r\n\tResource Attributes:\t\r\n\r\nProcess Information:\r\n\tProcess ID:\t\t0x7d8\r\n\tProcess Name:\t\tC:\\Windows\\explorer.exe\r\n\r\nAccess Request Information:\r\n\tAccesses:\t\tReadData (or ListDirectory)\r\n\t\t\t\t\r\n\tAccess Mask:\t\t0x1",
"Category": "File System",
"Opcode": "Info",
"SubjectUserSid": "S-1-5-21-3309588957-2002815810-1100576919-1103",
"SubjectUserName": "jdoe",
"SubjectDomainName": "NX",
"SubjectLogonId": "0x1eb3b",
"ObjectServer": "Security",
"ObjectType": "File",
"ObjectName": "C:\\audit\\test.txt",
"HandleId": "0x20d4",
"AccessList": "%%4416\n\t\t\t\t",
"AccessMask": "0x1",
"ProcessId": "0x7d8",
"ProcessName": "C:\\Windows\\explorer.exe",
"EventReceivedTime": "2021-09-30T13:18:31.675744+02:00",
"SourceModuleName": "object_access_audit",
"SourceModuleType": "im_msvistalog"
}This configuration uses the im_msvistalog module to collect all event IDs
with event source Microsoft-Windows-Security-Auditing. This will capture all
events generated by the audit policy.
Before they are sent to their destination, events are converted
to JSON using the to_json() procedure of
the xm_json module.
<Extension json>
    Module    xm_json
</Extension>

<Input windows_audit>
    Module    im_msvistalog
    <QueryXML>
        <QueryList>
            <Query Id="0" Path="Security">
                <Select Path="Security">*[System[Provider[
                    @Name='Microsoft-Windows-Security-Auditing']]]
                </Select>
            </Query>
        </QueryList>
    </QueryXML>
    Exec      to_json();
</Input>{
"EventTime": "2021-09-30T20:13:36.980952+02:00",
"Hostname": "WIN2016-2",
"Keywords": "9232379236109516800",
"EventType": "AUDIT_SUCCESS",
"SeverityValue": 2,
"Severity": "INFO",
"EventID": 4776,
"SourceName": "Microsoft-Windows-Security-Auditing",
"ProviderGuid": "{54849625-5478-4994-A5BA-3E3B0328C30D}",
"Version": 0,
"TaskValue": 14336,
"OpcodeValue": 0,
"RecordNumber": 5786115,
"ActivityID": "{778E4188-B940-0000-5971-8E7740B9D701}",
"ExecutionProcessID": 556,
"ExecutionThreadID": 584,
"Channel": "Security",
"Message": "The computer attempted to validate the credentials for an account.\r\n\r\nAuthentication Package:\tMICROSOFT_AUTHENTICATION_PACKAGE_V1_0\r\nLogon Account:\tjdoe\r\nSource Workstation:\tWIN2016-2\r\nError Code:\t0x0",
"Category": "Credential Validation",
"Opcode": "Info",
"PackageName": "MICROSOFT_AUTHENTICATION_PACKAGE_V1_0",
"TargetUserName": "jdoe",
"Workstation": "WIN2016-2",
"Status": "0x0",
"EventReceivedTime": "2021-09-30T20:14:22.911193+02:00",
"SourceModuleName": "windows_audit",
"SourceModuleType": "im_msvistalog"
}
On Windows Server 2003 and older operating systems, audit events are
logged with source Security and with different event IDs. See the Microsoft
documentation for a list of event IDs generated by
Basic security audit policy settings
on older operating systems.
|
