
Extracting data
When NXLog receives an event, it creates an event record with a $raw_event field, other core fields like $EventReceivedTime, and any fields provided by the particular module (see Fields for more information).
This section explores the various ways that NXLog can be configured to extract values from the raw event.
Some log sources (like Windows Event Log collected via im_msvistalog) already contain structured data. In this case, there is often no additional extraction required; see Log classification.
Log parsing with regular expressions via the Exec directive
NXLog supports the use of regular expressions for parsing log fields. For detailed information about regular expressions in NXLog, see the Reference Manual Regular Expressions section.
<38>Nov 22 10:30:12 myhost sshd[8459]: Failed password for invalid user linda from 192.168.1.60 port 38176 ssh2With this configuration, the Syslog message shown above is first parsed with parse_syslog().
This results in a $Message field created in the event record.
Then, a regular expression is used to further parse the $Message field and create additional fields if it matches.
<Extension _syslog>
    Module  xm_syslog
</Extension>

<Input udp>
    Module  im_udp
    Host    0.0.0.0
    Port    514
    <Exec>
        parse_syslog();
        if $Message =~ /(?x)^Failed\ (\S+)\ for(?:\ invalid user)?\ (\S+)\ from
                        \ (\S+)\ port\ \d+\ ssh2$/
        {
            $AuthMethod = $1;
            $AccountName = $2;
            $SourceIPAddress = $3;
        }
    </Exec>
</Input>
Named capturing is also supported. Regex named groups are automatically added to the event record as a field with the same name.
<Input in>
    Module  im_udp
    Host    0.0.0.0
    Port    514
    <Exec>
        parse_syslog();
        $Message =~ /(?x)^Failed\ (?<AuthMethod>\S+)\ for(?:\ invalid\ user)?
                     \ (?<AccountName>\S+)\ from\ (?<SourceIPAddress>\S+)\ port
                     \ \d+\ ssh2$/;
    </Exec>
</Input>| Field | Value |
|---|---|
$AuthMethod |
password |
$AccountName |
linda |
$SourceIPAddress |
192.168.1.60 |
Pattern matching with Grok
The xm_grok module provides parsing for unstructured log messages with Grok patterns.
The examples below demonstrate how to parse Apache logs using Grok patterns.
The message below is a sample of an Apache Access log.
192.168.3.20 - - [28/Jun/2019] "GET /cgi-bin/try/ HTTP/1.0" 200 3395The above Apache message can be parsed using the Grok pattern below.
ACCESS_LOG %{IP:ip_address} - - \[%{TIMESTAMP_ACCESS:timestamp}\]
"%{METHOD:http_method} %{UNIXPATH:uri} HTTP/%{HTTP_VERSION:http_version}"
%{INT:http_status_code} %{INT:response_size}The message below is a sample of an Apache error message.
[Fri Dec 16 01:46:23 2019] [error] [client 1.2.3.4] Directory index forbidden
by rule: /home/test/
The above Apache log message can be parsed using the Grok pattern below.
ERROR_LOG \[%{TIMESTAMP_ERROR:timestamp}\] \[%{LOGLEVEL:severity}\]
\[client %{IP:client_address}\] %{GREEDYDATA:message}
Lists of Grok patterns are available in various repositories. As an example, see the logstash-plugin section on GitHub.
The following configuration reads messages from the apache_entries.log file using the im_file module and stores the result in the $raw_event field.
The match_grok() function reads patterns from the patterns.txt file and attempts a series of matches on the $raw_event field.
If none of the patterns match, an internal message is logged.
<Extension grok>
    Module     xm_grok
    Pattern    patterns.txt
</Extension>

<Input messages>
    Module     im_file
    File       "apache_entries.log"
    <Exec>
        if not ( match_grok($raw_event, "%{ACCESS_LOG}") or
                 match_grok($raw_event, "%{ERROR_LOG}"))
        {
            log_info('Event did not match any pattern');
        }
    </Exec>
</Input>
This example uses the patterns.txt file, which contains all necessary Grok
patterns.
INT (?:[+-]?(?:[0-9]+))
YEAR (?>\d\d){1,2}
MONTH \b(?:[Jj]an(?:uary|uar)?|[Ff]eb(?:ruary|ruar)?|[Mm](?:a|ä)?r(?:ch|z)?|[Aa]pr(?:il)?|[Mm]a(?:y|i)?|[Jj]un(?:e|i)?|[Jj]ul(?:y)?|[Aa]ug(?:ust)?|[Ss]ep(?:tember)?|[Oo](?:c|k)?t(?:ober)?|[Nn]ov(?:ember)?|[Dd]e(?:c|z)(?:ember)?)\b
DAY (?:Mon(?:day)?|Tue(?:sday)?|Wed(?:nesday)?|Thu(?:rsday)?|Fri(?:day)?|Sat(?:urday)?|Sun(?:day)?)
HOUR (?:2[0123]|[01]?[0-9])
MINUTE (?:[0-5][0-9])
SECOND (?:(?:[0-5]?[0-9]|60)(?:[:.,][0-9]+)?)
UNIXPATH (/([\w_%!$@:.,+~-]+|\\.)*)+
GREEDYDATA .*
IP (?<![0-9])(?:(?:[0-1]?[0-9]{1,2}|2[0-4][0-9]|25[0-5])[.](?:[0-1]?[0-9]{1,2}|2[0-4][0-9]|25[0-5])[.](?:[0-1]?[0-9]{1,2}|2[0-4][0-9]|25[0-5])[.](?:[0-1]?[0-9]{1,2}|2[0-4][0-9]|25[0-5]))(?![0-9])
LOGLEVEL ([Aa]lert|ALERT|[Tt]race|TRACE|[Dd]ebug|DEBUG|[Nn]otice|NOTICE|[Ii]nfo|INFO|[Ww]arn?(?:ing)?|WARN?(?:ING)?|[Ee]rr?(?:or)?|ERR?(?:OR)?|[Cc]rit?(?:ical)?|CRIT?(?:ICAL)?|[Ff]atal|FATAL|[Ss]evere|SEVERE|EMERG(?:ENCY)?|[Ee]merg(?:ency)?)
TIMESTAMP_ACCESS %{INT}\/%{MONTH}\/%{YEAR}(:%{HOUR}:%{MINUTE}:%{SECOND} %{GREEDYDATA})?
TIMESTAMP_ERROR %{DAY} %{MONTH} %{INT} %{HOUR}:%{MINUTE}:%{SECOND} %{YEAR}
METHOD (GET|POST|PUT|DELETE|HEAD|TRACE|OPTIONS|CONNECT|PATCH){1}
HTTP_VERSION 1.(0|1)

ACCESS_LOG %{IP:ip_address} - - \[%{TIMESTAMP_ACCESS:timestamp}\] "%{METHOD:http_method} %{UNIXPATH:uri} HTTP/%{HTTP_VERSION:http_version}" %{INT:http_status_code} %{INT:response_size}
ERROR_LOG \[%{TIMESTAMP_ERROR:timestamp}\] \[%{LOGLEVEL:severity}\] \[client %{IP:client_address}\] %{GREEDYDATA:message}
Pattern matching with pm_pattern
Regular expressions are widely used in pattern matching. Unfortunately, using a large number of regular expression based patterns does not scale well, because these need to be evaluated linearly. The pm_pattern module implements a more efficient pattern matching than regular expressions used in Exec directives.
<38>Nov 22 10:30:12 myhost sshd[8459]: Failed password for invalid user linda from 192.168.1.60 port 38176 ssh2With this configuration, the above Syslog message is first parsed with parse_syslog(). This results in a $Message field created in the event record. Then, the pm_pattern module is used with a pattern XML file to further parse the record.
<Extension _syslog>
    Module      xm_syslog
</Extension>

<Input uds>
    Module      im_uds
    UDS         /dev/log
    Exec        parse_syslog_bsd();
</Input>

<Processor pattern>
    Module      pm_pattern
    PatternFile /var/lib/nxlog/patterndb.xml
</Processor>

<Output file>
    Module      om_file
    File        "/var/log/messages"
    Exec        to_syslog_bsd();
</Output>

<Route uds_to_file>
    Path        uds => pattern => file
</Route>
The patterns for the pm_pattern module instance above are declared in the following patterndb.xml file.
<?xml version='1.0' encoding='UTF-8'?>
<patterndb>
  <created>2010-01-01 01:02:03</created>
  <version>42</version>
  <!-- First and only pattern group in this file -->
  <group>
    <name>ssh</name>
    <id>42</id>
    <!-- Only try to match this group if $SourceName == "sshd" -->
    <matchfield>
      <name>SourceName</name>
      <type>exact</type>
      <value>sshd</value>
    </matchfield>
    <!-- First and only pattern in this pattern group -->
    <pattern>
      <id>1</id>
      <name>ssh auth failure</name>
      <!-- Do regular expression match on $Message field -->
      <matchfield>
        <name>Message</name>
        <type>regexp</type>
        <value>^Failed (\S+) for(?: invalid user)? (\S+) from (\S+) port \d+ ssh2</value>
        <!-- Set 3 event record fields from captured strings -->
        <capturedfield>
          <name>AuthMethod</name>
          <type>string</type>
        </capturedfield>
        <capturedfield>
          <name>AccountName</name>
          <type>string</type>
        </capturedfield>
        <capturedfield>
          <name>SourceIPAddress</name>
          <type>string</type>
        </capturedfield>
      </matchfield>
      <!-- Set additional fields if pattern matches -->
      <set>
        <field>
          <name>TaxonomyAction</name>
          <value>Authenticate</value>
          <type>string</type>
        </field>
        <field>
          <name>TaxonomyStatus</name>
          <value>Failure</value>
          <type>string</type>
        </field>
      </set>
    </pattern>
  </group>
</patterndb>| Field | Value |
|---|---|
$AuthMethod |
password |
$AccountName |
linda |
$SourceIPAddress |
192.168.1.60 |
$TaxonomyAction |
Authenticate |
$TaxonomyStatus |
Failure |
NXLog Manager provides an interface for writing pattern files, and will also test sample events to aid in establishing the correct match patterns. The pattern functions can be accessed from the PATTERNS menu in the page header.
The following instructions explain the steps required for creating the above pattern database with NXLog Manager.
-
Open PATTERNS > CREATE GROUP. Enter a Name for the new pattern group, and optionally a Description, in the Properties section. The name is used to refer to the pattern group later. The name of the above pattern group is
ssh. -
Add a match field by clicking Add Field in the Match section. Only messages that match will be further processed by this pattern group. In the above example, there is no reason to attempt any matches if the
$SourceNamefield does not equalsshd. The above pattern group uses Field name=SourceName, Match=EXACT, and Value=sshd.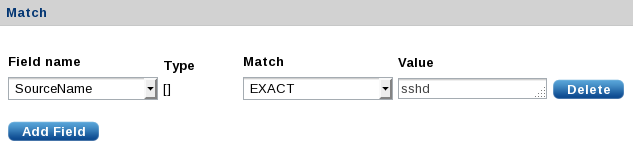
-
Save the new pattern group.
-
Open PATTERNS > CREATE FIELD to create a new field to be used when creating new patterns. For the above example, the
$AuthMethodfield must be added because it is not in the default set provided by NXLog Manager. Set Name=AuthMethodand Field Type=STRING, then click Save. -
Open PATTERNS > CREATE PATTERN. In the Pattern Info section, enter a Pattern Name and optionally a Pattern Description. Select the correct Pattern Group from the list. In the above example, the
sshpattern group is used. -
In the Match section, set match values for the fields to be matched. If a regular expression match with captured subgroups is detected, the interface will provide a Captured fields list where target fields can be selected. The above example uses Field name=
Message, Match=REGEXP, and Value=^Failed (\S+) for(?: invalid user)? (\S+) from (\S+) port \d+ ssh2$. The three captured fields areAuthMethod,AccountName, andSourceIPAddress.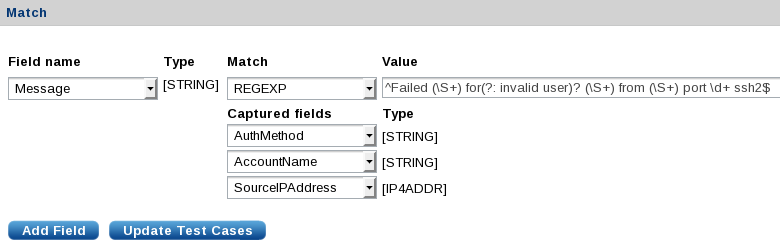
-
The Set section allows fields to be set if the match is successful. Click Add Field for each field. The above example sets
$TaxonomyStatustoFailureand$TaxonomyActiontoAuthenticate.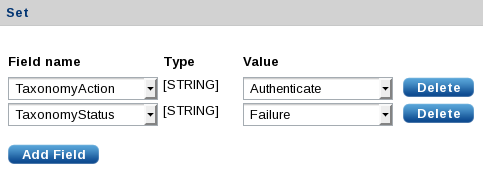
-
The Action section accepts NXLog language statements like you would specify in an Exec directive. Click Add action, type in the statement, and click Verify to make sure the statement is valid. The above example does not include any NXLog language statements.
-
The final tabbed section allows test messages to be entered to verify that the match works as expected. Click the + to add a test case. To test the above example, add a Value for the
Messagefield:Failed password for invalid user linda from 192.168.1.60 port 38176 ssh2. Click Update Test Cases in the Match section to automatically fill the captured fields. Verify that the fields are set as expected. Additional test cases can be added to test other events.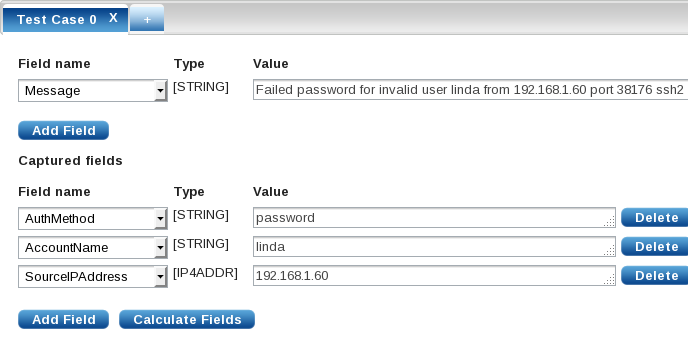
-
Save the new pattern. Then click Export to download the pattern.xml file or use the pattern to configure a managed agent.
See the NXLog Manager User Guide for more information.
Using the extracted fields
The previous sections explore ways that the log message can be parsed and new fields added to the event record. Once the required data has been extracted and corresponding fields created, there are various ways to use this new data.
-
A field or set of fields can be matched by string or regular expression to trigger alerts, perform filtering, or further classify the event.
-
Fields in the event record can be renamed, modified, or deleted.
-
Event correlation can be used to execute statements or suppress messages based on matching events inside a specified window.
-
Some output formats can be used to preserve the full set of fields in the event record (such as JSON and the NXLog Binary format).