
Hardening NXLog
Running under a non-root user on Linux
NXLog can be configured to improve security by running as
a non-root user. The
User and Group global
directives specify the user and group for the NXLog process to
run as. On Linux installations, NXLog is
configured by default to run as the nxlog user and nxlog group as shown
below.
User nxlog
Group nxlog
Some operations require privileges that are normally not available to
the nxlog user. In this case, the simplest solution is to configure
NXLog to retain full root privileges by removing the
User and Group
directives from the configuration. This is not recommended, however;
it is more secure to grant only the required privileges and to avoid
running NXLog as root. See the following sections for more
information.
Reading from /var/log
By default, the nxlog user will not have access to files in
/var/log. If your Linux distribution uses a group other than root for
the log files, you can use that group with the
Group directive. Otherwise, reconfigure your
system logger (Rsyslog for example) to create files with the necessary
ownership.
See Reading Rsyslog log files for more information.
UDP spoofing and binding to ports below 1024
NXLog requires special privileges if configured to perform UDP source address spoofing (with om_udpspoof) or to bind to a port below 1024 (for example to accept incoming Syslog messages on port 514). Consider the following solutions.
- Use built-in capability support
-
NXLog will automatically set the corresponding Linux capability before dropping root privileges.
In certain rare conditions, such as when NXLog is initially started with an empty configuration before receiving a configuration update from NXLog Manager, the required capabilities might not be set automatically. - Set the capability manually
-
For binding to ports below 1024, use the CAP_NET_BIND_SERVICE capability. For the UDP source address spoofing, use the CAP_NET_RAW capability. This can be configured with the capabilities directive.
Example 1. Setting Linux capabilitiesThis capability directive configuration sets the CAP_NET_BIND_SERVICE capability.
Capabilities cap_net_bind_service+epThis capability directive configuration sets both the CAP_NET_BIND_SERVICE and the CAP_NET_RAW capabilities.
Capabilities "cap_net_bind_service,cap_net_raw=+ep"
Reading the kernel log
NXLog requires special privileges to read from the Linux kernel log with the im_kernel module. Consider the following solutions.
- Use built-in capability support
-
NXLog will automatically set the Linux CAP_SYS_ADMIN capability before dropping root privileges.
In certain rare conditions, such as when NXLog is initially started with an empty configuration before received a configuration update from NXLog Manager, the required capabilities might not be set automatically. - Set the capability manually
-
Use the CAP_SYS_ADMIN capability or the CAP_SYSLOG capability (since Linux 2.6.37). See Setting Linux capabilities.
Configuring SELinux
To further harden NXLog, SELinux can optionally be used. SELinux improves security by providing mandatory access controls on Linux. This section provides an overview for creating a SELinux policy for NXLog. The resulting policy will provide the permissions necessary for the NXLog deployment to operate as configured, with SELinux enabled on the host.
The process is divided into two parts. First, a base policy is created. Then the policy is deployed and tailored to the specific requirements of the current NXLog configuration.
Base policy
The base policy file can be generated with the SELinux Policy Generation Tool (which requires a graphical environment) or with the SELinux CLI development utilities.
In either case, the following policy files are generated:
- nxlog.te
-
Base policy information; this file defines all the types and rules for a particular domain.
- nxlog.fc
-
File system information; this file defines he security contexts that are applied to files when the policy is installed.
- nxlog.if
-
Interface information; this file defines the default file context for the system.
- nxlog.sh
-
A helper shell script for compiling and deploying the policy module and fixing the labeling on the system; for use only on the target system.
- nxlog_selinux.spec
-
A specification file that can be used to generate an RPM package from the policy, useful for deploying the policy on another system later. This spec file is generated on RPM-based systems only.
Base policy using policy generation tool (GUI)
-
Install the SELinux Policy Generation Tool package.
On Red Hat based systems run the following command:
$ sudo yum install rpm-build policycoreutils-guiOn Debian based systems run the following command:
$ sudo apt-get install policycoreutils-gui -
Start the SELinux Policy Generation Tool from the system launcher.
-
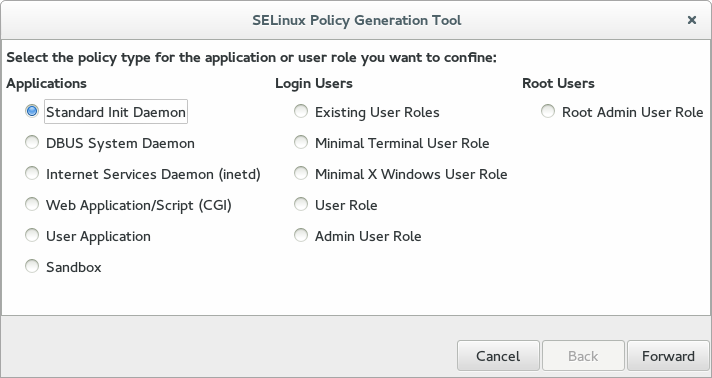
In the first screen, select Standard Init Daemon for the policy type, then click Forward.
-
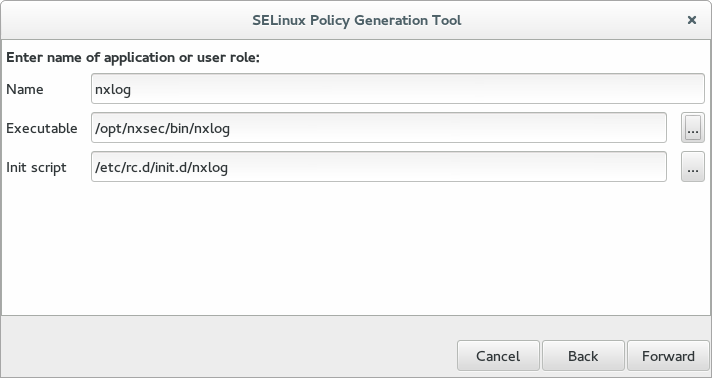
On the second screen, enter the following details for the application and user role, then click Forward.
- Name
-
A custom name for the role (for example,
nxlog) - Executable
-
The path to the NXLog executable (for example,
/opt/nxlog/bin/nxlog) - Init script
-
The path of the NXLog system init script (for example,
/etc/rc.d/init.d/nxlog)
-
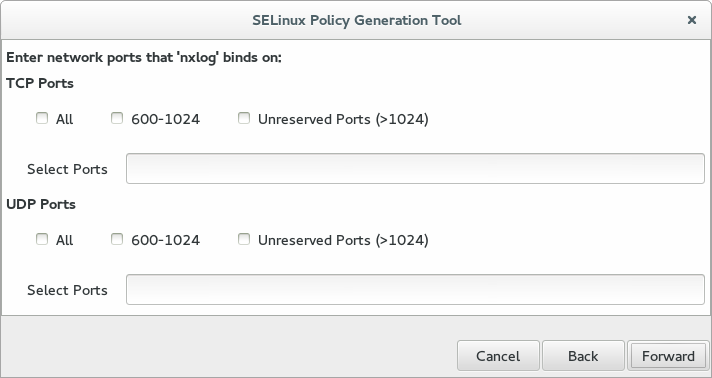
On the third screen, enter the TCP and UDP used by the NXLog deployment, then click Forward. If the ports are unknown or not yet determined, then leave these fields blank; they can be customized later.
-
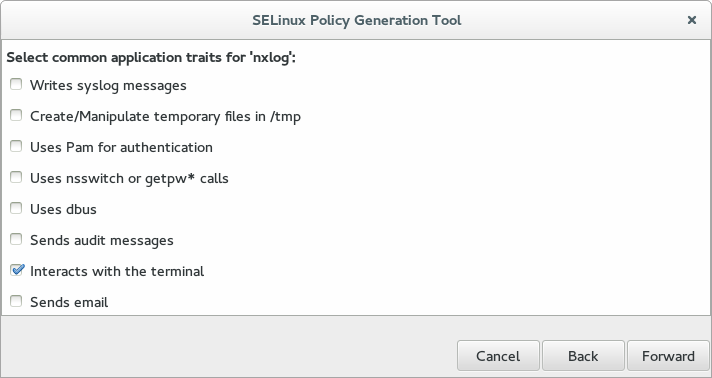
On the fourth screen, select the appropriate application traits for NXLog, then click Forward. The default configuration requires only the Interacts with the terminal trait. For collecting Syslog messages or creating files in /tmp, include the appropriate traits.
-
On the fifth screen, specify all the arbitrary files and directories that the NXLog installation should have access to, then click Forward. The default configuration requires only the NXLog system directory,
/opt/nxlog. Include the paths of any custom log files that NXLog needs to access.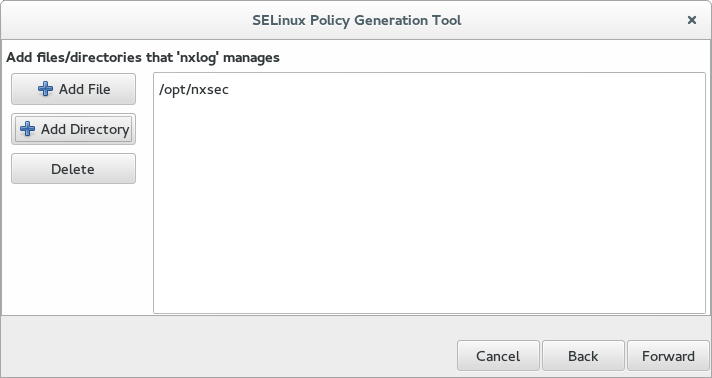
-
Additional SELinux configuration values can be set on the sixth screen. None of these are required for NXLog. Click Forward to continue.
-
The policy files are generated on the final screen. Click Save to write the policy to disk.
Base policy using sepolicy (CLI)
-
Install the SELinux Policy Core Policy Devel Utilities package.
On Red Hat based systems run the following command:
$ sudo yum install rpm-build policycoreutils-develOn Debian based systems run the following command:
$ sudo apt-get install policycoreutils-dev selinux-policy-default -
The base policy can be generated with the following command.
$ sepolicy generate -n nxlog --init /opt/nxlog/bin/nxlog -w /opt/nxlogAdditional managed directories can be added to the policy by passing to the -wparameter the full directory paths separated by spaces (for example,-w /opt/nxlog /var/log). -
The policy files are generated when the command exits successfully; the policy is written to the current working directory.
Deploying and customizing the policy
In this section, the base policy generated in the previous section will be applied and then customized with appropriate rules for NXLog operation as configured. To accomplish this, SELinux will be set to permissive mode and then the audit2allow tool will be used to generate additional SELinux rules based on the resulting audit logs.
| When set to permissive mode, SELinux generates alerts rather than actively blocking actions as it does in enforcing mode. Using permissive mode reduces system security, it is recommended that this mode is only used in a test environment. |
-
Make sure that NXLog is correctly configured with all required functionality.
-
Stop the NXLog service.
-
Transfer the files containing your SELinux base policy to the target system. All the files should be in the same directory.
-
Apply the SELinux base policy by executing the policy script. This script will compile the policy module, set the appropriate security flags on the directories specified, and install the policy.
$ sudo ./nxlog.shYou may see the error message
libsemanage.add_user: user system_u not in
password file
. This is caused by a bug in theselinux-policyRPM orselinux-policy-defaultDEB package and does not affect the policy at all. It has been fixed in later releases.You may see the error message
InvalidRBACRuleType: a is not a valid RBAC rule
type
. This is from a bug in thepolicycoreutilspackage. It only affects man page generation, which is not generated in this case. This has been fixed in later releases. -
Verify that the new policy is installed.
$ sudo semodule -l | grep nxlog -
Set SELinux to permissive mode. All events which would have been prevented by SELinux will now be permitted and logged to
/var/log/audit/audit.log(including events not related to NXLog).$ sudo setenforce 0 -
Start and then stop the NXLog service. Any actions taken by NXLog that are not permitted by the policy will result in events logged by the Audit system. Run
audit2allow -a -l -wto view all policy violations (with descriptions) since the last policy reload.$ sudo systemctl start nxlog $ sudo systemctl stop nxlogExample 2. Audit logsIf NXLog has been configured to listen on TCP port 1514, but the appropriate rules are not specified in the current SELinux policy, then various audit events will be generated when the NXLog process initializes and binds to that port. These events can be viewed from the Audit log file directly, with
ausearch, or withaudit2allow(as shown below).$ sudo audit2allow -a -l -w type=AVC msg=audit(1524239322.612:473): avc: denied { listen } for pid=5697 comm="nxlog" lport=1514 scontext=system_u:system_r:nxlog_t:s0 tcontext=system_u:system_r:nxlog_t:s0 tclass=tcp_socket Was caused by: Missing type enforcement (TE) allow rule. You can use audit2allow to generate a loadable module to allow this access.Additional log messages will be generated for any other file or network action not permitted by the SELinux policy. These actions would all be denied by SELinux when set to enforcing mode.
-
Use the helper script
--updateoption to add additional rules to the policy based on logged policy violations with thenxlogcontext. Review the suggested changes and press y to update the policy. If no changes are required, the script will exit zero.$ sudo ./nxlog.sh --updateExample 3. Updating the policyThe script will offer to add any required rules. The following output corresponds to the example in the previous step.
$ sudo ./nxlog.sh --update Found avc's to update policy with require { type nxlog_rw_t; type nxlog_t; class capability dac_override; class tcp_socket { bind create listen setopt }; class file execute; class capability2 block_suspend; } #============= nxlog_t ============== allow nxlog_t nxlog_rw_t:file execute; allow nxlog_t self:capability dac_override; allow nxlog_t self:capability2 block_suspend; allow nxlog_t self:tcp_socket { bind create listen setopt }; corenet_tcp_bind_generic_node(nxlog_t) corenet_tcp_bind_unreserved_ports(nxlog_t) Do you want these changes added to policy [y/n]? -
Set the SELinux policy to enforcing mode. This can be set permanently in
/etc/selinux/config.$ sudo setenforce 1 -
Reboot the system.
Running under a custom account on Windows
On Windows, the NXLog installer sets up the NXLog
service to run under the local system account. This procedure
describes how to configure a system service for NXLog that
runs under a dedicated svc-nxlog user account. This approach can
improve security by limiting the privileges that NXLog
requires to run.
| In enterprise environments managed by Group Policy, the dedicated user account and its permissions must be managed by the domain administrator. |
-
Create a new user account. Open the Computer Management console (
compmgmt.msc), expand Local Users and Groups and right-click on Users. Select New User… from the context menu.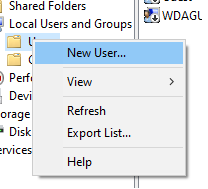
-
Enter the
svc-nxloguser name, description, and password; enable the Password never expires check box; and click [Create].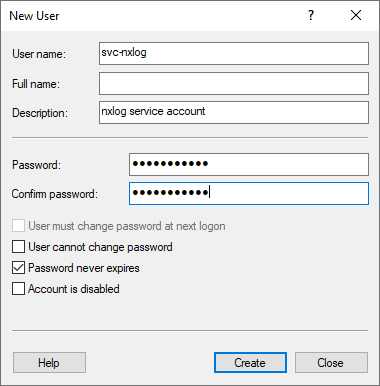
-
Open the Services console (
services.msc), right-click thenxlogservice, and select Properties.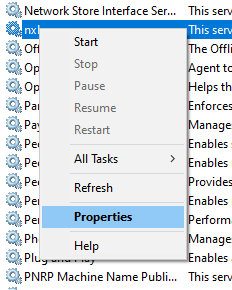
-
Under the Log On tab, select the This Account radio button, click [Browse…], select the
svc-nxloguser account, and enter the password. Then click [OK]. Windows will warn you that the service must be restarted.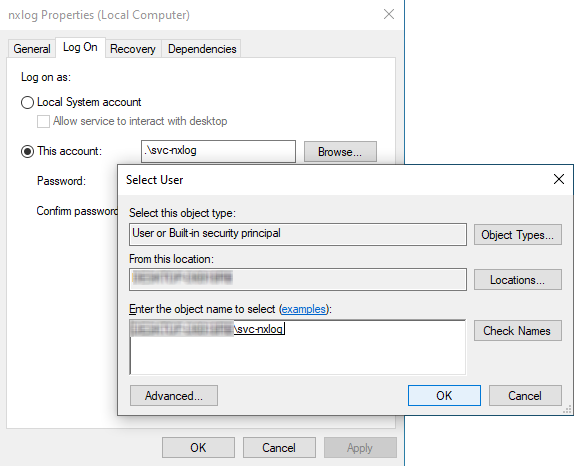
-
Open the Local Security Settings console (
secpol.msc), expand Local Policies, select User Rights Assignment in the left pane, then Right-click the Log on as a service policy and click Properties.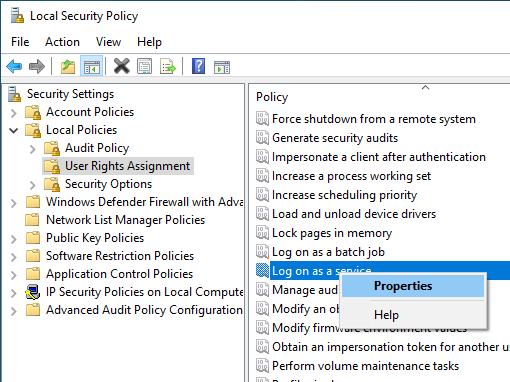
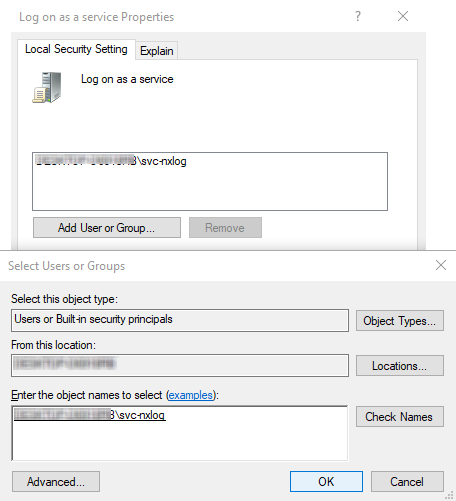
-
Click [Add User or Group…] and select the new user. The new user should appear in the list. Click [OK].
-
Repeating the same steps, also add the same user to the Manage auditing and security log policy.
-
Open the Local Users and Groups console (
lusrmgr.msc), click on Groups and add the new user to the Event Log Readers group. This step is required for collecting events from the Security channel.
-
If the agent is managed by NXLog Manager, the user also needs to be added to the Performance Monitor Users group, using the same method as in the previous step.
-
In Windows Explorer, browse to the NXLog installation directory (by default,
C:\Program Files\nxlogon 64-bit systems), right-click, and select Properties. Under the Security tab, click Edit…, then add the new user to the Group or user names list. Check Allow for the following permissions, and then click [OK].-
Modify
-
Read & Execute
-
List Folder Contents
-
Read
-
Write
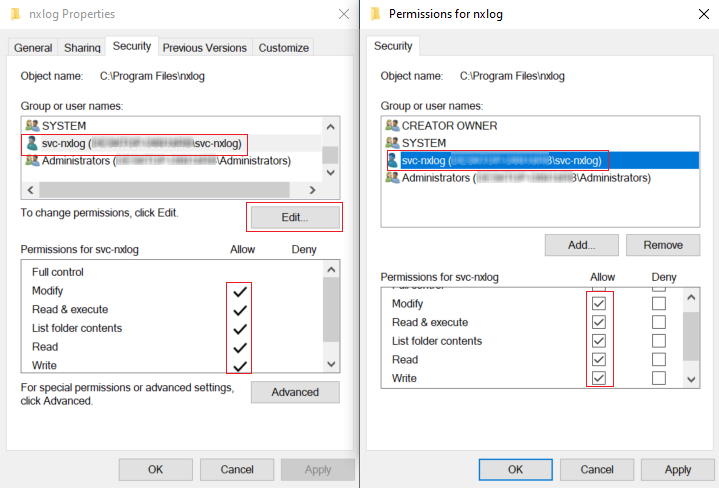
-
-
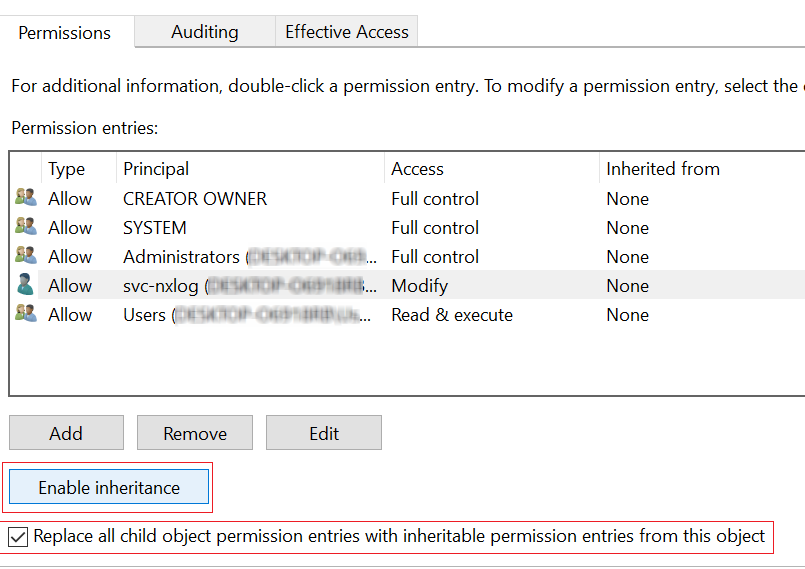
Under the Security tab, click Advanced, then in the Adavnced Security Settings for nxlog window, click Enable Inheritance and select Replace all child object permission entries with inheritable permission entries from this object. Click OK.
-
In the Services console (
services.msc), right-click thenxlogservice and select Restart.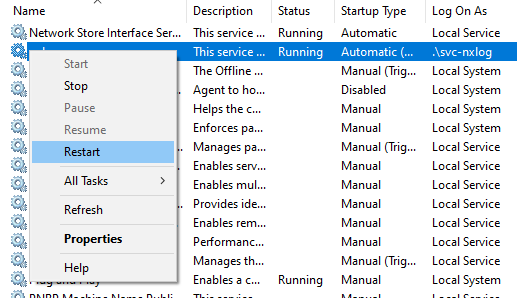
-
Check the NXLog log files for start-up errors. Successful startup should look like this:
nxlog.log2023-06-28 16:53:10 INFO nxlog-6.14.10786 started 2023-06-28 16:53:10 INFO connecting to 192.168.40.43 2023-06-28 16:53:12 INFO successfully connected to 192.168.40.43:1514 2023-06-28 16:53:12 INFO successfully connected to agent manager at 192.168.40.43:4041 in SSL mode
|
On some Windows systems, this procedure may result in the following access denied error when attempting to access the Windows Event Log: WARNING [im_msvistalog|windows] failed to subscribe to msvistalog events,access denied [error code: 5]: Access is denied. or WARNING [im_msvistalog|windows] ignoring source as it cannot be subscribed to (error code: 5) See the Windows Event Log error section of the Troubleshooting chapter for how to resolve this error. |