Dell iDRAC
Integrated Dell Remote Access Controller (iDRAC) is an interface that provides web-based or command line access to a server’s hardware for management and monitoring purposes. This interface may be implemented as a separate expansion card (DRAC) or be integrated into the motherboard (iDRAC). In both cases it uses resources separate from the main server and is independent from the server’s operating system.
Different server generations come with different versions of iDRAC. For example, PowerEdge R520, R620, or R720 servers have iDRAC7, while older models such as PowerEdge 1850 or 1950 come with iDRAC5. Remote Syslog via UDP is an option starting from iDRAC6.
| An iDRAC Enterprise license is required to redirect logs to a remote Syslog destination. |
SeqNumber       = 1523
Message ID      = USR0030
Category        = Audit
AgentID         = RACLOG
Severity        = Information
Timestamp       = 2017-03-26 13:53:36
Message         = Successfully logged in using john, from 192.168.0.106 and GUI.
Message Arg   1 = john
Message Arg   2 = 192.168.0.106
Message Arg   3 = GUI
FQDD            = iDRAC.Embedded.1
For more details regarding iDRAC configuration, go to Dell Support and search for the server model or iDRAC version.
| The steps below were tested with iDRAC7 but should work for newer versions as well. |
-
Configure NXLog for receiving Syslog entries via UDP (see the examples below), then restart NXLog.
-
Make sure the NXLog agent is accessible from the management interface.
-
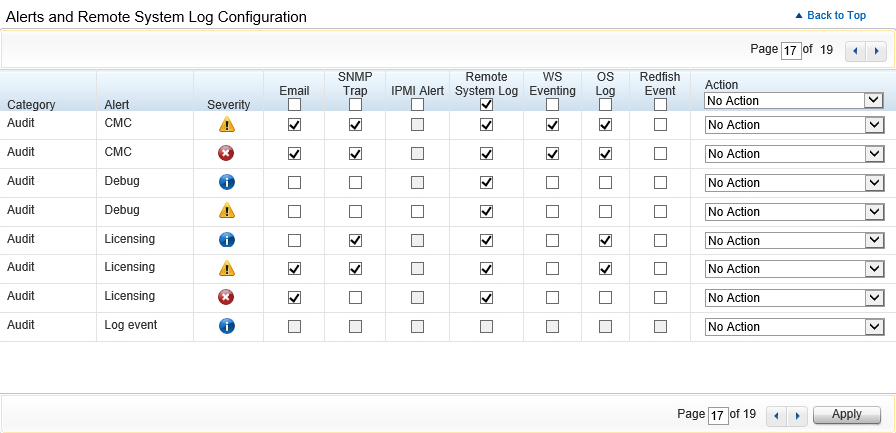
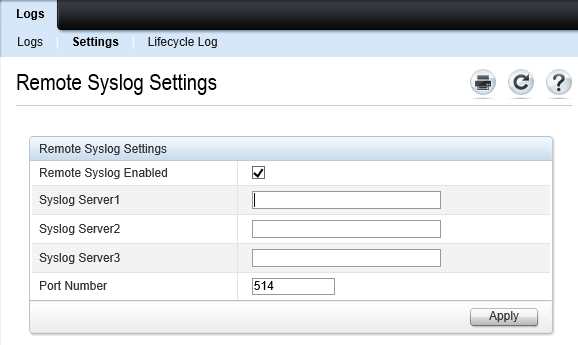
Configure iDRAC remote Syslog logging, using the web interface or the command line. See the following sections.
This example shows iDRAC logs as received and processed by NXLog, with the im_udp and xm_syslog modules.
<Extension _syslog>
    Module  xm_syslog
</Extension>

<Extension _json>
    Module  xm_json
</Extension>

<Input in_syslog_udp>
    Module  im_udp
    Host    0.0.0.0
    Port    514
    Exec    parse_syslog();
</Input>

<Output file>
    Module  om_file
    File    "/var/log/idrac.log"
    Exec    to_json();
</Output>{
"MessageSourceAddress": "192.168.5.50",
"EventReceivedTime": "2017-03-26 13:52:48",
"SourceModuleName": "in_syslog_udp",
"SourceModuleType": "im_udp",
"SyslogFacilityValue": 21,
"SyslogFacility": "LOCAL5",
"SyslogSeverityValue": 6,
"SyslogSeverity": "INFO",
"SeverityValue": 2,
"Severity": "INFO",
"EventTime": "2017-03-26 13:52:48",
"Hostname": "192.168.5.50",
"SourceName": "Severity",
"Message": "Informational, Category: Audit, MessageID: USR0030, Message: Successfully logged in using john, from 192.168.0.106 and GUI."
}The following configuration uses a regular expression to extract additional fields from each message.
<Input in_syslog_udp>
    Module  im_udp
    Host    0.0.0.0
    Port    514
    <Exec>
        parse_syslog();
        if $Message =~ /(?x)^([a-zA-Z]*),\ Category:\ ([a-zA-Z]*),
                        \ MessageID:\ ([a-zA-Z0-9]*),\ Message:\ (.*)$/
        {
            $DracMsgLevel = $1;
            $DracMscCategory = $2;
            $DracMscID = $3;
            $DracMessage = $4;
        }
    </Exec>
</Input>{
"MessageSourceAddress": "192.168.5.50",
"EventReceivedTime": "2017-04-15 17:32:47",
"SourceModuleName": "in_syslog_udp",
"SourceModuleType": "im_udp",
"SyslogFacilityValue": 21,
"SyslogFacility": "LOCAL5",
"SyslogSeverityValue": 6,
"SyslogSeverity": "INFO",
"SeverityValue": 2,
"Severity": "INFO",
"EventTime": "2017-04-15 17:32:47",
"Hostname": "192.168.5.50",
"SourceName": "Severity",
"Message": "Informational, Category: Audit, MessageID: USR0030, Message: Successfully logged in using john, from 192.168.0.106 and GUI.",
"DracMsgLevel": "Informational",
"DracMscCategory": "Audit",
"DracMscID": "USR0030",
"DracMessage": "Successfully logged in using john, from 192.168.0.106 and GUI."
}Configuring via the web interface
-
Log in to iDRAC.
-
Go to .
-
Select the Remote System Log option for all required alert types.

-
Click Apply.
-
Go to .
-
Select the Remote Syslog Enabled checkbox.
-
Specify up to three Syslog server IP addresses, change the UDP port if required, and then click Apply.

Configuring via the command line
-
Log in to iDRAC via SSH.
-
Run the following commands. Replace
ALERT,ACTION,NUMBER, andIP_ADDRESSwith the required values (see below).# racadm eventfilters set -c ALERT -a ACTION -n NOTIFICATION # racadm set iDRAC.Syslog.SyslogEnable 1 # racadm set iDRAC.Syslog.Server[NUMBER] IP_ADDRESS-
ALERT: the alert descriptor, in the format of
idrac.alert.category.[subcategory].[severity]. Available categories areall,system,storage,updates,audit,config, andworknotes. Valid severity values arecritical,warning, andinfo. -
ACTION: an action for this alert. Possible values are
none,powercycle,poweroff, andsystemreset. -
NOTIFICATION: required notifications for the alert. Valid values are
allornone, or a comma-separated list including one or more ofsnmp,ipmi,lcd,email, andremotesyslog. -
NUMBER: the Syslog server number—
1,2or3. -
IP_ADDRESS: the address of the NXLog agent.
Example 3. Configuring Syslog logging to an IP addressThe following commands disable all alert actions, enable Syslog notifications for all alerts (disabling other notifications), and enable Syslog logging to 192.168.6.143 (UDP port 514).
This example disables any previously configured alert actions or notifications. Different eventfiltersarguments must be used to enable or retain other action or notification types.# racadm eventfilters set -c idrac.alert.all -a none -n remotesyslog # racadm set iDRAC.Syslog.SyslogEnable 1 # racadm set iDRAC.Syslog.Server[1] 192.168.6.143 -
