
Microsoft Azure Logs Ingestion (om_azuremonitor)
This module forwards logs to Azure services that support the Azure Monitor Logs Ingestion API. Event data is sent in batches, reducing the latency caused by the HTTP responses, thus improving Microsoft Azure’s server performance.
Prerequisites
To use this module, you need a Microsoft Entra ID application and the following details:
-
The Application (client) ID.
-
The Directory (tenant) ID.
-
A client secret or a certificate and private key pair for authentication.
Create a Microsoft Entra ID application registration
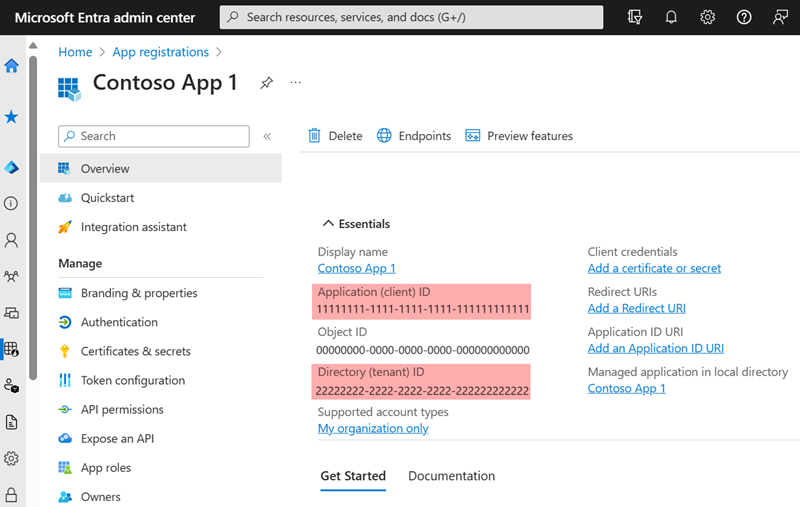
Follow the instructions to Register an application in Microsoft Entra ID. Once you have created the new application, take note of the Application (client) ID and the Directory (tenant) ID from the application Overview page.
Generate a client secret
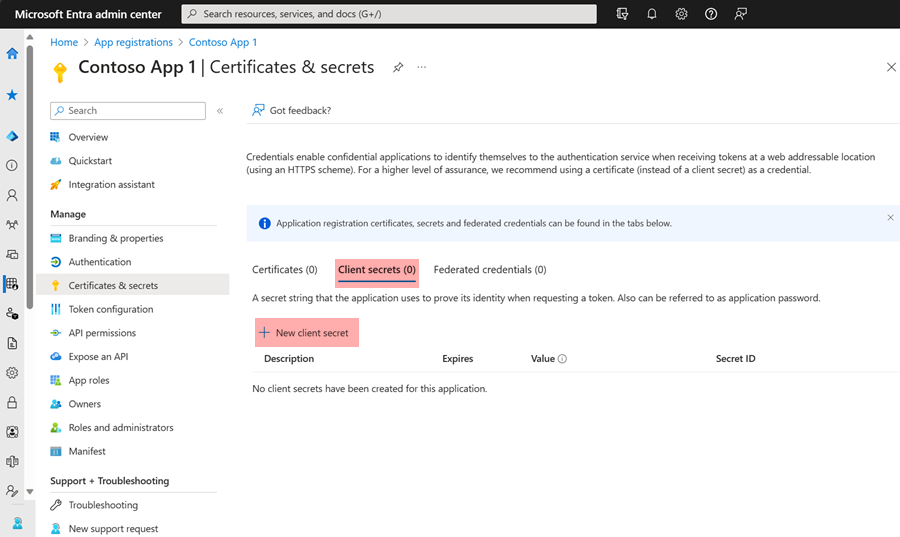
To use a client secret to authenticate with Microsoft’s API, follow the instructions to Add a client secret. Once you create the new client secret, save it in a safe location because you will not be able to retrieve it again once you navigate away from the page.
Generate a certificate and private key
To use certificate-based authentication to authenticate with Microsoft’s APIs, you need an X.509 certificate and the private key used to generate the certificate. The following instructions guide you through creating the private key pair using OpenSSL.
-
Save the following script in a file named
gencertkey.sh#!/bin/sh openssl req -new -nodes -newkey rsa:2048 -x509 -days 730 -keyout certkey.pem -out cert.pem #openssl pkcs12 -export -out cert.pfx -inkey certkey.pem -in cert.pem openssl x509 -outform der -in cert.pem -out cert.der cat cert.der |openssl dgst -binary -sha1 | openssl base64 >cert.base64thumb THUMBPRINT=`cat cert.base64thumb` echo "ThumbPrint:$THUMBPRINT" UUID=`uuidgen` CERT=`cat cert.pem | grep -v "\-\-\-\-"| tr -d '\n'` cat <<EOF "keyCredentials": [ { "customKeyIdentifier":"$THUMBPRINT", "keyId":"$UUID", "type":"AsymmetricX509Cert", "usage":"Verify", "value":"$CERT" } ], EOF -
The script depends on the
openssltoolkit and theuuidgenprogram. Install the corresponding packages if necessary.On Debian-based platforms:
# apt install openssl uuid-runtimeOn Centos/Red Hat platforms:
# yum install openssl util-linux -
Execute
gencertkey.shon the computer where NXLog Agent is installed to generate the certificate.$ ./gencertkey.shThe output:
Generating a RSA private key ............+++++ ................................................+++++ writing new private key to 'certkey.pem' ----- You are about to be asked to enter information that will be incorporated into your certificate request. What you are about to enter is what is called a Distinguished Name or a DN. There are quite a few fields but you can leave some blank For some fields there will be a default value, If you enter '.', the field will be left blank. ----- Country Name (2 letter code) [AU]: State or Province Name (full name) [Some-State]: Locality Name (eg, city) []: Organization Name (eg, company) [Internet Widgits Pty Ltd]: Organizational Unit Name (eg, section) []: Common Name (e.g. server FQDN or YOUR name) []: Email Address []: ThumbPrint:0nFt3fB0JP7zuSmHaRQtmsFNYqo= "keyCredentials": [ { "customKeyIdentifier":"0nFt3fB0JP7zuSmHaRQtmsFNYqo=", "keyId":"629ab88d-1059-454b-b258-4ca05b46dee4", "type":"AsymmetricX509Cert", "usage":"Verify", "value":"MIIDXTCCAkWgAwIBAgIJAP+XrnwhAxjOMA0GCSqGSIb3DQEBCwUAMEUxCzAJB..." } ], -------- -
Take note of the following:
-
The path of the
certkey.pemfile and the value ofThumbPrint. You will need these to configure NXLog Agent. -
The value of
KeyCredentials. You will need this to configure the Microsoft Entra ID application.
-
-
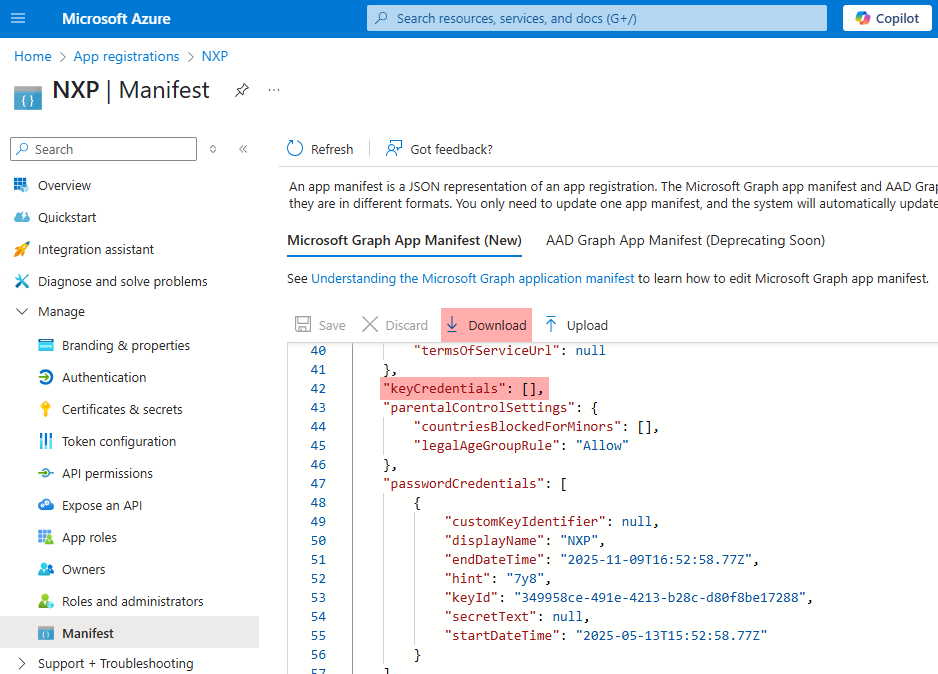
Go to the Microsoft Entra ID application registration page, select Manifest on the left, and click Download.
-
Edit the downloaded manifest file and replace the KeyCredentials value with the value from the previous step.
"keyCredentials": [ { "customKeyIdentifier":"0nFt3fB0JP7zuSmHaRQtmsFNYqo=", "keyId":"629ab88d-1059-454b-b258-4ca05b46dee4", "type":"AsymmetricX509Cert", "usage":"Verify", "value":"MIIDXTCCAkWgAwIBAgIJAP+XrnwhAxjOMA0GCSqGSIb3DQEBCwUAMEUxCzAJB..." } ], -
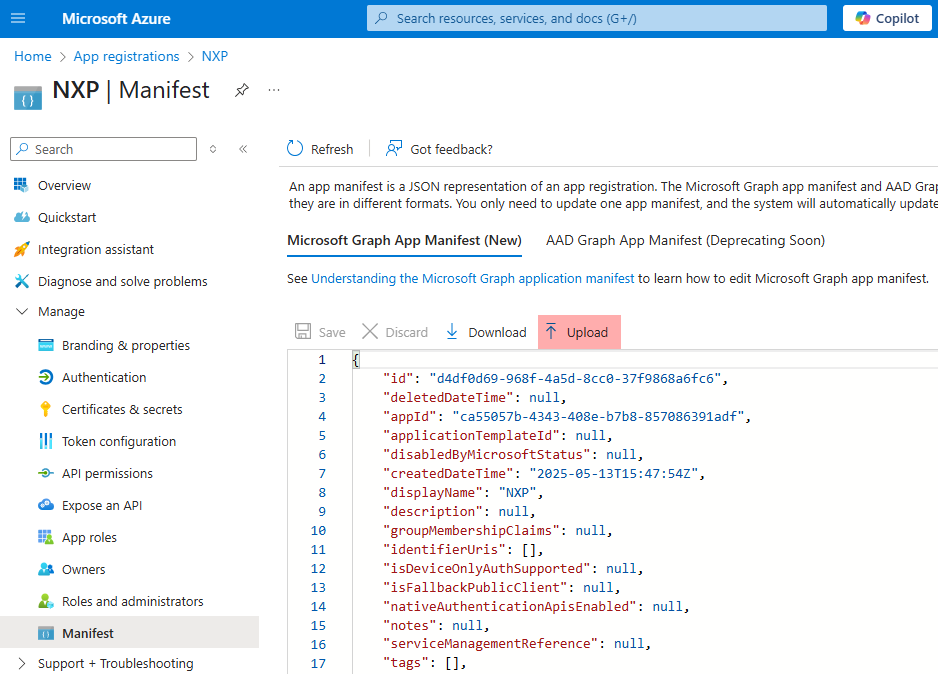
Save the changes and upload the manifest to Microsoft Azure.
Output log format
om_azuremonitor forwards log records over HTTP(S) as JSON payload.
The JSON format depends on the value of the $raw_event field.
The module checks if the value of $raw_event is valid JSON and applies the following rules:
-
If it is valid JSON, the value is forwarded as is.
-
If it is not valid JSON, the log record is converted to JSON in the following format:
{
  "raw_event": "<json_escaped_raw_event>"
}
Additional metadata, including the NXLog Agent-specific fields EventReceivedTime, SourceModuleName, and SourceModuleType, will not be included in the output unless these values have been written to the $raw_event field.
The processing required to achieve this depends on the format of the input data, but generally, it means you need to:
-
Parse the log record according to the data format.
-
If the input data is already in JSON format, use parse_json() to parse
$raw_eventinto fields. -
If the input is unstructured plain text data, copy the value of
$raw_eventto a custom field.
-
-
Create and populate any additional custom fields.
-
Use to_json() to convert the fields to JSON format and update the value of
$raw_event.
See the Examples section for NXLog Agent configuration examples of the above.
Logs Ingestion API requirements
To send data to a custom table, you must create a data collection endpoint (DCE) and a data collection rule (DCR) in Microsoft Azure. Instructions are available in the Microsoft tutorial Send data to Azure Monitor Logs with Logs ingestion API (Azure portal).
The following requirements are essential to note when planning your data structure:
-
The JSON object must match the structure expected by your DCR. If you forward logs that do not match the expected format, the server will silently discard them.
-
If the data doesn’t match the structure of the target table, your DCR must include a transformation to convert JSON fields to table columns accordingly.
-
Azure Monitor Logs tables must have a
TimeGeneratedcolumn containing the timestamp of the event. You can either set this field from your NXLog Agent configuration, e.g., by renaming theEventReceivedTimefield, or add a transformation to your DCR to rename it. -
Table columns in Azure Monitor Logs are case-sensitive. Therefore, the field names in the JSON object must match the columns exactly when sending logs via the Logs Ingestion API.
TimeGenerated field
Azure Monitor Logs requires the TimeGenerated field for built-in tables.
The server will discard the record without generating an error if it’s not present.
om_azuremonitor automatically adds a $TimeGenerated field to the record based on the following rules to avoid data loss:
-
If
$TimeGeneratedis present, is inYYYY-MM-DDThh:mm:ssZformat, and is no more than 48 hours behind or 24 hours ahead of the current time, the field will not be changed.
If $TimeGenerated is not available, the module creates it with the value of:
-
$EventTime, if this field is present, is inYYYY-MM-DDThh:mm:ssZformat and is no more than 48 hours behind or 24 hours ahead of the current time. -
Else,
$EventReceivedTimeif it is present, inYYYY-MM-DDThh:mm:ssZformat, and is no more than 48 hours behind or 24 hours ahead of the current time. -
If neither field is present, it will use the current time in
YYYY-MM-DDThh:mm:ssZformat.
Configuration
|
Data sent with this module must be encoded in UTF-8. Otherwise, the destination will refuse and drop it. If the source does not guarantee that data is UTF-8 encoded, use the xm_charconv extension module to convert it to UTF-8. See Auto-detect and convert character sets in the NXLog Platform User Guide for an example. |
The om_azuremonitor module accepts the following directives in addition to the common module directives. The ClientId, ClientSecret, DcrImmutableId, StreamName (or its alias TableName), TenantId, and URL directives are required.
Required directives
The following directives are required for the module to start.
The path of the private key file that was used to generate the certificate specified by the CertThumbprint directive. It is only required if you’re using certificates to authenticate to the Azure Monitor Logs Ingestion API. This directive is mutually exclusive with the ClientSecret directive. |
|||
The thumbprint of the X.509 certificate. It is only required if you’re using certificates to authenticate to the Azure Monitor Logs Ingestion API. This directive is mutually exclusive with the ClientSecret directive. |
|||
The |
|||
The Microsoft Entra ID application client secret. It is only required if you’re using a client secret to authenticate to the Azure Monitor Log Analytics API. This directive is mutually exclusive with the CertThumbprint and CertKeyFile directives. |
|||
Specifies the ID of the Data Collection Rule (DCR) to use for Azure Monitor to ingest the logs. |
|||
The name of the Azure Monitor stream that will receive the logs.
You must prefix custom stream names with |
|||
Alias for StreamName.
You must prefix custom table names with
|
|||
The ID of the Microsoft Entra tenant to connect to. |
|||
Specifies the Data Collection Endpoint (DCE) URI. The module works in a failover configuration if additional URL directives are specified on new lines. If the first URL is unreachable, the module automatically fails over to the next one. If the last URL is unreachable, the module fails over to the first URL. |
HTTPS directives
The following directives configure secure data transfer via HTTPS.
Specifies if the connection should be allowed with an expired certificate.
If set to |
|
Specifies if the connection should be allowed without certificate verification.
If set to |
|
The path to a directory containing certificate authority (CA) certificates. These certificates will be used to verify the certificate presented by the remote host. The certificate files must be named using the OpenSSL hashed format, i.e. the hash of the certificate followed by .0, .1 etc. To find the hash of a certificate using OpenSSL: For example, if the certificate hash is A remote host’s self-signed certificate (which is not signed by a CA) can also be trusted by including a copy of the certificate in this directory. The default operating system root certificate store will be used if this directive is not specified.
Unix-like operating systems commonly store root certificates in In addition, Microsoft’s PKI repository contains root certificates for Microsoft services. |
|
The path of the certificate authority (CA) certificate that will be used to verify the certificate presented by the remote host. A remote host’s self-signed certificate (which is not signed by a CA) can be trusted by specifying the remote host certificate itself. In case of certificates signed by an intermediate CA, the certificate specified must contain the complete certificate chain (certificate bundle). |
|
The path of the certificate file that will be presented to the remote host during the HTTPS handshake. This directive is only required when using a Proxy that uses TLS/SSL. |
|
The path of the private key file that was used to generate the certificate specified by the HTTPSCertFile directive. This is used for the HTTPS handshake. This directive is only required when using a Proxy that uses TLS/SSL. |
Optional directives
This optional directive can be specified multiple times to add custom headers to each HTTP request. |
|||
This optional directive can be used to enable HTTP compression for outgoing HTTP messages.
The possible values are |
|||
HTTP basic authentication password. You must also set the HTTPBasicAuthUser directive to use HTTP authentication. |
|||
HTTP basic authentication username. You must also set the HTTPBasicAuthPassword directive to use HTTP authentication. |
|||
Maximum size of the request in bytes. The default is 64 MB. |
|||
This optional directive is used to specify the protocol, IP address (or hostname) and port number of the HTTP or SOCKS proxy host to be used.
The format is |
|||
This optional directive sets the reconnect interval in seconds. If it is set, the module attempts to reconnect in every defined second. If it is not set, the reconnect interval will start at 1 second and double with every attempt. In the latter case, when the system decides that the reconnection is successful, the reconnect interval is immediately reset to 1 sec.
|
|||
This optional directive defines the behavior when the connection with the remote host is lost.
When set to |
Examples
To send data to a custom table, you must create a data collection endpoint (DCE) and a data collection rule (DCR) in Microsoft Azure. Instructions are available in the Microsoft Learn tutorial with Logs ingestion API. Once you have your DCE and DCR set up, configure an om_azuremonitor instance as follows.
| It might take up to 30 minutes for the assigning permissions to the DCR to take affect |
<Output azure_monitor>
    Module            om_azuremonitor

    ClientId          ms_entra_app_id
    TenantId          ms_entra_tenant_id
    ClientSecret      ms_entra_app_client_secret

    URL               data_collection_endpoint
    DcrImmutableId    dcr_immutable_id
    StreamName        Custom-stream_name
</Output>To send data to a built-in table, you must create a data collection endpoint (DCE) and a data collection rule (DCR) in Microsoft Azure using one of the following templates:
The template automatically creates a data collection rule (DCR) to redirect logs from Custom-MyTableRawData to the desired table.
Currently, it is not possible to insert records directly into built-in tables.
See Create a data collection endpoint on Microsoft Learn for more information.
Once you have your DCE and DCR set up, configure an om_azuremonitor instance as follows. The destination table name corresponds to the table created by the template.
<Output azure_monitor>
    Module            om_azuremonitor

    ClientId          ms_entra_app_id
    TenantId          ms_entra_tenant_id
    ClientSecret      ms_entra_app_client_secret

    URL               data_collection_endpoint
    DcrImmutableId    dcr_immutable_id
    StreamName        Custom-MyStreamRawData
</Output>This configuration uses certificate-based authentication to connect to the Azure Monitor Logs Ingestion API. See Generate a certificate and private key above.
<Output azure_monitor>
    Module            om_azuremonitor

    ClientId          ms_entra_app_id
    TenantId          ms_entra_tenant_id

    URL               data_collection_endpoint
    DcrImmutableId    dcr_immutable_id
    StreamName        Custom-stream_name

    CertKeyFile       /path/to/certkey.pem (1)
    CertThumbprint    certificate_thumbprint (2)
</Output>| 1 | The CertKeyFile directive specifies the path of the certificate’s private key file. |
| 2 | The CertThumbprint directive specifies the certificate’s thumprint. |