
NXLog Manager Configuration
Once the NXLog Manager service is running, you should be able to access
the web interface at http://x.x.x.x:9090/nxlog-manager.
The default access credentials are as follows:
User ID: admin
Password: nxlog123
Managing Encryption Key for Administrators
Understanding the encryption mechanism in NXLog Manager is crucial for its stable operation. This section explains what the encryption key is and what practices should be followed in this regard.
During the first login of the admin user, NXLog Manager generates the
encryption key. The key is shared among all administrative accounts with
ROLE_ADMINISTRATOR and/or ROLE_CERTIFICATE roles within the same application
session.
The application session is an instance of the started service which is always new at each start of NXLog Manager.
The encryption key encrypts the private keys of user accounts. The application session cannot function without the key. This is the reason why it should always be available either in the system database and/or in the application session.
After each administrator login, this key is decrypted and stored in the application session.
For each new administrative user as well as the admin user,
during the first login the key is copied, encrypted with the user’s password,
and stored in the NXAuthSettings table. After a user changes its
password, the key is encrypted with the new password. Additional details
about the encryption of certificates are provided in the Certificates Encryption section.
|
If for any reason it is required, the encryption of private keys can be disabled.
See the content about the |
Best Practices for Managing Encryption Keys
Follow the rules below when dealing with encryption keys to ensure the smooth and trouble-free operation of NXLog Manager.
-
The NXLog Manager instance should always have at least one account with the assigned
ROLE_ADMINISTRATORand/orROLE_CERTIFICATEroles. Otherwise, it does not function. -
It is recommended to keep the default
adminaccount in the system. Instead of deleting, it can be kept in a disabled state and used only in specific situations. This account can provide the application session with the encryption key after NXLog Manager is restarted.If keeping the
adminaccount is not possible, another account with theROLE_ADMINISTRATORand/orROLE_CERTIFICATEroles should be created and logged into the same application session with theadmin. This action will share the encryption key from theadminto the new account and makes it available for all future accounts. After this action is taken, theadminaccount can be deleted because the new administrative account can now log in and share the encryption key within the application session. -
It is strongly recommended to have a backup for the NXLog Manager database while taking any actions with administrative accounts.
-
After each restart of NXLog Manager, at least one administrative account with the
ROLE_ADMINISTRATORand/orROLE_CERTIFICATEroles should always be available for login, decryption of the encryption key, and sharing it within the application session. If the only administrative account is deleted or unassigned from its roles, the decryption key is also deleted from the application session and the database.
|
This situation immediately leads to an unrecoverable loss of system and data control. |
-
Accounts with the
ROLE_ADMINISTRATORand/orROLE_CERTIFICATEroles should be assigned only to trusted system administrators. Other users should employ other roles which are available in NXLog Manager. -
Each new account with the
ROLE_ADMINISTRATORand/orROLE_CERTIFICATEroles should share the same application session with the other administrative accounts. There is no point in logging into another session if it has no encryption key from a logged user. -
The same encryption key should be available for all administrative accounts on the running instance of NXLog Manager.
|
In case all administrative accounts are deleted, the decryption key is also destroyed and NXLog Manager terminates. This immediately leads to a complete data and system loss. |
Set Session and Screen Lock (User Interface) Timeouts
It is sometimes desirable to limit the time an NXLog Manager session remains active, or how long the screen remains unlocked, after authentication.
To set how long the NXLog Manager UI waits before requiring user
re-authentication, find the screenLockIdleTimeB block in conf/jetty-env.xml
and then set screenLockIdleTime to the desired value. To control the active
session length, find the applicationSettingsB block and then set
sessionTimeout to the desired value. Note that sessionTimeout must be larger
than screenLockIdleTime for screen lock to work. Values are in minutes.
The following example shows the directives in context. Note that other directives have been omitted from the example to aid readability.
<New id="applicationSettingsB" class="org.eclipse.jetty.plus.jndi.Resource">
    <Arg/>
    <Arg>bean/applicationSettingsBean</Arg>
    <Arg>
        <New class="com.nxsec.log4ensics.data.bean.common.ApplicationSettingsBean">
            <!--Session Timeout set to 15 minutes-->
            <Set name="sessionTimeout">15</Set>
        </New>
    </Arg>
</New>
<New id="screenLockIdleTimeB" class="org.eclipse.jetty.plus.jndi.Resource">
    <Arg/>
    <Arg>bean/screenLockIdleTimeBean</Arg>
    <Arg>
        <New class="com.nxsec.log4ensics.data.bean.common.ScreenLockIdleTimeBean">
            <!--Screen Lock Idle Time set to 10 minutes-->
            <Set name="screenLockIdleTime">10</Set>
        </New>
    </Arg>
</New>
Installation Wizard
When the administrator logs in the first time, a dialog window will be displayed to help with the initial configuration: 'You don’t have a default CA and AgentManager certificate. Do you want to create a CA and a CERT?' Click Yes to proceed with the CA setup.
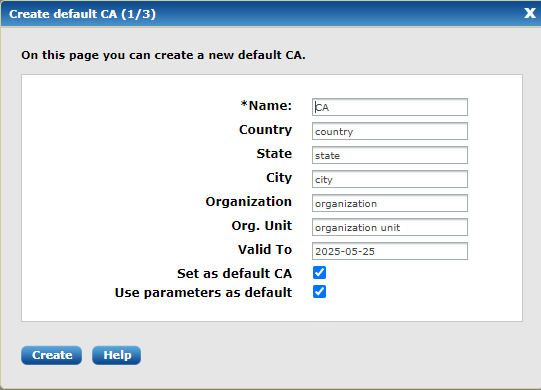
Fill in the form and then click Create.
The next dialog window will ask to create a certificate for the Agent manager.
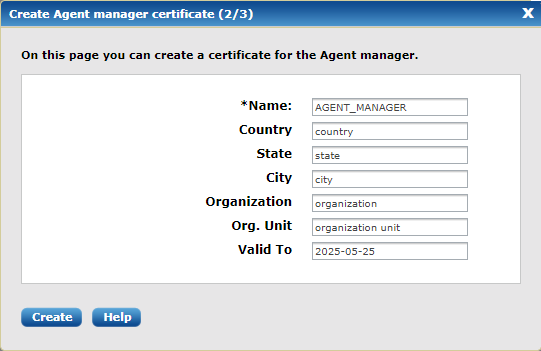
Fill in the form and then click Create.
Finally, the NXLog Manager settings need to be provided.
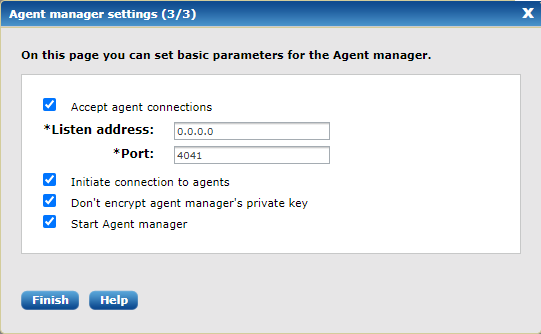
The default values should be sufficient for most users; click Finish.
The initial settings can be changed any time later under the menu items Admin > Settings > Agent Manager and Admin > Settings > Certificates.
Agent Manager Configuration
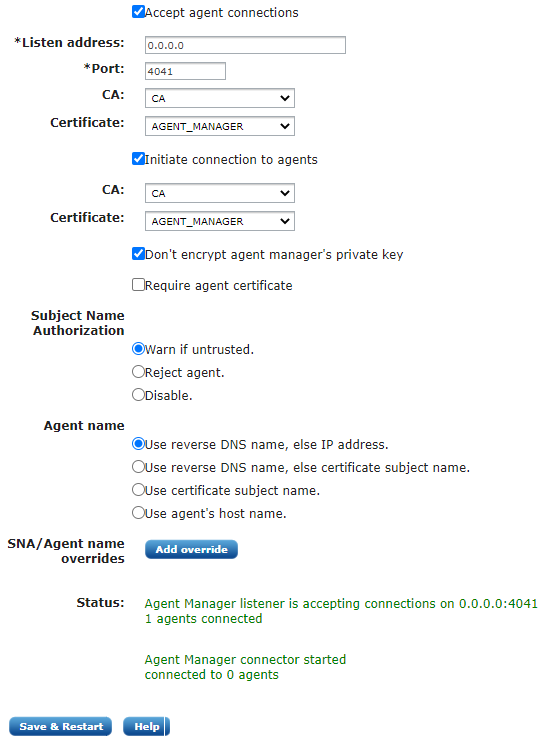
Navigate to Admin > Settings > Agent Manager and fill out the following form accordingly.
| If you have already configured the Agent manager with the Wizard as described in the previous section then you will not need to modify anything here. Just make sure your settings are correct. |
Select whether you would like the agents or the agent manager to initiate the connection. This can be useful when special firewall and zone rules apply. Make sure that the agent manager certificate is properly set. Click Save & Restart to apply settings.
The Don’t encrypt agent manager’s private key checkbox disables using of
the encryption key if activated. For more information, see the
NXLog Manager Configuration section.
Connecting Agents
To ensure that the NXLog agents can only be controlled by the NXLog Manager, NXLog agents are controlled over a secure trusted SSL and each NXLog agent needs its own private key and certificate.
Automated Deployment
The requirement of a private key and certificate pair for each NXLog agent would prevent automated installation. Fortunately, it is possible to install the NXLog agents with only the CA certificate and an initial configuration containing only the details on how to establish the control connection with the NXLog Manager.
The installation steps for automated agent deployment consist of the following:
-
Install the NXLog package.
-
Copy the initial configuration file.
-
Copy the CA certificate file.
-
Start the NXLog service and verify that it is connected.
These steps are discussed below.
To export the CA certificate, navigate to Admin > Certificates and select the CA with the checkbox as shown in the screenshot below.
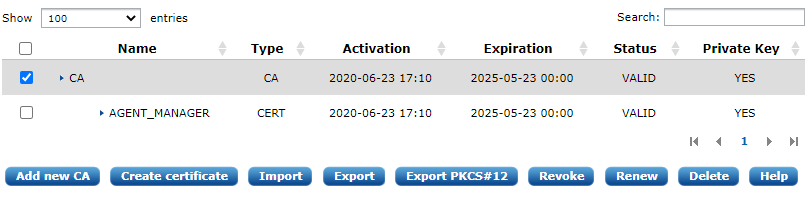
Click Export. The CA certificate should be exported using the
'Certificate in PEM format' option. Save the file as agent-ca.pem.
The default NXLog installation will create a file that is to be
updated by NXLog Manager. On Windows systems this is
C:\Program Files\nxlog\conf\nxlog.d\managed.conf, on GNU/Linux
systems this configuration file is
/opt/nxlog/etc/nxlog.d/managed.conf. When doing an automated
deployment, this file should be replaced with the following default
configuration.
# Please set the following values to suit your environment and make
# sure agent-ca.pem is copied to %CERTDIR% with the proper ownership

define NXLOG_MANAGER_ADDRESS X.X.X.X
define NXLOG_MANAGER_PORT 4041

LogLevel    INFO
LogFile     %MYLOGFILE%

<Extension agent_management>
    Module            xm_soapadmin
    Connect           %NXLOG_MANAGER_ADDRESS%
    Port              %NXLOG_MANAGER_PORT%
    SocketType        SSL
    CAFile            %CERTDIR%/agent-ca.pem
#   CertFile          %CERTDIR%/agent-cert.pem
#   CertKeyFile       %CERTDIR%/agent-key.pem
    AllowUntrusted    TRUE
    RequireCert       FALSE
    <ACL conf>
        Directory     %CONFDIR%
        AllowRead     TRUE
        AllowWrite    TRUE
    </ACL>
    <ACL cert>
        Directory     %CERTDIR%
        AllowRead     TRUE
        AllowWrite    TRUE
    </ACL>
</Extension>
Please make sure to replace X.X.X.X with the proper IP address of the NXLog Manager instance that the NXLog agent needs to be connected to.
The CA certificate file agent-ca.pem must be also copied to the proper location as referenced in the above configuration which is normally under C:\Program Files\nxlog\cert\ on Windows systems and under /opt/nxlog/var/lib/nxlog/cert/ on GNU/Linux systems.
|
When the configuration and certificate files are updated remotely, NXLog
must have permission to overwrite these files when it is running as a
regular (i.e. |
# chown -R nxlog:nxlog /opt/nxlog/var/lib/nxlogNow start the NXLog service. The nxlog.log file should contain the
following if the NXLog agent has successfully connected.
2014-10-24 17:24:46 WARNING no functional input modules!
2014-10-24 17:24:46 WARNING no routes defined!
2014-10-24 17:24:46 INFO nxlog-2.8.1281 started
2014-10-24 17:24:46 INFO connecting to agent manager at X.X.X.X:4041
2014-10-24 17:24:46 INFO successfully connected to agent manager at X.X.X.X:4041 in SSL mode
Click the AGENTS menu to see the list of agents. You should see the newly connected agent with an UNTRUSTED (yellow) status. If you don’t see the agent there, check the logs for error diagnostics.

The name of the untrusted agent should be the reverse DNS of its IP address.
In order to establish a mutually trusted connection between the NXLog agent and NXLog Manager, a certificate and private key pair needs to be issued and transferred to the agent. Select the untrusted agent in the list and click Issue certificate. When Update connected agents is enabled, the newly issued certificate and the configuration will be pushed to the agent. The agent will need to reload the configuration to reconnect with the certificate, select the agent and click Reload.
After the agent has successfully reconnected and the agent list is refreshed the agent status should be 'online' showing a green sphere.

At this stage, the NXLog agent should be operational and can now be Configuring Agents from the NXLog Manager interface.
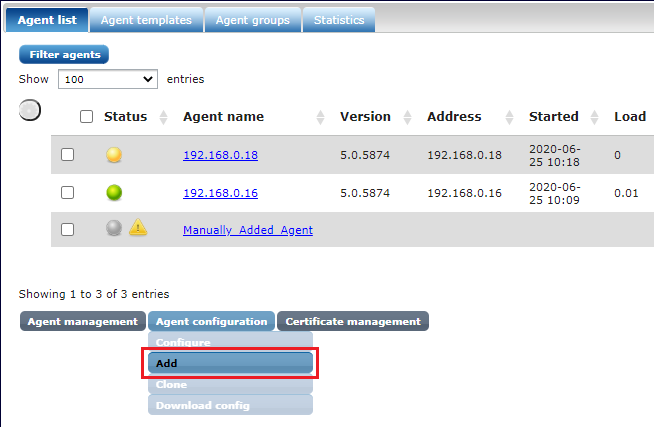
Manual Deployment
Manual deployment requires adding an agent using 'Add' on the interface. After the agent is configured and has its certificate issued, select its checkbox in the agent list and click Download config.
On GNU/Linux systems, extract the agents-config.zip and put the files
under /opt/nxlog/var/lib/nxlog. Make sure the files have the proper
ownership:
# chown -R nxlog:nxlog /opt/nxlog/var/lib/nxlog
On Windows systems, place the certificates in C:\Program Files\nxlog\cert.
After restarting the nxlog service, the agent can now be seen as Online under AGENTS.
Configuring Agents
Once the agent is connected and is shown as Online, it can be remotely configured from the NXLog Manager web interface.
-
To configure the log collection, click on your agent in the agent list and then select the Configure tab.
-
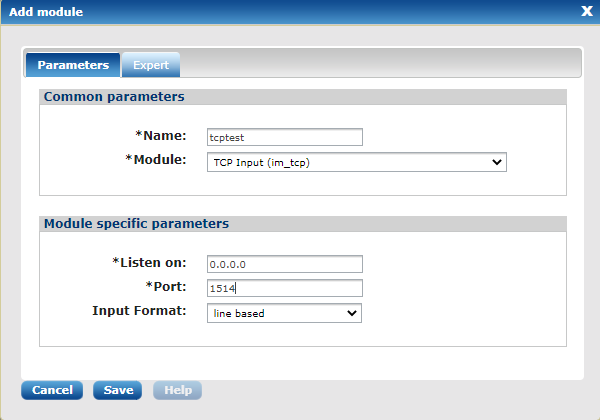
Click 'Routes' and add a route. Add a TCP input module for testing purposes:
Name: tcptest
Module: TCP Input (im_tcp)
Listen On: 0.0.0.0
Port: 1514
Input Format: line based
-
Add an output module. For test purposes we will use a null output that discards the data.
Name: out
Module: Null Output (om_null)
-
Now click Update config on the Info tab, then click Reload.
After the agent is restarted the newly configured modules are visible on the Modules tab.
-
Test the data collection:
telnet x.x.x.x 1514
type something
-
On the Modules tab check all modules and click Refresh status. The count under the Received column is 1 (or more).
The system is now ready to be further configured as per your requirements.
Configuring Logger Settings
By default, NXLog Manager log files are kept in the
/opt/nxlog-manager/log directory on Linux installations and the
<NXLogManagerDirectory>/log directory on the Docker installation. All
log messages are collected in the nxlog-manager.log file.
As of version 5.6.5633, NXLog Manager uses the Logback logging framework. See Configuring Log4j settings in older versions if you are using an older version of NXLog Manager.
Logging configuration files are available in the /opt/nxlog-manager/conf directory on Linux installations and the <NXLogManagerDirectory>/conf directory on the Docker installation of NXLog Manager.
Log priorities, levels, and log rotation can be configured in the logback.xml file located in this directory.
Log rotation is set by default to rotate files at the beginning of each day. The frequency of log rotation can be controlled by the fileNamePattern parameter, as shown below.
<fileNamePattern>${logs.root}.log.%d{yyyy-MM-dd}.gz</fileNamePattern>| fileNamePattern | Rollover schedule |
|---|---|
%d{yyyy-MM} |
Rollover at the beginning of each month |
%d{yyyy-ww} |
Rollover at the first day of each week. The first day of the week depends on the locale. |
%d{yyyy-MM-dd} |
Rollover at midnight each day. |
%d{yyyy-MM-dd-a} |
Rollover at midnight and midday of each day. |
%d{yyyy-MM-dd-HH} |
Rollover at the top of every hour. |
%d{yyyy-MM-dd-HH-mm} |
Rollover at the beginning of every minute. |
/opt/nxlog-manager/resources/logback.xml defines four different files, including a debug file and a trace file that need to be enabled separately.
Log rotation can be controlled individually for each log file by altering the fileNamePattern parameter at each of the four appender sections.
|
To enable debug logging:
-
Change the priority level from
INFOtoDEBUG, -
Change
WARNlevel toDEBUGin the loggers you require, -
Remove the comment from the
debugAppenderreference, as shown below.
<root level="DEBUG">
  <appender-ref ref="internalAppender"/>
  <appender-ref ref="errorAppender"/>
  <appender-ref ref="debugAppender"/>
</root>
Configuring Log4j settings in older versions
NXLog Manager version 5.6.5620 and older versions use the Log4j 1.2 logging framework.
Logging configuration files are available in the /opt/nxlog-manager/conf directory on Linux installations and the <NXLogManagerDirectory>/conf directory on the Docker installation of NXLog Manager.
Log priorities, levels, and log rotation can be configured in the log4j.xml file located in this directory.
Log rotation is set by default to rotate files at the beginning of each month. The frequency of log rotation can be controlled by the DatePattern parameter, as shown below.
<param name="DatePattern" value="'.'yyyy-MM"/>The following table summarizes different DatePattern options.
| DatePattern | Rollover schedule |
|---|---|
'.'yyyy-MM |
Rollover at the beginning of each month |
'.'yyyy-ww |
Rollover at the first day of each week. The first day of the week depends on the locale. |
'.'yyyy-MM-dd |
Rollover at midnight each day. |
'.'yyyy-MM-dd-a |
Rollover at midnight and midday of each day. |
'.'yyyy-MM-dd-HH |
Rollover at the top of every hour. |
'.'yyyy-MM-dd-HH-mm |
Rollover at the beginning of every minute. |
/opt/nxlog-manager/conf/log4j.xml defines four different files, including a debug file and a trace file that need to be enabled separately.
Log rotation can be controlled individually for each log file by altering the DatePattern parameter at each of the four appender sections.
|
To enable the debug logging:
-
Change the priority level from
INFOtoDEBUG, -
Change
WARNlevel toDEBUGin the loggers you require, -
Remove the comment from the
debugAppenderreference, as shown below.
<root>
  <priority value="DEBUG"/>
  <appender-ref ref="internalAppender"/>
  <appender-ref ref="errorAppender"/>
  <appender-ref ref="debugAppender"/>
</root>
Configuring SSL debugging
To gain more insight on what happens during the SSL communication and the
reasons which cause the connection to fail, additionally edit the
nxlog-manager.conf file by adding the -Djavax.net.debug=ssl,handshake
options to the JVM_OPTS parameter. The ssl option turns on SSL debugging
and the handshake option prints each handshake message.
To learn more about options, see the Debugging Utilities section on the Oracle website.
After the changes, restart the nxlog-manager service and connect the
agent first in untrusted mode and then restart it with the newly issued
certificates.
Once this has been done, please send us the /opt/nxlog-manager/log/nxlog-manager.debug log file.