Deploying on AWS
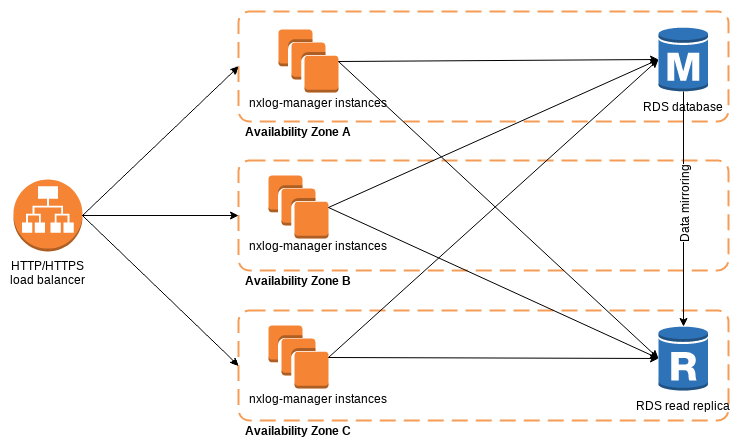
NXLog Manager can be run in the cloud environment, such as Amazon Web Services. Cloud services can be easily leveraged to provide high availability and disaster recovery capabilities. In such a scenario, NXLog Manager is deployed in a distributed setup, across multiple availability zones.
Setting up NXLog Manager on AWS
-
To start with, the database needs to be prepared. The Amazon Relational Database Service (RDS) works well with NXLog Manager. For data redundancy, create a database (MySQL or MariaDB) in Multi-AZ deployment mode. This option will create a read replica.

-
Install NXLog Manager from the DEB or RPM package, depending on the operating system. At least the EC2 "t2.small" instance type is recommended.
-
Edit
/opt/nxlog-manager/db_init/db.conf. Add the RDS hostname and the database master username/password to theMYSQLOPTSvariable.MYSQLOPTS="-h RDS_INSTANCE.rds.amazonaws.com -P 3306 -u DB_MASTER_USER -pDB_PASSWORD" -
Execute the database initialization script. This should only be done once for the cluster!
# cd /opt/nxlog-manager/db_init
# ./dbinit.sh
-
Configure NXLog Manager to run in a distributed manner by editing the
INSTANCE_MODEin/opt/nxlog-manager/conf/nxlog-manager.conf.INSTANCE_MODE=distributed-manager -
In
/opt/nxlog-manager/conf/jetty-env.xml, provide details for Java Message Service (JMS) communication.Set
JMSBrokerAddressto the instance private IP, used for communications inside the VPC.<Set name="jmsBrokerAddress">172.31.9.100</Set>Set database details in
jdbcUrlby providing the RDS endpoint.<Set name="jdbcUrl">jdbc:mysql://RDS_INSTANCE.rds.amazonaws.com:3306/nxlog-manager5?useUnicode=true&characterEncoding=UTF-8&characterSetResults=UTF-8&autoReconnect=true</Set>Also update
Log4ensicsDatabaseAccess.<New class="com.nxsec.log4ensics.data.bean.common.Log4ensicsDatabaseAccess"> <Set name="databaseName">nxlog-manager5</Set> <Set name="username">nxlog-manager5</Set> <Set name="password">nxlog-manager5</Set> <Set name="location">RDS_INSTANCE.rds.amazonaws.com:3306</Set> </New> -
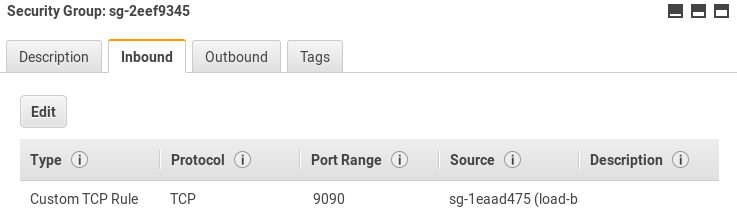
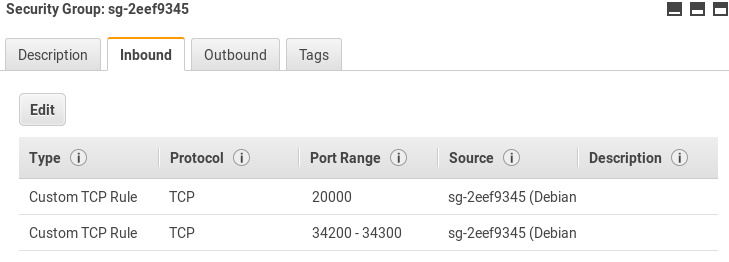
From the EC2 service dashboard, go to Security Groups. Allow TCP traffic on ports 20000 and 34200-34300 to allow JMS communications inside the security group created for NXLog Manager EC2 instances. Please note that the security group ID should be used in the Source field.
-
The NXLog Manager service can now be started.
# service nxlog-manager start
Configuring Load Balancing
In order to access NXLog Manager from a single URL, as well as benefit from application redundancy, a Load Balancer is needed.
-
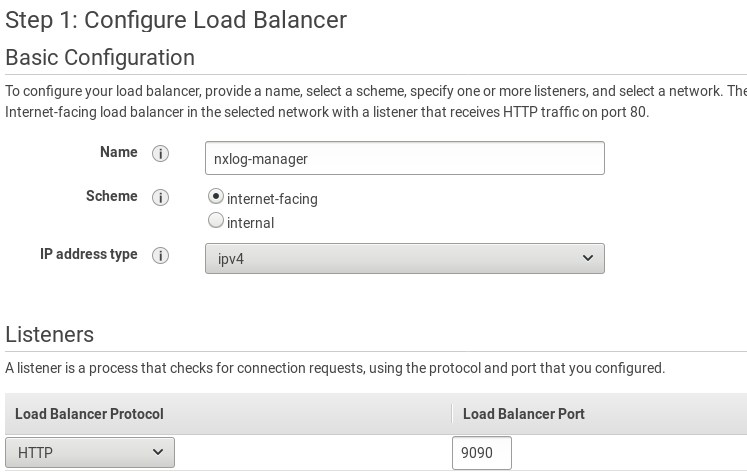
From the EC2 service dashboard go to Load Balancing. Click Create Load Balancer. Select Application Load Balancer and click Create.
-
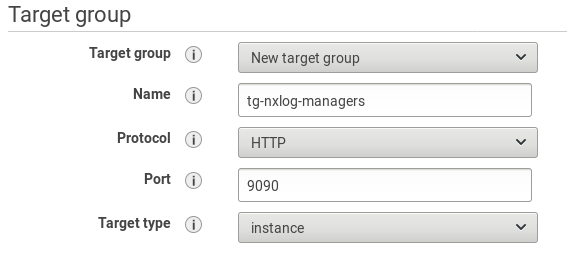
Configure the load balancer. Set the listener to use port 9090 (the same as the backend application).
-
Choose availability zones and configure a security group to limit access to the load balancer. Configure routing to forward requests to port 9090.
-
Configure the health check path to
/nxlog-manager. In Advanced health check settings, set the Success codes to 302, as it is the default reply from the nxlog-manager service.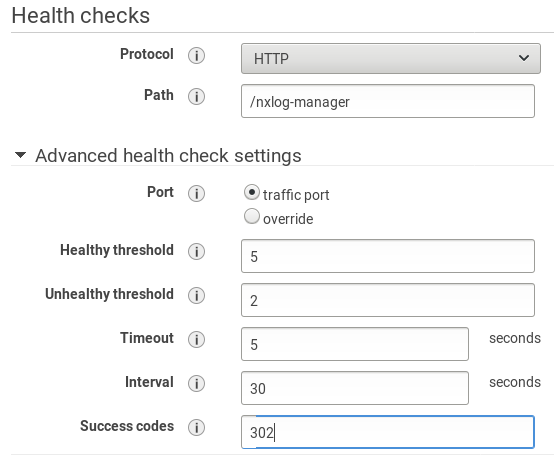
-
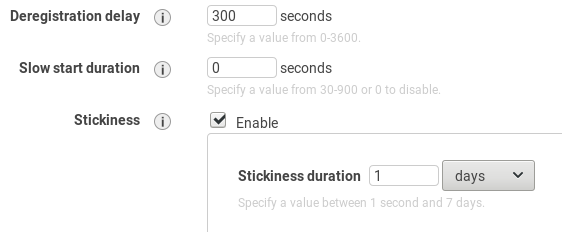
Select instances for the target group and finish the creation of the load balancer. From the EC2 dashboard go to Target Groups (in the LOAD BALANCING section). Select the target group and click Edit attributes. Enable Stickiness to prevent breaking user sessions. This will create a cookie named AWSALB with encrypted contents.
-
Edit security groups to allow traffic between the load balancer and its target group. After this step, the solution is ready.