
Microsoft Windows
This page describes the steps for installing and upgrading NXLog Agent on Microsoft Windows.
Prerequisites
Make sure you check the following before installing NXLog Agent:
-
Verify that you have sufficient privileges to install system services on the target machine.
-
Ensure Windows Installer is not turned off by a group or local policy:
-
Open the Group Policy Management console (
gpmc.msc) on your domain controller or the Local Group Policy Editor (gpedit.msc) on the target machine. -
Navigate to Computer Configuration > Administrative Templates > Windows Components > Windows Installer > Turn off Windows Installer. The setting must be Not configured or Disabled.
-
| Domain administrator privileges do not override Group Policy settings. |
If these conditions are not met, the installer may exit prematurely without a clear error message.
Installing NXLog Agent
First, download the NXLog Agent MSI file.
-
Log in to NXLog Platform.
-
In the left navigation menu, click Product download.
-
Select the NXLog Agent tab.
-
Select and download the installation file for your operating system version and architecture.
Table 1. Available NXLog Agent Windows installers Platform Package Microsoft Windows (64-bit)
nxlog-6.14.10786_windows_x64.msi
Microsoft Windows (32-bit)
nxlog-6.14.10493_windows_i686.msi
The NXLog Agent installer packages are digitally signed. See Verify the signature of the Windows installer for further details.
The examples below use the Windows 64-bit file. Replace the file name accordingly when executing the commands.
Connecting to NXLog Platform
You can configure NXLog Agent to connect to NXLog Platform automatically.
The installation looks for the following command line arguments to configure the Remote Management (xm_admin) instance in the managed.conf file.
- NXP_ADDRESS
-
The NXLog Platform Agent Management hostname or IP address and port. The installation sets the Host to this value.
- NXP_AGENT_LABEL
-
Sets the
agent_labellabel to this value. - NXP_OTHER_LABELS
-
A list of comma-separated key-value pairs, specifying custom labels. Accepted values include alphanumeric characters and the following symbols:
$ - _ + ! * ' ( ) ; : . /. Keys and values cannot start with a digit, and spaces will be replaced with underscores (_). Depending on the command-line environment you use, you may need to quote or escape certain characters. A maximum of ten key-value pairs is allowed.
You can use the labels to Set up automatic agent enrollment.
For example:
> msiexec /q /i nxlog-6.14.10786_windows_x64.msi NXP_ADDRESS="agents.nxlog.example.com:5515" NXP_AGENT_LABEL="new" NXP_OTHER_LABELS="key1=value1,key2=value2"Installing interactively
-
Run the installer by double-clicking the MSI file. Accept the license agreement and choose and, optionally, choose an alternative installation directory. Click Install to start the installation.
-
Once the installation is ready, click Finish. This will open the
README.txtfile in Notepad. -
Configure NXLog Agent by editing
nxlog.conf. You can find the file atC:\Program Files\nxlog\conf\nxlog.confby default.
See Log collection in the NXLog Platform User Guide for more information and configuration examples.
For more details about configuring NXLog Agent to collect logs on Windows, see Microsoft Windows log sources. -
Verify the configuration file syntax.
> "C:\Program Files\nxlog\nxlog.exe" -v 2017-03-17 08:05:06 INFO configuration OK -
Start NXLog Agent from the Service console (
services.msc). The service name isnxlog. You can also run NXLog Agent from the command line by invokingnxlog.exewith the-fargument.
If NXLog Agent does not start as expected, see Service fails to start below.
Installing with msiexec
You can use msiexec for an unattended installation. This command shows no prompts, but you must run it with administrator privileges.
> msiexec /i nxlog-6.14.10786_windows_x64.msi /qTo allow Windows to prompt for administrator privileges but still execute an unattended installation, use /qb instead.
> msiexec /i nxlog-6.14.10786_windows_x64.msi /qbTo specify a custom installation directory, use the INSTALLDIR property.
> msiexec /i nxlog-6.14.10786_windows_x64.msi /q INSTALLDIR="C:\nxlog"Installing via Group Policy
For large deployments, it may be convenient to use Group Policy to install NXLog Agent.
| These steps were tested with a Windows Server 2016 domain controller and a Windows 7 client. There are multiple ways to configure an NXLog Agent installation with Group Policy. The required steps for your network may vary from those listed below. |
-
Log on to the server as an administrator.
-
Set up an Active Directory group for computers requiring an NXLog Agent installation. NXLog Agent will be automatically installed and configured on each computer in this group.
-
Open the Active Directory Users and Groups console (
dsa.msc). -
Under the domain, right-click on Computers and click Group.
-
Provide a name for the group. For example, nxlog. Use the Security group type and Global context (or the context suitable for your case).
-
Add computers to the group by selecting one or more, clicking Add to a group…, and entering the group name (
nxlog).
-
-
Create a network share for distributing the NXLog Agent files.
-
Create a folder in the desired location (for example,
C:\nxlog-dist). -
Set up the folder as a share: right-click, select Properties, open the Sharing tab, and click Share….
-
Add the group (
nxlog) and click Share. Take note of the share name provided by the wizard, it will be needed later (for example,\\WINSERV1\nxlog-dist). -
Copy the required files to the shared folder. If you manage your agents from NXLog Platform, this will include at least three files:
nxlog-6.14.10786_windows_x64.msi,managed.conf, and the CA certificateagent-ca.pem. If not, use a customnxlog.confinstead ofmanaged.conf, omit the CA certificate, and include any other files required by the configuration.The managed.conffile is located in theC:\Program Files\nxlog\conf\nxlog.d\directory.
-
-
Create a Group Policy Object (GPO) for the NXLog Agent deployment.
-
Open the Group Policy Management console (
gpmc.msc). -
In the console tree, under Domains, right-click on your domain and click Create a GPO in this domain, and Link it here…; this will create a GPO under the Group Policy Objects folder and link it to the domain.
-
Name the GPO (for example,
nxlog) and click OK. -
Select the newly created GPO in the tree.
-
In the Security Filtering list, add the Active Directory group created in step 2 (
nxlog). Remove anything else. -
Right-click on the GPO and click Edit. The Group Policy Management Editor console will be opened for editing the GPO.
-
-
Add the NXLog Agent MSI to the GPO.
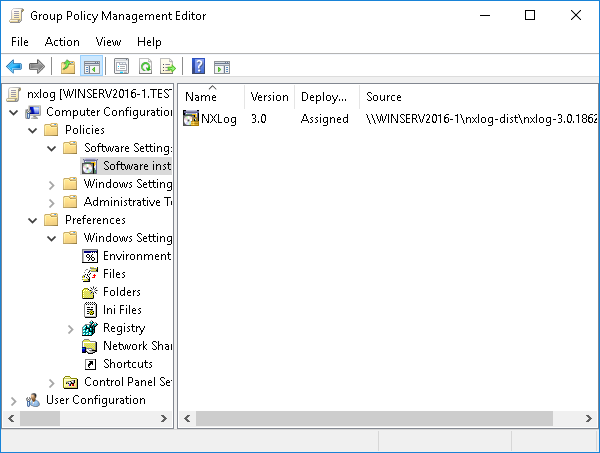 Figure 1. Configured NXLog Agent GPO
-
Under Computer Configuration > Policies > Software Settings, right-click Software installation. Click New > Package… to create a deployment package for NXLog Agent.
-
Browse to the network share and open the
nxlog-6.14.10786_windows_x64.msipackage. It is important to use the Uniform Naming Convention (UNC) path (for example,\\WINSERV1\nxlog-dist) so the file will be accessible by remote computers. -
Select the Assigned deployment method.
-
-
Add the required files to the GPO by following these steps for each file.
-
Under Computer Configuration > Preferences > Windows Settings, right-click on Files. Click New > File.
-
Select the Replace action in the drop-down.
-
Choose the source file on the network share (for example,
\\WINSERV1\nxlog-dist\managed.confor\\WINSERV1\nxlog-dist\agent-ca.pem). -
Type in the destination path for the file (for example,
C:\Program Files\nxlog\conf\nxlog.d\managed.conforC:\Program Files\nxlog\cert\agent-ca.pem). -
Check Apply once and do not reapply under the Common tab for files that should only be deployed once. This is especially important for
managed.confbecause NXLog Platform will write configuration changes to that file. -
Click OK to create the File in the GPO.
-
-
After the Group Policy is updated on the clients and NXLog Agent is installed, one more reboot will be required before the NXLog Agent service starts automatically.
For more information about Group Policy, see the following Microsoft Learn articles:
Prevent the service from starting automatically during installation
The default behavior of the NXLog Agent MSI installer is to automatically start the service during the installation process. In environments where this behavior is undesirable, the MSI installer can be edited to prevent the NXLog Agent service from starting automatically.
InstEd is a free tool for editing MSI packages. Follow the steps below to use this tool and disable automatic service start for the NXLog Agent MSI installer. These steps have been tested with InstEd version 1.5.15.26.
| InstEd is a third-party software and using it subjects you to its terms and conditions. NXLog provides no guarantees and is not responsible for any loss or damage of any sort resulting from the use of third-party products. |
-
Download and install InstEd MSI editor.
-
Open InstEd, click on File > Open, and select the desired NXLog Agent MSI package.
-
With the Tables tab selected, scroll down to locate ServiceControl.
-
Change the Event column to
0x0004and the Wait column to0. -
Click on File > Save and specify a name for the new package.
-
Close InstEd and install NXLog Agent.
InstEd Editor configuration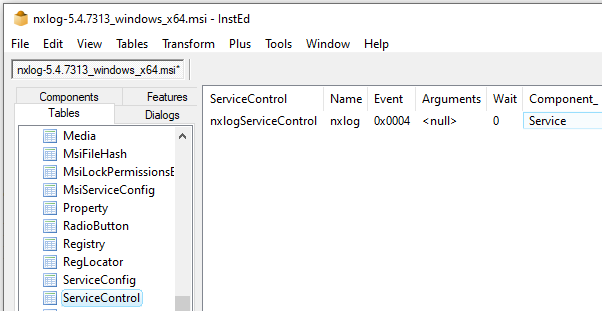
You must close InstEd before installing NXLog Agent.
Upgrading NXLog Agent
Follow these steps to upgrade NXLog Agent to the latest release, or to replace a trial installation with a licensed copy.
The installation will not modify the existing configuration files unless you specify the FORCE command line argument.
However, we recommend backing up the configuration files before starting this process.
When upgrading, you can configure new NXLog Platform settings by specifying the relevant command line arguments in addition to the FORCE argument when executing the installer.
For example:
> msiexec /q /i nxlog-6.14.10786_windows_x64.msi NXP_ADDRESS="agents.nxlog.example.com:5515" NXP_AGENT_LABEL="windows" FORCE="TRUE"When forcing a configuration update, the installation backs up the nxlog.conf and managed.conf files before applying the changes.
Currently, if you specify the NXP_ADDRESS and NXP_AGENT_LABEL command line arguments without FORCE, the installer does not perform the upgrade and exits without an error message.
|
To upgrade interactively:
-
Run the new MSI installer as described in Installing NXLog Agent above. The installer will detect the current installation and perform the upgrade within the same installation directory.
If the Services console ( services.msc) is open, the installer may request the computer to be rebooted or display a permission error. Please ensure that the Services console is not open before attempting an upgrade. -
Start the NXLog Agent service via the Services console (
services.msc) or by rebooting the system. Open the NXLog Agent log file, by default,C:\Program Files\nxlog\data\nxlog.log, with a text editor to verify NXLog Agent is working as expected.
For Group Policy deployments, follow these steps:
-
Download the new MSI package as described in Installing NXLog Agent above.
-
Place the new MSI in the distribution share. See Create a network share above.
-
Add this MSI as a new package to the NXLog Agent GPO. Follow the steps under Add the NXLog Agent MSI.
-
Right-click on the new package and click Properties. Open the Upgrades tab, click Add…, select the previous version from the list, and click OK.
| If you want to downgrade to a previous version of NXLog Agent, you must manually uninstall the current version first. See Uninstalling NXLog Agent. |
Uninstalling NXLog Agent
There are several ways to uninstall NXLog Agent.
-
From the Control Panel (not discussed here).
-
By using
msiexecand the original NXLog Agent MSI. -
Via the same GPO it was originally deployed with.
-
Via a downloadable batch script.
In addition to the above, we provide a method to remove any Windows Registry traces after uninstalling NXLog Agent.
Uninstalling with msiexec
Uninstall NXLog Agent using msiexec with the following command:
> msiexec /x nxlog-6.14.10786_windows_x64.msi /qb
This procedure may not remove all files that were created while configuring NXLog Agent.
Likewise, any files created as a result of NXLog Agent’s operations will not be removed.
You may wish to delete the installation directory, C:\Program Files\nxlog by default, once NXLog Agent is uninstalled.
|
Uninstalling via Group Policy
Follow these steps for Group Policy installations:
-
Open the original Group Policy Object (GPO) used for installing NXLog Agent. See Create a Group Policy Object above.
-
For each NXLog Agent version that has been installed, right-click the package and either:
-
click All Tasks > Remove…, and choose the Immediately uninstall removal method; or
-
click Properties, open the Deployment tab, and check Uninstall this application when it falls out of the scope of management.
NXLog Agent will be uninstalled when the GPO is no longer applied to the computer. An additional action will be required, such as removing the selected computer(s) from the nxloggroup. See Set up an Active Directory group above.
-
Removing traces of NXLog Agent from Windows Registry
After uninstalling NXLog Agent there might be some left-over traces in the Windows Registry.
We provide a list of Windows Registry entries to be removed as a .reg file.
Download the reg-entries.reg file from the NXLog public contrib repository.
Execute the following command to remove any NXLog Agent remnants from Windows Registry:
> regedit.exe /S reg-entries.regUninstalling with a script
You can download the necessary files from the windows-uninstall directory in NXLog’s public contrib repository.
The script combines the steps of Uninstalling with msiexec and Removing traces of NXLog Agent from Windows Registry. It also prompts you whether to remove the installation directory.
The following files need to be located in the same directory:
-
uninstall-x64.bat- The main script. -
reg-entries.reg- The list of Windows Registry entries to remove. -
The exact version of the MSI installer you used to install NXLog Agent.
Use the following command to execute the script:
> uninstall-x64.bat nxlog-6.14.10786_windows_x64.msiThe README.MD file in the repository explains how the script works.
Troubleshooting
The following section provides tips for diagnosing and resolving NXLog Agent installation and startup issues on Windows.
Checking the Event Viewer
When an MSI installation fails, Windows records error details in the Event Viewer.
-
Open the Event Viewer (
eventvwr.msc). -
Navigate to Windows Logs > Application.
-
Look for events with the source MsiInstaller to identify the cause of the failure.
Generating an msiexec installation log
For a detailed installation log, use the /L*V flag with msiexec.
Run the command below, then check the log file for any errors.
> msiexec /i nxlog-6.14.10786_windows_x64.msi /qb /L*V "nxlog-install.log"Service fails to start
If NXLog Agent installs but the service does not start, try these steps:
-
Validate the configuration file syntax by running:
> "C:\Program Files\nxlog\nxlog.exe" -vIf there’s a configuration error, it will appear in the console.
-
Open the NXLog Agent log file at
C:\Program Files\nxlog\data\nxlog.logand check for any error messages.Some text editors, such as WordPad, use exclusive locking and will not open the log file while NXLog Agent is running. -
Open Event Viewer (
eventvwr.msc), navigate to Windows Logs > System, and look for events with the source Service Control Manager.
See also: