
Hardening NXLog Agent on Linux
On Linux, the NXLog Agent installer creates a user and group called nxlog.
The main NXLog Agent configuration file, located at /opt/nxlog/etc/nxlog.conf, is assigned root:nxlog ownership and permissions of 640.
These permissions allow superusers to read and modify the configuration file, and the user nxlog to read the file only.
Other users do not have permission to read or modify the file.
Additionally, the NXLog Agent installation contains a dedicated directory, /opt/nxlog/etc/nxlog.d, for additional configuration files.
By default, the folder contains a single configuration file, managed.conf, used to manage NXLog Agent from NXLog Platform.
This folder is assigned nxlog:nxlog ownership and managed.conf has permissions of 600.
These permissions allow only the user nxlog to read and modify the file.
If you do not manage NXLog Agent from NXLog Platform, you can exclude the nxlog.d folder from the main configuration file by removing the following lines:
define CONFDIR %INSTALLDIR%/etc/nxlog.d
include %CONFDIR%/*.conf
New files created in the nxlog.d folder may have different permissions.
For example, a permissions setting of 644 allows other users to read the file.
You can modify the default permissions by changing the umask settings.
Refer to the umask-related documentation of your operating system for more information.
|
Running as a different user or group
User nxlog
Group nxlog
By default, the nxlog user does not have access to files in /var/log.
See Permission denied to a log file on Linux for more information.
|
Granting additional Linux capabilities
NXLog Agent can set additional Linux capabilities during service startup before dropping the root privileges. There are two ways of setting additional capabilities:
- Rely on automatically setting capabilities
-
Normally, NXLog Agent automatically sets the Linux capabilities required for configured modules.
In certain rare conditions, such as when NXLog Agent starts with an empty configuration before receiving a configuration update from NXLog Platform, the required capabilities might not be set automatically. - Set the capabilities manually
-
You can use the Capabilities global directive to ensure that the capabilities you need are set or to set capabilities not defined by the configuration’s modules.
The following configuration example sets the
CAP_NET_BIND_SERVICEcapability:Capabilities cap_net_bind_service+epYou can also set multiple capabilities. The following configuration example sets
CAP_NET_BIND_SERVICEandCAP_NET_RAW:Capabilities "cap_net_bind_service,cap_net_raw=+ep"
UDP spoofing and binding to ports below 1024
NXLog Agent requires special privileges if configured to perform UDP source address spoofing with om_udpspoof or to bind to a port below 1024 (for example, to accept incoming syslog messages on port 514). Use Linux capabilities to grant the privileges:
-
To bind to ports below 1024, use the
CAP_NET_BIND_SERVICEcapability. -
For UDP source address spoofing, configure the
CAP_NET_RAWcapability.
Reading the kernel log
NXLog Agent requires special privileges to read from the Linux kernel log with the im_kernel module. Use Linux capabilities to grant one of the following privileges:
-
CAP_SYS_ADMIN -
CAP_SYSLOG(since Linux 2.6.37)
Configuring SELinux
You can use Security-Enhanced Linux (SELinux) to harden NXLog Agent further. SELinux allows you to implement mandatory access controls for applications, processes, and files.
To take advantage of SELinux, you must create an SELinux policy for NXLog Agent and ensure that SELinux is enabled on the host. Creating a policy is split into two parts: creating a base policy and then deploying and customizing the policy to the requirements of the NXLog Agent configuration.
Creating a base policy
To generate the base policy, use either the GUI-based SELinux Policy Generation Tool or the SELinux CLI development utilities. In either case, you will generate the following files:
- nxlog.te
-
Base policy information that defines the policy types and rules for a particular domain.
- nxlog.fc
-
File system information that defines the security contexts applied to files when the policy is installed.
- nxlog.if
-
Interface information that defines the default file context for the system.
- nxlog.sh
-
A helper shell script for compiling and deploying the policy module and fixing the labeling on the system. For use only on the target system.
- nxlog_selinux.spec
-
A specification file for generating an RPM package from the policy. It helps deploy the policy on other systems. This file is generated only on RPM-based systems.
Creating a base policy using Policy Generation Tool (GUI)
Follow these steps to generate the base policy using SELinux Policy Generation Tool:
-
Install the SELinux Policy Generation Tool package.
-
On Red Hat-based systems, run the following command:
$ sudo dnf install rpm-build policycoreutils-guior
$ sudo yum install rpm-build policycoreutils-gui -
On Debian-based systems, run the following command:
$ sudo apt-get install policycoreutils-gui
-
-
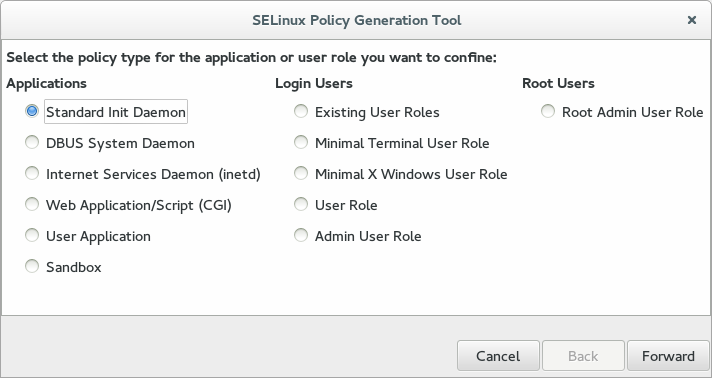
Start the SELinux Policy Generation Tool from the system launcher.
-
On the first screen, select Standard Init Daemon under Applications, then click Forward.
-
Enter the following details for the application and user role, then click Forward:
- Name
-
User-defined name for the role. Example:
nxlog. - Executable
-
Full path to the NXLog Agent executable. Example:
/opt/nxlog/bin/nxlog. - Init script
-
Full path to the NXLog Agent system init script. Example:
/etc/rc.d/init.d/nxlog.
-
Enter the TCP and UDP port numbers NXLog Agent will listen on, then click Forward. If you still need to determine the ports, leave these fields blank. You can customize them later.
-
Enter the TCP and UDP port numbers NXLog Agent will connect to, then click Forward. If you still need to determine the ports, leave these fields blank. You can customize them later.
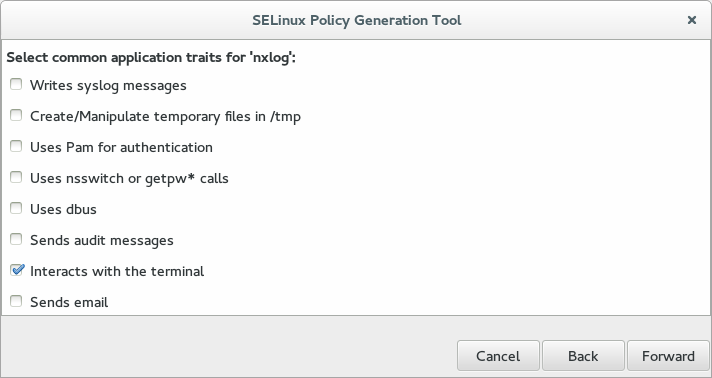
-
Select the application traits your NXLog Agent modules and configuration need, then click Forward.
The default configuration requires only the Interacts with the terminal trait.
-
Specify any files and directories the NXLog Agent installation requires access to, then click Forward.
The default configuration only needs access to the NXLog Agent system directory,
/opt/nxlog. Include the paths of any custom log files that you want to read. -
Optionally, set additional SELinux configuration values, then click Forward to continue.
NXLog Agent does not require any additional values.
-
Select the location where to save the policy files, then click Apply to write the policy to disk.
-
Click Close to exit the SELinux Policy Generation Tool.
Creating a base policy using sepolicy (CLI)
Follow these steps to generate the base policy from the command line:
-
Install the SELinux Policy Core Policy Devel Utilities package.
-
On Red Hat-based systems, run the following command:
$ sudo dnf install rpm-build policycoreutils-develor
$ sudo yum install rpm-build policycoreutils-devel -
On Debian-based systems, run the following command:
$ sudo apt-get install policycoreutils-dev selinux-policy-default
-
-
Change to the directory where you want to save the policy files. The command writes the files to the current working directory.
$ cd /home/example/mysepolicy -
Execute the following command to generate the base policy:
$ sepolicy generate -n nxlog --init /opt/nxlog/bin/nxlog -w /opt/nxlogYou can specify additional managed directories for the policy by listing their absolute paths separated by a space. For example:
$ sepolicy generate -n nxlog --init /opt/nxlog/bin/nxlog -w /opt/nxlog /var/log
Deploying and customizing the policy
After generating the base policy, you need to apply it and, if required, customize it with appropriate rules for the NXLog Agent configuration.
| The following procedure temporarily sets SELinux in permissive mode, in which SELinux generates alerts rather than actively blocking actions as it does in enforcing mode. Using permissive mode reduces system security. We recommend completing the procedure on your test or staging environment before applying the verified policy in your production environment. |
-
Make sure you have configured NXLog Agent with all the functionality you require.
-
Stop the NXLog Agent service.
$ sudo systemctl stop nxlog -
Execute the bash script generated above to apply the SELinux base policy.
The policy script compiles the policy module, sets the appropriate security flags on the directories specified, and installs the policy.
$ sudo ./nxlog.shReplace
nxlogwith the actual name you used for the policy.You might see the error message
libsemanage.add_user: user system_u not in password file. This error is caused by a bug in theselinux-policyRPM orselinux-policy-defaultDEB package, which does not affect the policy. The issue has been fixed in later releases.You might see the error message
InvalidRBACRuleType: a is not a valid RBAC rule type. A bug in thepolicycoreutilspackage causes this error. It only affects the generation of man pages, which we do not use in our case. The issue has been fixed in later releases. -
Verify the new policy was installed successfully.
$ sudo semodule -l | grep nxlogReplace
nxlogwith the actual name you used for the policy. The command should produce a single line with the name of your policy. -
Set SELinux to permissive mode. SELinux will now permit and log all previously blocked events to
/var/log/audit/audit.log, including events unrelated to NXLog Agent.$ sudo setenforce 0 -
Restart NXLog Agent.
Any actions taken by NXLog Agent that the policy does not permit will result in events logged by the Audit system. Run
audit2allow -a -l -wto view all policy violations since the last policy reload.$ sudo systemctl start nxlog $ sudo systemctl stop nxlogExample 1. Audit logsSuppose you configured NXLog Agent to listen on TCP port 1514, but the current SELinux policy does not contain the appropriate rules. In that case, various audit events will be generated when the NXLog Agent process initializes and binds to that port. You can view these events from the Audit log file directly with
ausearch, or useaudit2allow, as shown below.$ sudo audit2allow -a -l -w type=AVC msg=audit(1524239322.612:473): avc: denied { listen } for pid=5697 comm="nxlog" lport=1514 scontext=system_u:system_r:nxlog_t:s0 tcontext=system_u:system_r:nxlog_t:s0 tclass=tcp_socket Was caused by: Missing type enforcement (TE) allow rule. You can use audit2allow to generate a loadable module to allow this access.Additional log messages are generated for any other file or network action not permitted by the SELinux policy. SELinux will deny such actions when set to enforcing mode.
-
Use the policy script’s
--updateoption to add additional rules to the policy based on logged policy violations with thenxlogcontext.Review the suggested changes and press Y to update the policy. the script doesn’t produce any output.
$ sudo ./nxlog.sh --updateExample 2. Updating the policyThe script offers to add any required rules. The following output continues on the previous example.
$ sudo ./nxlog.sh --update Found avc's to update policy with require { type nxlog_rw_t; type nxlog_t; class capability dac_override; class tcp_socket { bind create listen setopt }; class file execute; class capability2 block_suspend; } #============= nxlog_t ============== allow nxlog_t nxlog_rw_t:file execute; allow nxlog_t self:capability dac_override; allow nxlog_t self:capability2 block_suspend; allow nxlog_t self:tcp_socket { bind create listen setopt }; corenet_tcp_bind_generic_node(nxlog_t) corenet_tcp_bind_unreserved_ports(nxlog_t) Do you want these changes added to policy [y/n]? -
Set the SELinux policy to enforcing mode. Execute the following command to set the mode until the next reboot:
$ sudo setenforce 1To set it permanently, set
SELINUX=enforcingin/etc/selinux/configand reboot the system.