Amazon Web Services (AWS)
AWS is a subsidiary of Amazon that provides various cloud computing services. This guide provides an overview of how to collect logs from AWS with NXLog Agent.
Amazon CloudWatch
Amazon CloudWatch is a set of cloud monitoring services. The CloudWatch Logs service can be used to collect log data from Elastic Compute Cloud (EC2), CloudTrail, Route 53, and other sources. See the CloudWatch documentation for more information about configuring and using CloudWatch logs.
You can set up NXLog Agent to retrieve CloudWatch log streams in two ways:
-
NXLog Agent can connect to the CloudWatch API using the Boto 3 client and poll for AWS logs at regular intervals. This is suitable when a short delay in log collection is acceptable.
-
Configure AWS Lambda to push logs to NXLog Agent via HTTP. This method offers low-latency log collection.
Pulling logs via the CloudWatch API
-
A service account must be created for accessing the log data. In the AWS web interface, go to Services > IAM.
-
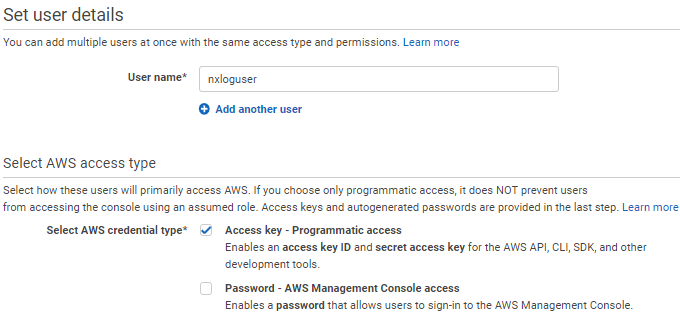
Click the Users option in the left-side panel and click the Add user button.
-
Provide a User name, for example,
nxlog. Tick the checkbox to allow Programmatic access to this account.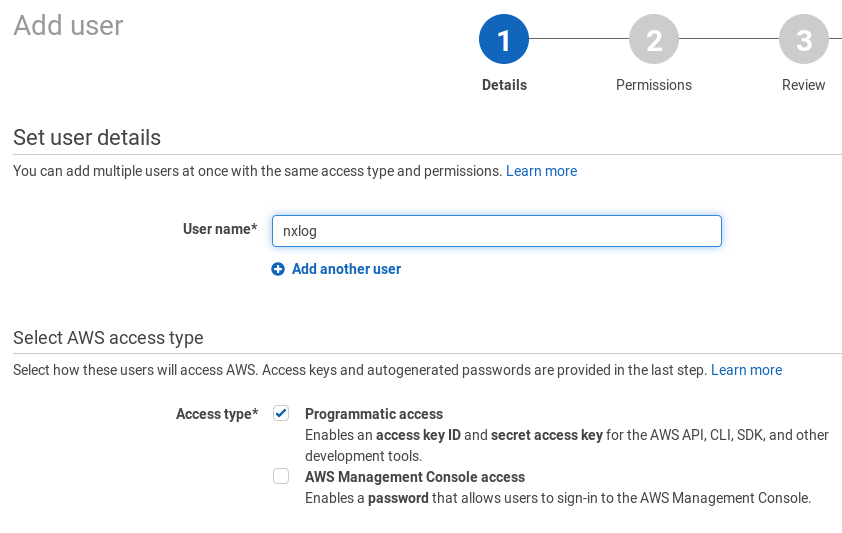
-
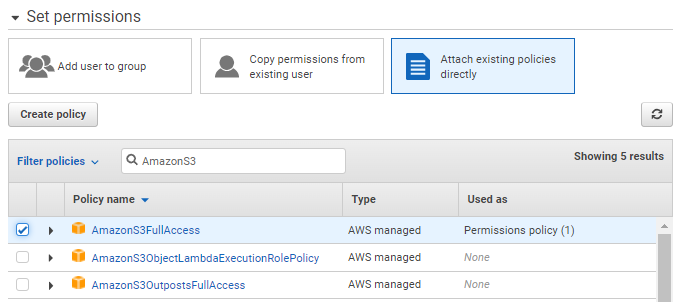
Choose to Attach existing policies directly and select the CloudWatchLogsReadOnly policy. Click Next: Review and then Create user.

-
Save access keys for this user and Close.
-
Install and configure Boto 3, the AWS SDK for Python. See the Boto 3 Quickstart and Credentials documentation for more details.
-
Edit the
region_nameandgroup_namevariables in thecloudwatch.pyscript, as necessary. -
Configure NXLog Agent to execute the script with the im_python module.
This NXLog Agent configuration uses im_python to execute the CloudWatch add-on script. The xm_json parse_json() procedure is then used to parse the JSON log data into fields.
<Extension json>
    Module        xm_json
</Extension>

<Input py>
    Module        im_python
    PythonCode    cloudwatch.py
    Exec          parse_json();
</Input>

<Output output_file>
    Module        om_file
    File          '/path/to/output/file'
    Exec          to_json();
</Output>import nxlog, boto3, json, time
class LogReader:
def __init__(self, time_interval):
client = boto3.client('logs', region_name='eu-central-1')
self.lines = ""
all_streams = []
group_name = '<ENTER GROUP NAME HERE>'
#query CloudWatch for all log streams in the group
stream_batch = client.describe_log_streams(logGroupName=group_name)
all_streams += stream_batch['logStreams']
start_time = int(time.time()-time_interval)*1000
end_time = int(time.time())*1000
while 'nextToken' in stream_batch:
stream_batch = client.describe_log_streams(
logGroupName=group_name, nextToken=stream_batch['nextToken'])
all_streams += stream_batch['logStreams']
nxlog.log_debug(str(len(all_streams)))
#get log data from all available streams
for stream in all_streams:
#get first log batch (up to 10,000 log events)
logs_batch = client.get_log_events(logGroupName=group_name,
logStreamName=stream['logStreamName'],
startTime=start_time,
endTime=end_time)
#write events from the first batch in JSON format
self.json_dump(logs_batch, group_name, stream['logStreamName'])
#get next log batches till all the data is collected
while 'nextToken' in logs_batch:
logs_batch = client.get_log_events(
logGroupName=group_name, logStreamName=stream['logStreamName'],
startTime=start_time, endTime=end_time,
nextToken=logs_batch['nextToken'])
self.json_dump(logs_batch, group_name, stream['logStreamName'])
nxlog.log_debug('Pulling logs: ' + gettime(start_time) + ' - ' +
gettime(end_time) + '\n')
def json_dump(self, cloudwatch_logs, group_name, stream_name):
for event in cloudwatch_logs['events']:
event.update({'group': group_name, 'stream': stream_name })
self.lines += json.dumps(event) + '\n'
def getlogs(self):
if not self.lines:
return None
return self.lines
def gettime(time_miliseconds):
return time.strftime('%Y-%m-%d %H:%M:%S',
time.localtime(time_miliseconds/1000))
def read_data(module):
# log pull time interval in seconds
time_interval = 300
module['reader'] = LogReader(time_interval)
reader = module['reader']
logdata = module.logdata_new()
line = reader.getlogs()
if line:
logdata.set_field('raw_event', line)
logdata.post()
nxlog.log_debug("Data posted")
module.set_read_timer(time_interval)
nxlog.log_info("INIT SCRIPT")Accepting log data from Lambda via HTTP
Using a push model follows an event-driven computing approach and allows for low latency. In this scenario, an AWS Lambda function sends log data in JSON format with the HTTP POST method. NXLog Agent listens for connections and accepts log data.
-
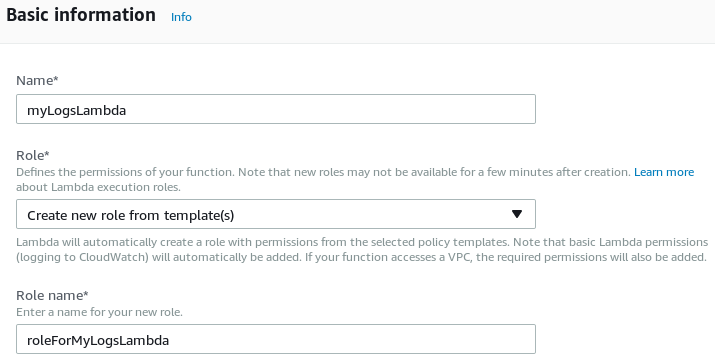
In the AWS web interface, go to Services > Lambda and click the Create function button.
-
Click the Author from scratch button.
-
Provide the name for the function and select Create a new role from template(s) from the Role dropdown. Enter a role name to be associated with this Lambda function. Then click the Create function button.
-
Under Function code select Upload a .ZIP file for Code entry type, select Python under Runtime, and change the Handler name to
lambda_function.lambda_handler. -
Set the correct host and port in
lambda_function.py, then upload a ZIP archive with that file (and certificates, if needed). Click Save.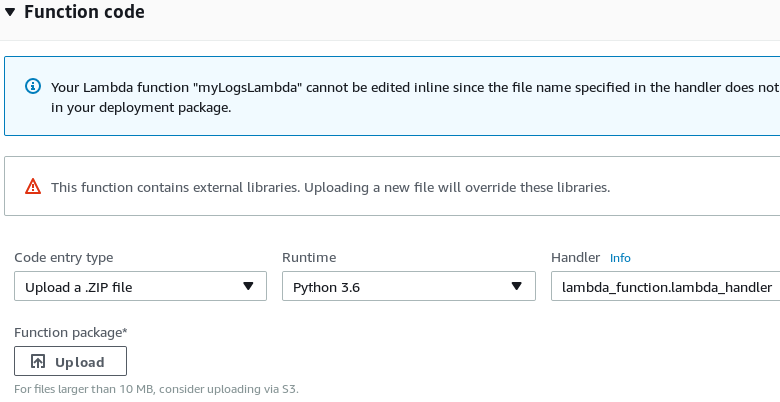
-
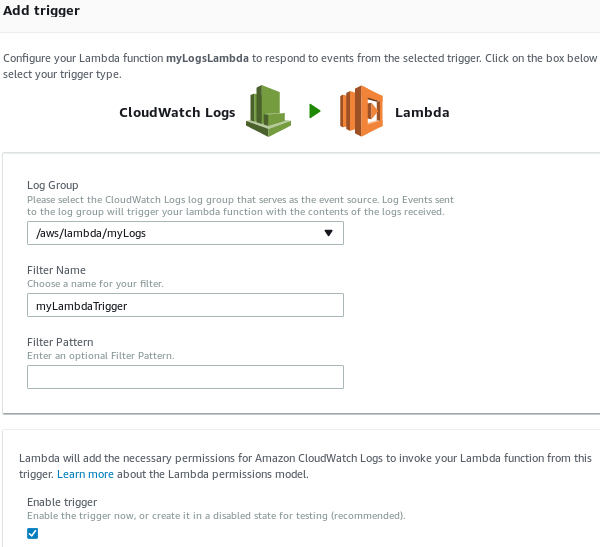
From the Configuration tab, change to the Triggers tab. Click + Add trigger.
-
Choose CloudWatch Logs as a trigger for the Lambda function. Select the log group that should be forwarded and provide a Filter Name, then click Submit.
In this example, the im_http module listens for connections from the Lambda script via HTTP. The xm_json parse_json() procedure is then used to parse the JSON log data into fields.
<Extension json>
    Module              xm_json
</Extension>

<Input http>
    Module              im_http
    ListenAddr          127.0.0.1
    Port                8080
    HTTPSCertFile       %CERTDIR%/server-cert.pem
    HTTPSCertKeyFile    %CERTDIR%/server-key.pem
    HTTPSCAFile         %CERTDIR%/ca.pem
    HTTPSRequireCert    TRUE
    Exec                parse_json();
</Input>

<Output output_file>
    Module              om_file
    File                '/path/to/output/file'
    Exec                to_json();
</Output>import json, base64, zlib, ssl, http.client
print('Loading function')
def lambda_handler(event, context):
compressed_logdata = base64.b64decode(event['awslogs']['data'])
logdata = zlib.decompress(compressed_logdata, 16+ zlib.MAX_WBITS)
context = ssl.SSLContext(ssl.PROTOCOL_TLSv1_2)
context.load_verify_locations("ca.pem")
# For more details regarding the SSLContext.load_cert_chain()
# function, please refer to Python's ssl module documentation at
# <https://docs.python.org/3/library/ssl.html#ssl.SSLContext>
context.load_cert_chain("client.pem")
conn = http.client.HTTPSConnection("<HOST>:<PORT>", context=context)
conn.set_debuglevel(3)
headers = {"Content-type": "application/json"}
conn.request('POST', "", logdata, headers)
conn.close()Amazon EC2
Amazon EC2 provides cloud-based virtual computing.
When running NXLog Agent in EC2 instances, it may be helpful to include the current instance ID in the collected logs. For more information about retrieving EC2 instance metadata and adding it to event data, see the Amazon Web Services section of the Cloud Instance Metadata chapter.
Amazon Simple Storage Service (S3)
Amazon S3 is a high-availability, low-latency storage service offered by Amazon. For more information, see the AWS Amazon S3 Overview.
Prerequisites
-
Create an IAM user in your AWS account and configure it as follows:
-
Select Access key - Programmatic access for AWS access type.
-
Select Attach existing policies directly for permissions and choose the AmazonS3FullAccess policy.
-
In the final step, take note of the Access key ID and Secret access key. Note that these credentials are only displayed once; if you lose them, you will need to generate new credentials.
-
-
Create a bucket if you are forwarding logs to Amazon S3.
Collecting logs from Amazon S3
This configuration uses the im_amazons3 input module to read logs from an Amazon S3 bucket. It expects log records in JSON format. It then converts the data back to JSON using the to_json() procedure, which enriches log records with the NXLog Agent core fields.
<Extension json>
    Module       xm_json
</Extension>

<Input s3_weblogs>
    Module       im_amazons3
    Region       eu-north-1
    Bucket       MYBUCKET
    Server       SRV01
    InputType    json (1)

    AccessKey    <YOUR_ACCESS_KEY> (2)
    SecretKey    <YOUR_SECRET_KEY>  (3)
</Input>

<Output file>
    Module       om_file
    File         '/tmp/weblogs'
    Exec         to_json();
</Output>| 1 | Sets the InputType directive to the xm_json module instance name to automatically parse log records into structured data. |
| 2 | The AccessKey directive specifies the AWS public access key ID. |
| 3 | The SecretKey directive specifies the AWS secret access key. |
{
  "id": 101,
  "EventTime": "2022-04-11 20:23:27",
  "URL": "https://www.example.com",
  "Title": "Example Domain",
  "Hostname": "PC1",
  "User": "jdoe"
}{
"EventReceivedTime": "2022-04-11T20:37:27.525134+02:00",
"SourceModuleName": "s3_weblogs",
"SourceModuleType": "im_amazons3",
"id": 101,
"EventTime": "2022-04-11T20:23:27.000000+02:00",
"URL": "https://www.example.com",
"Title": "Example Domain",
"Hostname": "PC1",
"User": "jdoe"
}Sending logs to Amazon S3
See AWS S3 buckets, objects, keys, and structure for information on the schema that NXLog Agent creates to store logs.
This configuration uses the im_file input module to read syslog messages from a file, and parses log records into structured data using the parse_syslog() procedure of the xm_syslog module. It then converts log records to JSON format using the to_json() procedure of the xm_json module and forwards the data to an Amazon S3 bucket using an om_amazons3 module instance.
<Extension syslog>
    Module       xm_syslog
</Extension>

<Extension json>
    Module       xm_json
</Extension>

<Input system_logs>
    Module       im_file
    File         '/var/log/syslog'
    Exec         parse_syslog();
</Input>

<Output s3_bucket>
    Module       om_amazons3
    Region       eu-north-1
    Bucket       MYBUCKET
    Server       SRV01

    AccessKey    <YOUR_ACCESS_KEY> (1)
    SecretKey    <YOUR_SECRET_KEY>  (2)
    Exec         to_json();
</Output>| 1 | The AccessKey directive specifies the AWS public access key ID. |
| 2 | The SecretKey directive specifies the AWS secret access key. |
Apr 11 18:41:35 server-1 systemd[1]: apt-daily-upgrade.service: Succeeded.{
"EventReceivedTime": "2022-04-11T18:41:51.091637+02:00",
"SourceModuleName": "system_logs",
"SourceModuleType": "im_file",
"SyslogFacilityValue": 1,
"SyslogFacility": "USER",
"SyslogSeverityValue": 5,
"SyslogSeverity": "NOTICE",
"SeverityValue": 2,
"Severity": "INFO",
"Hostname": "server-1",
"EventTime": "2022-04-11T18:41:35.000000+02:00",
"SourceName": "systemd",
"ProcessID": 1,
"Message": "apt-daily-upgrade.service: Succeeded."
}Verifying data in Amazon S3
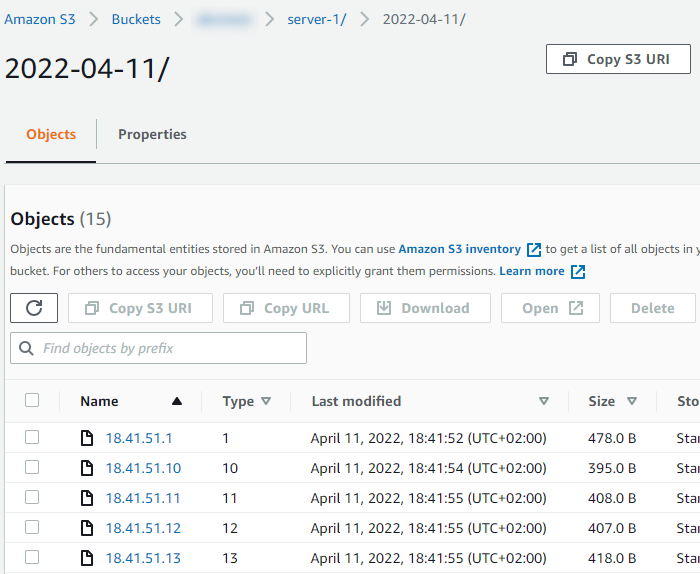
Reception of log data can be verified using the AWS Management Console:
-
Log in to your AWS Management Console.
-
Navigate to Services > Storage > S3.
-
Click on the name of your bucket under Buckets.
-
You should find a folder with the server name you specified in
s3_write.py. Click on the folder to list the objects in it.