.NET application logs
NXLog Agent can be used to capture logs directly from Microsoft .NET™ applications using third-party utilities. This guide demonstrates how to set up these utilities with a sample .NET application and a corresponding NXLog Agent configuration.
This guide uses the SharpDevelop IDE, but Microsoft Visual Studio™ on Windows, or MonoDevelop on Linux could also be used. The log4net package and log4net.Ext.Json extension are also required.
The following instructions were tested with SharpDevelop
5.1.0, .NET 4.5,
log4net 2.0.5, and
log4net.Ext.Json
1.2.15.14586. To use NuGet packages without the NuGet package
manager, simply download the file using the "Download"
link, add a .zip extension to the filename, and extract it.
|
-
Create a new Solution in SharpDevelop by selecting File > New > Solution and choosing the Console Application option. Enter a name and click Create.
-
Place the log4net and log4net.Ext.Json DLL files in the
bin\Debugdirectory of your project. -
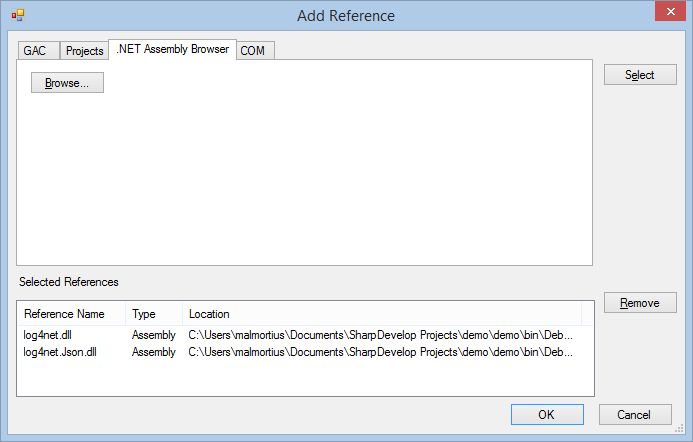
Select Project > Add Reference. Open the .NET Assembly Browser tab and click Browse. Add the two DLL files so that they appear in the Selected References list, then click OK.

-
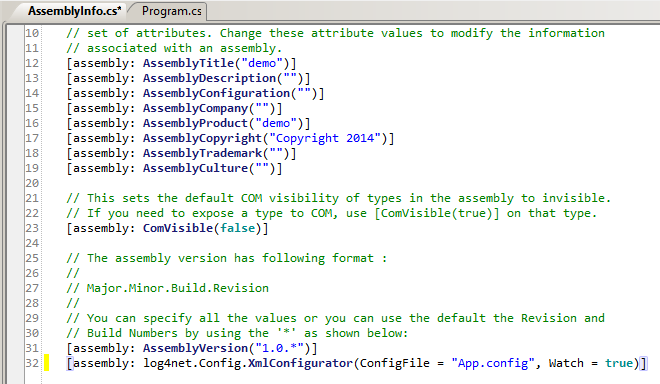
Edit the
AssemblyInfo.csfile (under Properties in the Projects sidebar) and add the following line.[assembly: log4net.Config.XmlConfigurator(ConfigFile = "App.config", Watch = true)]
-
Click the Refresh icon in the Projects sidebar to show all project files.
-
Create a file named
App.configin thebin\Debugfolder, open it for editing, and add the following code. Update theremoteAddressvalue of the with the IP address (or hostname) of the NXLog Agent instance.App.config<configuration> <configSections> <section name="log4net" type="log4net.Config.Log4NetConfigurationSectionHandler, log4net" /> </configSections> <log4net> <appender name="UdpAppender" type="log4net.Appender.UdpAppender"> <remoteAddress value="192.168.56.103" /> <remotePort value="514" /> <layout type="log4net.Layout.SerializedLayout, log4net.Ext.Json" /> </appender> <root> <level value="DEBUG"/> <appender-ref ref="UdpAppender"/> </root> </log4net> </configuration> -
Edit the
Program.csfile, and replace its contents with the following code. This loads the log4net module and creates some sample log messages.Program.csusing System; using log4net; namespace demo { class Program { private static readonly log4net.ILog mylog = log4net.LogManager.GetLogger(typeof(Program)); public static void Main(string[] args) { log4net.Config.BasicConfigurator.Configure(); mylog.Debug("This is a debug message"); mylog.Warn("This is a warn message"); mylog.Error("This is an error message"); mylog.Fatal("This is a fatal message"); Console.ReadLine(); } } } -
Configure NXLog Agent.
nxlog.conf<Extension _json> Module xm_json </Extension> <Input in> Module im_udp Host 0.0.0.0 Port 514 <Exec> $raw_event =~ s/\s+$//; # Parse JSON into fields for later processing if required parse_json(); </Exec> </Input> <Output out> Module om_file File "/tmp/output" </Output> <Route r> Path in => out </Route> -
In SharpDevelop, press the F5 key to build and run the application. The following output should appear.
Demo output4301 [1] DEBUG demo.Program (null) - This is a debug message 4424 [1] WARN demo.Program (null) - This is a warn message 4425 [1] ERROR demo.Program (null) - This is an error message 4426 [1] FATAL demo.Program (null) - This is a fatal message -
Examine the
/tmp/outputfile. It should show the sample log entries produced by the .NET application.NXLog Agent output{"date":"2014-03-19T09:41:08.7231787+01:00","Level":"DEBUG","AppDomain":"demo.exe","Logger":"demo.Program","Thread":"1","Message":"This is a debug message","Exception":""} {"date":"2014-03-19T09:41:08.8456254+01:00","Level":"WARN","AppDomain":"demo.exe","Logger":"demo.Program","Thread":"1","Message":"This is a warn message","Exception":""} {"date":"2014-03-19T09:41:08.8466327+01:00","Level":"ERROR","AppDomain":"demo.exe","Logger":"demo.Program","Thread":"1","Message":"This is an error message","Exception":""} {"date":"2014-03-19T09:41:08.8476223+01:00","Level":"FATAL","AppDomain":"demo.exe","Logger":"demo.Program","Thread":"1","Message":"This is a fatal message","Exception":""}
