Send Windows logs to Microsoft Sentinel
Microsoft Sentinel is Microsoft’s security information and event management (SIEM) solution, offered as a service within Microsoft Azure. Because of its presence within Azure and close integration with other Azure services, Microsoft refers to Sentinel as "a scalable, cloud-native, and security orchestration automated response (SOAR) solution." For more information about Microsoft Sentinel, see the Microsoft Sentinel documentation.
NXLog Agent can send security logs to Microsoft Sentinel using the Microsoft Sentinel (om_azuremonitor) module. NXLog Platform’s advanced log collection, processing, and forwarding capabilities make it the perfect all-in-one solution for sending logs to Microsoft Sentinel.
Prerequisites
-
A Microsoft Azure subscription
-
Understanding the Microsoft Sentinel authentication requirements, as explained in the Microsoft Azure Logs Ingestion (om_azuremonitor) documentation.
Configure Microsoft Sentinel
This section guides you through the steps to configure Microsoft Sentinel to accommodate logs from Windows Event Log.
Create a Microsoft Entra ID application registration
Follow the steps below to create a Microsoft Entra ID application registration:
-
On the Microsoft Azure home page, select App registrations.
-
On the App registration page, click + New registration.
-
In the free text field under Name, type a name for your application.
-
Click Register.
-
Take note of the Application (client) ID and the Directory (tenant) ID from the application Overview page. You will need these when configuring the
ClientIdandTenantIdin NXLog Agent.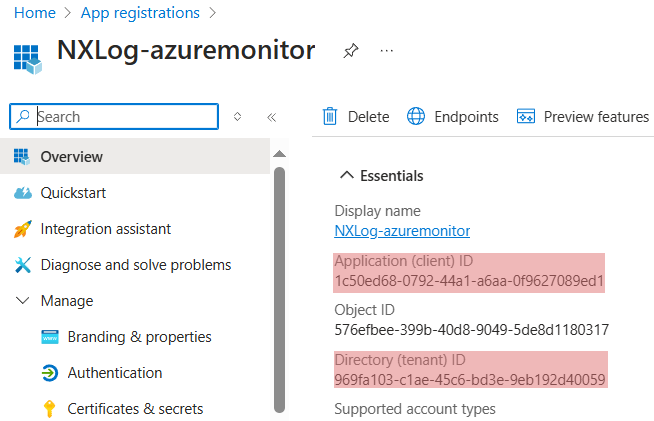
Configure authentication/Add credentials
You can use a client secret or a certificate to authenticate with Microsoft.
Set up a client secret
Follow these steps to use a client secret:
-
From the application page, expand Manage and select Certificates & secrets.
-
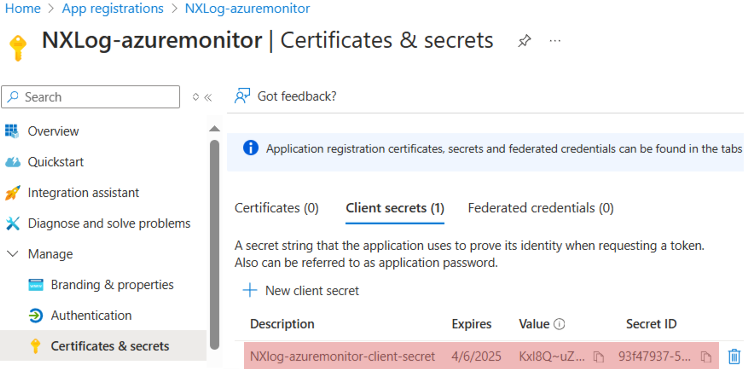
Select Client secrets, and then select + New client secret.
-
Provide a description and duration for the secret, then click Add.
-
Take note of your Secret ID.
Set up a certificate and private key pair
Follow these steps to use a certificate:
-
From the application page, expand Manage and select Certificates & secrets.
-
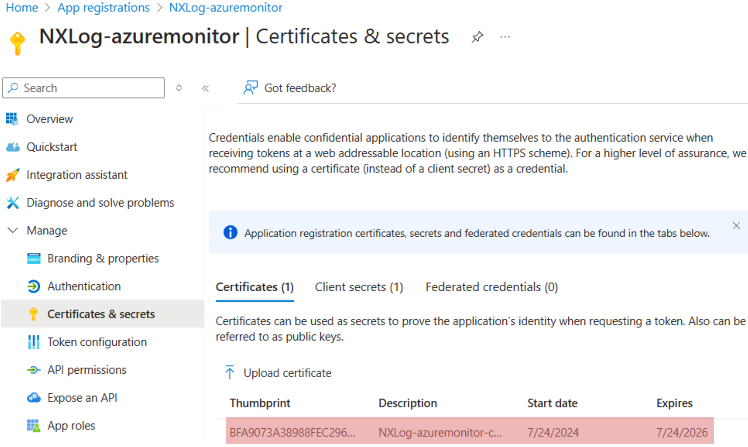
Select Certificates, select Upload certificate, and then select the certificate file to upload.
-
Click Add. Once the certificate is uploaded, the thumbprint, start date, and expiration values are displayed.
For testing purposes, you can use a self-signed certificate. The procedure for applying the certificate is the same as described above. To create a self-signed certificate, refer to Generate an X.509 certificate in the NXLog Agent Reference Manual.
Create a Resource group
-
On the Microsoft Azure home page, select Resource groups.
-
On the Resource groups page, click + Create.
-
Enter the following values:
-
Subscription: Select your Azure subscription.
-
Resource group: Enter a new resource group name.
-
Region: Select an Azure location.
-
-
Click Review + Create.
-
Click Create.
As a result, your Resource Group is created and visible within the list of Resource Groups.
Configure the Monitoring Metrics Publisher permissions
Follow the steps below to grant your Microsoft Entra ID application the Monitoring Metrics Publisher role on the new resource group:
-
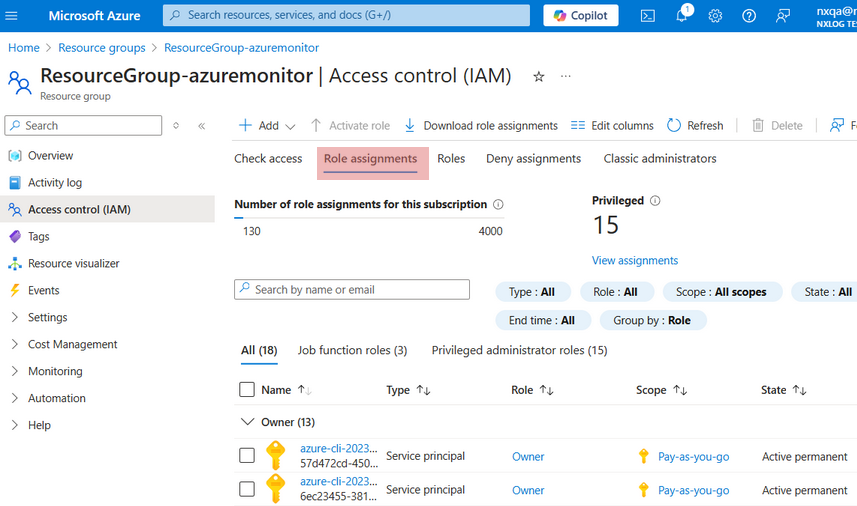
From Resource groups, select the newly created Resource group, then go to Access control (IAM), and click Add role assignment.
-
Search for and select the Monitoring Metrics Publisher role, then click Next.
-
On the Members tab, under the Members section, click Select members and search for the Microsoft Entra ID application created earlier.
-
Choose your application and click Select.
-
Click Review + assign.
As a result your role assignment will be visible under Role assignments.
Create a Log Analytics workspace
-
On the Microsoft Azure home page, select Log Analytics workspaces.
-
On the Log Analytics workspaces page, click + Create.
-
Enter the following values:
-
Subscription: Select your Azure subscription.
-
Resource group: Select the Resource group you created earlier.
-
Name: Give a sensible name to your Log Analytics workspace.
-
Region: Select your Azure location.
-
-
Click Review + Create, then click Create.
-
Wait for the deployment to complete, then click Go to resource.
-
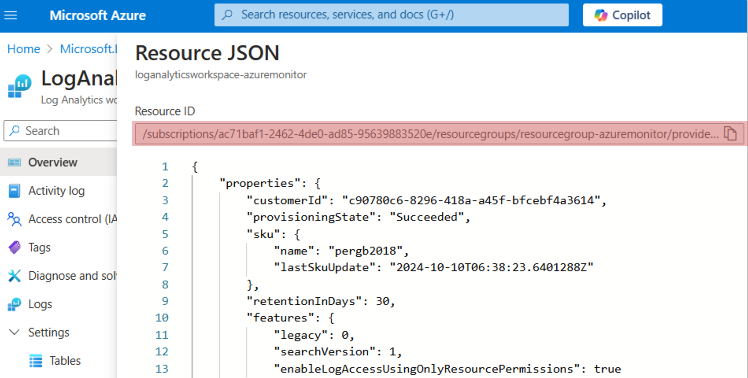
In the top right corner of the page, click JSON View and take note of the Resource ID displayed.
Create a new Data collection endpoint
-
On the Microsoft Azure home page, select Data collection endpoints.
-
On the Data collection endpoints page, click + Create.
-
Enter the following values:
-
Endpoint Name: Give a sensible name to your Data collection endpoint.
-
Subscription: Select your Azure subscription.
-
Resource group: Select the Resource group you created earlier.
-
Region: Select your Azure location.
-
-
Click Review + Create, then click Create. As a result, your Data collection endpoint is deployed. The Azure interface is redirecting you to the Data collection endpoint page.
-
Wait for the deployment to complete, then click on the data collection endpoint you created.
-
Take note of the Logs Ingestion URL displayed here.
-
In the top right corner of the page, click JSON View and take note of the Resource ID displayed.
Install Microsoft Sentinel
-
On the Microsoft Azure home page, select Microsoft Sentinel.
-
Search for and select Microsoft Sentinel.
-
Choose the Workspace you created earlier and click Add.
Import a custom NXLog DCR template
-
Download the JSON file that holds the custom deployment: windows-dcr-template.json.
-
On the Microsoft Azure home page, select Deploy a custom template.
-
Click Build your own template in the editor, then click Load file.
-
Browse to the location of the JSON file, select it, and then click Open.
-
Click Save.
-
In the Custom deployment page:
-
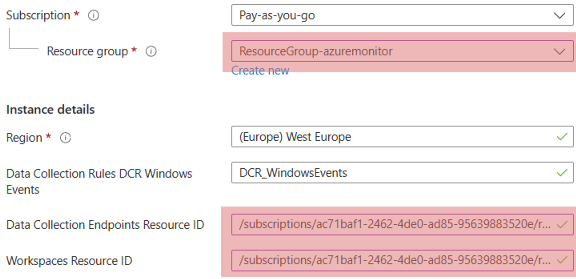
Select the Resource group you created earlier.
-
Enter the Data Collection Endpoints Resource ID you noted when creating the Data collection endpoint.
-
Enter the Workspace Resource ID you noted when creating the Log Analytics workspace.
-
-
Click Review + Create, then click Create. As a result, your Custom deployment is created. The Azure interface redirects you to its deployment page.
-
When the deployment is ready, click Go to resource.
-
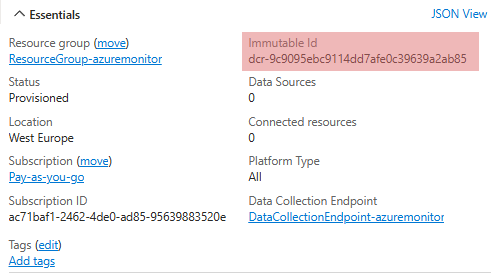
Take note of the Immutable Id in the top right corner.
Configure NXLog Agent to send data to Microsoft Sentinel
This part provides examples for sending logs to Microsoft Sentinel using both authentication methods discussed above.
This configuration collects Application, Security, and System logs from Windows Event Log using the im_msvistalog module.
It formats log records in JSON using the xm_json extension and sends them to Microsoft Sentinel with the om_azuremonitor module.
Authentication with Microsoft Sentinel is done using an App secret, which requires the ClientId, ClientSecret (an app secret), and TenantId directives.
The DcrImmutableId directive specifies the data collection rule to be used in Microsoft Sentinel.
<Input windows_events>  (1)
    Module            im_msvistalog
    <QueryXML>
        <QueryList>
            <Query Id='0'>
                <Select Path='Application'>*</Select>
                <Select Path='Security'>*</Select>
                <Select Path='System'>*</Select>
            </Query>
        </QueryList>
    </QueryXML>
</Input>

<Extension xm_json>
    Module            xm_json
</Extension>

<Output microsoft_sentinel>
    Module            om_azuremonitor
    API               LogsIngestion
    ClientId          8d7397d5-dedd-4884-8233-669e4113f75f  (2)
    ClientSecret      kzG8Q~uJNqpNXAOFx0JHshJ_Rre7b1WsZX9GtamC  (3)
    TenantId          969fa103-c1ae-45c6-bd3e-9eb192d40059  (4)
    URL               https://dce-azuremonitor-ip21.westeurope-1.ingest.monitor.azure.com   (5)
    DcrImmutableId    dcr-2de4b6f8c54e457ba6ab6e7c9ab0db25  (6)
    StreamName        Custom-WindowsEvents-Stream-01  (7)
    <Exec>  (8)
        $out_template = (
            'TimeGenerated' => $EventTime,
            'Computer' => $Hostname,
            'Channel' => $Channel,
            'EventData' => $Message,
            'EventID' => $EventID,
            'EventLevel' => $SeverityValue,
            'EventLevelName' => $Level,
            'EventRecordId' => $RecordNumber,
            'Keywords' => $Keywords,
            'Opcode' => $Opcode,
            'Provider' => $SourceName,
            'SystemProcessId' => $ExecutionProcessID
        );
        $raw_event = xm_json->to_json($out_template);
    </Exec>
</Output>

<Route route1>
    Path              windows_events => microsoft_sentinel
</Route>| 1 | The block collecting the logs from Windows Event Log. |
| 2 | The Application (client) ID you created here previously. |
| 3 | The Secret ID you created in this step. |
| 4 | The Directory (tenant) ID you created here previously. |
| 5 | The Logs Ingestion URL you took note of when creating the Data collection endpoint. |
| 6 | The Immutable Id you created above. |
| 7 | The stream name defined in the provided JSON file you uploaded in Import a custom NXLog DCR template. |
| 8 | Creates a new associative array ($out_template) where each field in the Windows Event Log is mapped to a custom field name. |
This configuration collects Application, Security, and System logs from Windows Event Log using the im_msvistalog module.
It formats log records in JSON using the xm_json extension and sends them to Microsoft Sentinel with the om_azuremonitor module.
Authentication with Microsoft Sentinel is done using OAuth 2.0 with a client certificate, which requires the ClientId, CertKeyFile (the path to the client certificate private key).
The TenantId and DcrImmutableId directives are used to specify the Microsoft Entra ID tenant and the data collection rule.
<Input windows_events>  (1)
    Module            im_msvistalog
    <QueryXML>
        <QueryList>
            <Query Id='0'>
                <Select Path='Application'>*</Select>
                <Select Path='Security'>*</Select>
                <Select Path='System'>*</Select>
            </Query>
        </QueryList>
    </QueryXML>
</Input>

<Extension xm_json>
    Module            xm_json
</Extension>

<Output microsoft_sentinel>
    Module            om_azuremonitor
    API               LogsIngestion
    ClientId          8d7397d5-dedd-4884-8233-669e4113f75f  (2)
    CertKeyFile       C:\Program Files\nxlog\cert\certkey.pem  (3)
    CertThumbprint    v6kHOjiYj+wpZzgHv0IuFyj405Y=  (4)
    TenantId          969fa103-c1ae-45c6-bd3e-9eb192d40059  (5)
    URL               https://dce-azuremonitor-ip21.westeurope-1.ingest.monitor.azure.com  (6)
    DcrImmutableId    dcr-2de4b6f8c54e457ba6ab6e7c9ab0db25  (7)
    StreamName        Custom-WindowsEvents-Stream-01  (8)
    <Exec>  (9)
        $out_template = (
            'TimeGenerated' => $EventTime,
            'Computer' => $Hostname,
            'Channel' => $Channel,
            'EventData' => $Message,
            'EventID' => $EventID,
            'EventLevel' => $SeverityValue,
            'EventLevelName' => $Level,
            'EventRecordId' => $RecordNumber,
            'Keywords' => $Keywords,
            'Opcode' => $Opcode,
            'Provider' => $SourceName,
            'SystemProcessId' => $ExecutionProcessID
        );
        $raw_event = xm_json->to_json($out_template);
    </Exec>
</Output>

<Route route1>
    Path              windows_events => microsoft_sentinel
</Route>| 1 | The block collecting the logs from Windows Event Log. |
| 2 | The Application (client) ID you created here previously. |
| 3 | The path of the private key file that was used to generate the certificate you created here |
| 4 | The Thumbprint you created in this step. |
| 5 | The Directory (tenant) ID you created here previously. |
| 6 | The Logs Ingestion URL you took note of when creating the Data collection endpoint. |
| 7 | The Immutable Id you created above. |
| 8 | The stream name defined in the provided JSON file you uploaded in Import a custom NXLog DCR template. |
| 9 | Creates a new associative array ($out_template) where each field in the Windows Event Log is mapped to a custom field name. |
Verifying data reception in Microsoft Sentinel
If you configured everything correctly, you should see your logs in Microsoft Sentinel.
-
On the Microsoft Azure home page, select Microsoft Sentinel.
-
Click on your Microsoft Sentinel instance.
-
Select Logs.
-
Select your Time range, then click Run to run a search query.
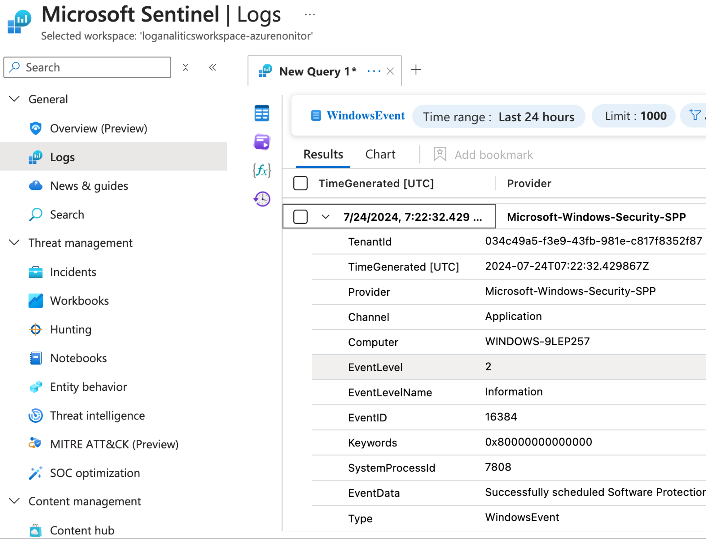
As a result, you should see your ingested logs, as seen in the image below:
