
Apple macOS
This page describes the steps for installing and upgrading NXLog Agent on Apple macOS.
Installing NXLog Agent
Follow these steps to install NXLog Agent on Apple macOS. You will need administrator privileges to complete the installation process.
First, download the appropriate NXLog Agent installer file from the NXLog website.
-
Log in to your account, then click My account at the top of the page.
-
Under the Downloads > NXLog Agent files tab, choose the correct package for your system.
Table 1. Available NXLog Agent macOS installers Platform Package macOS (arm)
nxlog-6.2.9212_macos_arm64.pkg
macOS (x86)
nxlog-6.2.9212_macos_x86_64.pkg
The NXLog Agent installer packages are digitally signed. See Verify the signature of the macOS installer for further details. -
Optional: To change the NXLog Agent user and group for the installation, create a
/tmp/.nxlogfile with the following command. During installation, a new user and a new group will be created using the values specified in this command. They will be used for the User and Group directives innxlog.conf, and to set ownership of the/opt/nxlogdirectory. Specifying an already existing user or group is not supported. The created user and group will be deleted when you uninstall NXLog Agent.$ echo 'nxlog2:nxlog2' > /tmp/.nxlog -
Install NXLog Agent. You can execute the installation interactively or from the command line.
-
To install interactively, double-click the NXLog Agent package.
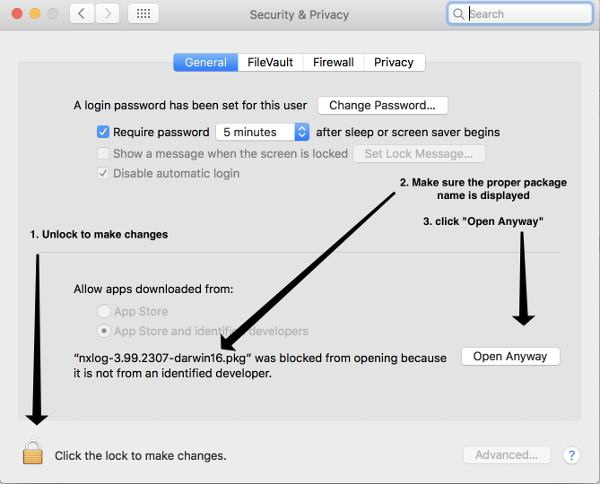
NXLog Agent installer packages are signed with our developer certificate. However, if you see the following message, go to System Preferences > Security & Privacy and click Open Anyway, then follow the instructions shown by the installer.
"nxlog-6.2.9212_macos.pkg" can’t be opened because it is from an unidentified developer.
-
To install the package using the command line, run the following command.
$ sudo installer -pkg nxlog-6.2.9212_macos.pkg -target /
Password:
installer: Package name is nxlog-6.2.9212-macos-x86
installer: Upgrading at base path /
installer: The install was successful.
The target volume is specified by
/in the example above. However, the installer supports alternate target volumes.By default, all NXLog Agent files are copied to
/opt/nxlog. To specify a custom installation directory, create an XML file with the following contents, replacing/opt/nxlogcustomwith your preferred directory:choices.xml<?xml version="1.0" encoding="UTF-8"?> <!DOCTYPE plist PUBLIC "-//Apple//DTD PLIST 1.0//EN" "http://www.apple.com/DTDs/PropertyList-1.0.dtd"> <plist version="1.0"> <array> <dict> <key>attributeSetting</key> <string>/opt/nxlogcustom</string> <key>choiceAttribute</key> <string>customLocation</string> <key>choiceIdentifier</key> <string>com.nxlog.agent</string> </dict> </array> </plist>Once you create the directory for the alternative installation directory, invoke the command line installer with the path and name of the XML file:
$ sudo mkdir -p /opt/nxlogcustom
$ sudo installer -pkg nxlog-6.2.9212_macos.pkg -target / -applyChoiceChangesXML ./choices.xml
The
launchd(8)script is installed in/Library/LaunchDaemons/com.nxlog.plistand has theKeepAliveflag set totrue(launchdwill automatically restart NXLog Agent). NXLog Agent log files are managed bylaunchdand can be found in/var/log/. -
-
Configure NXLog Agent by editing
/opt/nxlog/etc/nxlog.conf. See Log collection in the NXLog Platform User Guide for more information and configuration examples. -
Verify the configuration file syntax.
$ sudo /opt/nxlog/bin/nxlog -v 2017-03-17 08:05:06 INFO configuration OK -
To apply your changes, stop NXLog Agent with the following command. The
launchdmanager will restart the daemon and the new configuration will be loaded.$ sudo launchctl stop com.nxlog -
To permanently stop NXLog Agent, you must unload the service.
$ sudo launchctl unload -w /Library/LaunchDaemons/com.nxlog.plist -
Use the following command to start NXLog Agent and permanently enable the service.
$ sudo launchctl load -w /Library/LaunchDaemons/com.nxlog.plist
Upgrading NXLog Agent
Follow the installation instructions to upgrade NXLog Agent.
The installation script will not modify the existing configuration files. However, we recommend making a backup of the configuration files before starting this process. After the installation is complete, NXLog Agent will restart automatically.
| The same user and group will be used for the upgrade as was used for the original installation. See installation user and group above. Changing to a different user and group during an upgrade is not supported. |
Changing the installation directory during the upgrade is not supported. If you want to change the installation directory:
-
Back up the existing configuration files, certificates, and any other files in the installation directory by copying them to another location.
-
Uninstall NXLog Agent by following the instructions below.
-
Install NXLog Agent to the new installation directory by following the installation instructions.
-
Copy the configuration files you backed up to the new installation directory.
Uninstalling NXLog Agent
Follow these steps to uninstall NXLog Agent
-
Start the uninstaller script as user
root.This will remove custom configuration files, certificates, and any other files in the listed directories. Save these files to another location first if you do not wish to discard them. $ sudo bash /opt/nxlog/bin/uninstaller -yUse the -nswitch (instead of-y) if you would like to preserve user data. -
Delete user data if you are sure it will not be needed anymore.
$ sudo rm -rf /opt/nxlog
Follow the steps below to manually uninstall NXLog Agent.
-
Unload the daemon.
$ sudo launchctl unload /Library/LaunchDaemons/com.nxlog.plist -
Delete the
nxloguser and group that were created during installation. If you used a custom user/group during the installation, remove those instead. See installation user and group above.$ sudo dscl . -delete "/Groups/nxlog" $ sudo dscl . -delete "/Users/nxlog" -
Remove the NXLog Agent files.
This will remove custom configuration files, certificates, and any other files in the listed directories. Save these files to another location first if you do not wish to discard them. $ sudo rm -rf /opt/nxlog /Library/LaunchDaemons/com.nxlog.plist \ /var/log/nxlog.std* && \ sudo pkgutil --forget com.nxlog.agent