
Microsoft Defender for Identity
Microsoft Defender for Identity is a cloud-based security solution that detects and investigates advanced threats, compromised identities, and malicious insider actions within Active Directory domains. It provides the following functionality:
-
Monitoring of user and entity behavior
-
Protection of user identities and credentials stored in Active Directory
-
Identification and investigation of suspicious user activity and advanced attacks throughout the kill chain
-
Notification capabilities
For the sake of brevity, this guide will refer to Microsoft Defender for Identity as MDI.
Using NXLog with Microsoft Defender for Identity
MDI is limited to sending security alerts via email or syslog messages. This may pose a challenge when logs need to be forwarded to a third-party SIEM or a log analytics service that requires a different format.
With its rich feature set, NXLog provides superior log processing and log enrichment capabilities. It can also output logs in a wide range of formats such as JSON and XML. It can receive events from MDI using the im_tcp, im_udp or im_ssl input modules, parse them into structured data, and forward events as needed.
Also, since MDI is a cloud service, there might be other security concerns too, especially when forwarding events to an on-site SIEM or analytics solution that resides within your corporate network. In this case, you would be required to expose your on-site SIEM server to the internet, which is less than ideal. However, you can use NXLog to act as an on-site relay exposing it to the internet instead. Exposing a single relay agent devoid of any sensitive data to the internet is a much better approach for minimizing risk.
Setting up Microsoft Defender for Identity
For instructions on how to create an MDI instance, see the Microsoft Quickstart: Create your Microsoft Defender for Identity instance.
To start monitoring an Active Directory domain, an MDI sensor needs to be installed in the domain either on the Domain Controller or on a standalone server that is a member of the domain. The former is preferable because it provides network, Windows Event Log, and event tracing (ETW) data collection and analysis, whereas the standalone sensor only provides support for network and Windows Event Log data. For instructions on how to install the sensor, see the Microsoft Quickstart: Download the Microsoft Defender for Identity sensor setup package.
Once the installation is complete, you need to configure MDI Notifications. In the following example, we will show how to set up syslog notifications.
To configure MDI sensors to forward syslog messages to NXLog, follow these steps.
-
Log in to the MDI portal by going to
https://<instance_name>.atp.azure.com/. -
Navigate to Configuration > Notifications.
-
In the Syslog notifications section, click Configure.

-
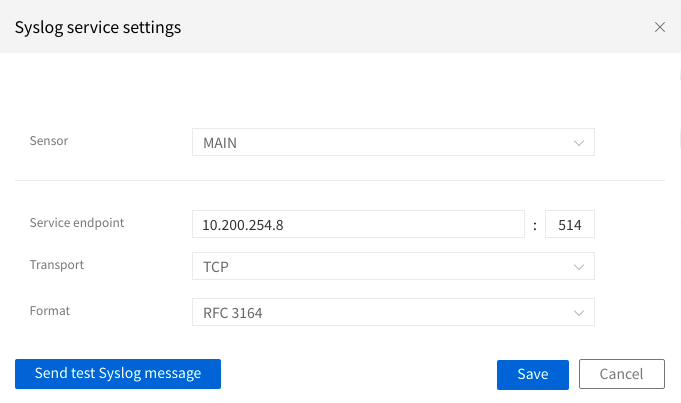
On the Syslog service settings dialog window, select the sensor and provide the endpoint address and port NXLog will listen on. Select the network (TCP, TLS, or UDP) protocol for relaying data and the syslog format (RFC 3164 or RFC 5424). Save the configuration.
|
If you have already configured NXLog, you can test the connection between MDI and NXLog. In the Syslog service settings dialog window, click Send test Syslog message. When successfully connected, NXLog will capture a syslog message similar to this. <119>May 24 12:11:03 MAIN CEF:0|Microsoft|Azure ATP|2.147.14073.49253|TestMessage|TestMessage|0|msg=Test message externalId=0 |
Configuring NXLog to receive data from Defender for Identity
The following example demonstrates how to process syslog-formatted messages that MDI sensors send.
Below is a sample User and IP address reconnaissance (SMB) alert sent by an MDI sensor.
<36>May 24 14:49:49 MAIN CEF:0|Microsoft|Azure ATP|2.148.14089.56229|EnumerateSessionsSecurityAlert|User and IP address reconnaissance (SMB)|5|start=2021-05-24T14:46:55.1581610Z app=SrvSvc shost=USER-PC msg=John Doe on USER-PC enumerated SMB sessions on MAIN, retrieving recent IP addresses of johndoe (192.168.31.152). externalId=2012 cs1Label=url cs1=https://user.atp.azure.com/securityAlert/068dd41a-cad8-40e5-b905-d533c3815d17 cs2Label=trigger cs2=update cs3Label=mSecUrl cs3=https://security.microsoft.com/alerts/aa068dd41a-cad8-40e5-b905-d533c3815d17This NXLog configuration uses the im_tcp input module to receive syslog messages over TCP.
In order to parse syslog messages containing CEF-formatted content, the xm_syslog and xm_cef extension modules need to be loaded.
This enables us to call the parse_syslog_bsd() procedure needed for parsing syslog (RFC 3164) message content.
For parsing the CEF-formatted content in the $Message field, we can call the parse_cef() procedure.
There are two output instances configured, the first uses the om_http module to forward the alerts over HTTP, while the second utilizes the om_file module to save data locally to file. In both cases, the alerts are formatted as JSON using the xm_json module and its corresponding to_json() procedure.
<Extension syslog>
    Module            xm_syslog
</Extension>

<Extension json>
    Module            xm_json
</Extension>

<Extension cef>
    Module            xm_cef
</Extension>

<Input from_syslog>
    Module            im_tcp
    ListenAddr        0.0.0.0:514
    <Exec>
        parse_syslog_bsd();
        parse_cef($Message);
        delete($Message);
    </Exec>
</Input>

<Output to_http>
    Module            om_http
    URL               https://server:8080/
    Exec              to_json();
</Output>

<Output to_file>
    Module            om_file
    File              '/tmp/output'
    Exec              to_json();
</Output>

<Route r1>
    Path              from_syslog => to_http, to_file
</Route>
This sample shows the JSON-formatted output that NXLog produces after parsing and processing.
{
  "EventReceivedTime": "2021-05-24T21:03:22.461722+03:00",
  "SourceModuleName": "from_file",
  "SourceModuleType": "im_file",
  "SyslogFacilityValue": 4,
  "SyslogFacility": "AUTH",
  "SyslogSeverityValue": 4,
  "SyslogSeverity": "WARNING",
  "SeverityValue": 3,
  "Severity": "WARNING",
  "Hostname": "MAIN",
  "EventTime": "2021-05-24T14:49:49.000000+03:00",
  "SourceName": "CEF",
  "CEFVersion": 0,
  "CEFDeviceVendor": "Microsoft",
  "CEFDeviceProduct": "Azure ATP",
  "CEFDeviceVersion": "2.148.14089.56229",
  "CEFSignatureID": "EnumerateSessionsSecurityAlert",
  "CEFName": "User and IP address reconnaissance (SMB)",
  "CEFSeverity": 5,
  "start": "2021-05-24T17:46:55.158161+03:00",
  "app": "SrvSvc",
  "shost": "USER-PC",
  "msg": "John Doe on USER-PC enumerated SMB sessions on MAIN, retrieving recent IP addresses of johndoe (192.168.31.152).",
  "externalId": "2012",
  "cs1Label": "url",
  "cs1": "https://user.atp.azure.com/securityAlert/068dd41a-cad8-40e5-b905-d533c3815d17",
  "cs2Label": "trigger",
  "cs2": "update",
  "cs3Label": "mSecUrl",
  "cs3": "https://security.microsoft.com/alerts/aa068dd41a-cad8-40e5-b905-d533c3815d17"
}