Solarwinds Loggly
This guide explains how to collect and parse logs with NXLog so that they can be forwarded to Loggly.
Solarwinds Loggly is a cloud-based log analysis and monitoring service. NXLog can be configured to send log data to Loggly in Syslog format over TCP, or via the Loggly API using HTTP(S).
The Loggly Customer Token
Loggly requires a customer token to be included with each event sent to its service. This token is an alpha-numeric string which is generated when a Loggly account is created and it can be found on the Source Setup > Customer Tokens page of the Loggly web interface. For more information, refer to the Loggly documentation about the Customer Token.
- Example Loggly customer token
-
69af9e44-e002-4f67-8777-7b3b93ab0297
The NXLog configuration will need this token for sending log data to Loggly.
Sending Logs to Loggly Using TCP
Syslog is the most common way to send data to Loggly. NXLog can be configured to send data in IETF Syslog (RFC5424) format using the xm_syslog module.
When using this method, the customer token and any custom tags need to be included in the structured data section of the Syslog message.
In the configuration below, NXLog processes a log file using the im_file module, generates a Syslog message using the xm_syslog module, and sends it to Loggly using the om_tcp module. The log data is formatted as JSON using the xm_json module. Logs are given the tag linux to make them easily searchable in Loggly.
The CUSTOMER_TOKEN value needs to be replaced with an actual Loggly
customer token. In this example, processing is done
in the output instance where the NXLog ID in the structured data
of the Syslog message is replaced with the customer token defined by the
CUSTOMER_TOKEN constant.
define CUSTOMER_TOKEN xxxx-xxx-xxxx-xxxx-xxxx

<Extension json>
    Module    xm_json
</Extension>

<Extension syslog>
    Module    xm_syslog
</Extension>

<Input file>
    Module    im_file
    File      "/var/log/file"
    Exec      parse_syslog();
    Exec      $Message = to_json();
</Input>

<Output loggly_tcp>
    Module    om_tcp
    Host      logs-01.loggly.com:514
    Exec      to_syslog_ietf();
    Exec      $raw_event =~ s/(\[NXLOG@14506.*?\])//g; \
              $raw_event = replace($raw_event, \
              '{', '[%CUSTOMER_TOKEN%@41058 tag="linux"] {', 1);
</Output>The following is a sample of the Syslog header that will be sent to Loggly. The structured data includes the customer token and tag as specified in the NXLog configuration.
<13>1 2020-11-26T06:41:43 NXLog-Ubuntu-1 dbus-daemon 3540 -
[xxxx-xxxx-xxxx-xxxx-xxxx@41058 tag="linux"]
The JSON formatted log sample below will be sent as part of the Syslog message to the Loggly service.
{
  "EventReceivedTime": "2020-11-26 08:22:43",
  "SourceModuleName": "file",
  "SourceModuleType": "im_file",
  "SyslogFacilityValue": 1,
  "SyslogFacility": "USER",
  "SyslogSeverityValue": 5,
  "SyslogSeverity": "NOTICE",
  "SeverityValue": 2,
  "Severity": "INFO",
  "Hostname": "NXLog-Ubuntu-1",
  "EventTime": "2020-11-26 06:41:43",
  "SourceName": "dbus-daemon",
  "ProcessID": "3540",
  "Message": "Successfully activated service 'org.gnome.Terminal'"
}Logs can be sent securely to Loggly using TLS encryption. To be able to make use of TLS, the Loggly certificate file needs to be downloaded and placed in a location that can be accessed by NXLog.
The configuration below uses the im_msvistalog module to collect events from the Windows Event Log, generates a Syslog message using the xm_syslog module, and sends it to Loggly using the om_ssl module. The event data is formatted in JSON using the xm_json module. Events are given the tag windows to make them easily searchable in Loggly.
The CUSTOMER_TOKEN value needs to be replaced with an actual Loggly
customer token. In this example, processing is done
in the output instance where the customer token defined by the
CUSTOMER_TOKEN constant is inserted before the JSON data.
The CERTDIR value needs to be replaced with the actual path to the Loggly
certificate.
define CERTDIR C:\Program Files\nxlog\cert

define CUSTOMER_TOKEN xxxx-xxx-xxxx-xxxx-xxxx

<Extension json>
    Module            xm_json
</Extension>

<Extension syslog>
    Module            xm_syslog
</Extension>

<Input eventlog>
    Module            im_msvistalog
    <QueryXML>
        <QueryList>
            <Query Id='0'>
                <Select Path="System">*[System[(Level=1  or Level=2)]]</Select>
            </Query>
        </QueryList>
    </QueryXML>
    Exec              $Message = to_json();
</Input>

<Output loggly_tls>
    Module            om_ssl
    Host              logs-01.loggly.com:6514
    CAFile            %CERTDIR%\logs-01.loggly.com_sha12.crt
    AllowUntrusted    FALSE
    Exec              to_syslog_ietf();
    Exec              $raw_event =~ s/(\[.*])//g; \
                      $raw_event = replace($raw_event, \
                      '{', '[%CUSTOMER_TOKEN%@41058 tag="windows"] {', 1);
</Output>The following is a sample of the Syslog header that will be sent to Loggly. The structured data includes the customer token and tag as specified in the NXLog configuration.
<11>1 2020-11-26T11:09:30.592060Z Hopper VBoxNetLwf 0 -
[xxxx-xxxx-xxxx-xxxx-xxxx@41058 tag="windows"]
The JSON formatted sample event below will be sent as part of the Syslog message to the Loggly service.
{
  "EventTime": "2020-11-26 12:09:30",
  "Hostname": "Hopper",
  "Keywords": "36028797018963968",
  "EventType": "ERROR",
  "SeverityValue": 4,
  "Severity": "ERROR",
  "EventID": 12,
  "SourceName": "VBoxNetLwf",
  "TaskValue": 0,
  "RecordNumber": 44000,
  "ExecutionProcessID": 0,
  "ExecutionThreadID": 0,
  "Channel": "System",
  "Message": "The driver detected an error on \\Device\\VBoxNetLwf.",
  "Data": "\\Device\\VBoxNetLwf",
  "EventData.Binary": "00000C0001000000000000000C0004",
  "EventReceivedTime": "2020-11-26 13:19:02",
  "SourceModuleName": "eventlog",
  "SourceModuleType": "im_msvistalog"
}
Sending Logs to Loggly Using HTTPS
As part of their API, Loggly provides two HTTP(S) endpoints that accept log data, one for sending single log records and another to send logs in batches. NXLog can be configured to send logs to Loggly over HTTPS using the om_http module. Data can be sent as plaintext, JSON, or any of the log formats supported by automated parsing. Refer to the Loggly documentation for a list of supported log types.
When logs are sent over HTTPS, the Loggly customer token and any custom tags need to be included as part of the URL.
To send data to Loggly using HTTPS, the Loggly certificate file needs to be downloaded and placed in a location accessible to NXLog.
In the configuration below, NXLog will send a POST request for every log record it processes. The events are given the tag http to make them easily searchable in Loggly. This method is suited for low volume log sources where a considerable amount of time elapses between each new event. For high volume logging, see the configuration for sending logs in batches.
The CUSTOMER_TOKEN value needs to be replaced with an actual Loggly
customer token.
The HTTPSCAFile directive needs to specify the actual path and filename of
the Loggly certificate.
define CUSTOMER_TOKEN xxxx-xxx-xxxx-xxxx-xxxx

<Output loggly_http>
    Module         om_http
    URL            https://logs-01.loggly.com/inputs/%CUSTOMER_TOKEN%/tag/http/
    HTTPSCAFile    /opt/nxlog/cert/logs-01.loggly.com_sha12.crt
</Output>In the configuration below, NXLog will POST log data to Loggly in
batches. The events are given the tag http to make them
easily searchable in Loggly. The BatchMode
directive in the output block needs to be set to multiline, to specify that
each log record should be separated by a new line.
The Loggly bulk endpoint supports up to 1MB per event and a maximum of 5MB per batch. For simplicity, this example uses the default NXLog batch settings. For further configuration options, see the BatchSize and BatchFlushInterval directives.
The CUSTOMER_TOKEN value needs to be replaced with an actual Loggly
customer token.
The HTTPSCAFile directive needs to specify the actual path and filename of
the Loggly certificate.
define CUSTOMER_TOKEN xxxx-xxx-xxxx-xxxx-xxxx

<Output loggly_http>
    Module         om_http
    URL            https://logs-01.loggly.com/bulk/%CUSTOMER_TOKEN%/tag/http/
    BatchMode      multiline
    HTTPSCAFile    /opt/nxlog/cert/logs-01.loggly.com_sha12.crt
</Output>| It may take a few minutes for data to be indexed and shown in the Loggly web interface. If not, see the Loggly documentation on troubleshooting HTTP. |
Verifying Data in Loggly
Reception of log data can be verified using the Loggly web interface.
One way to do this is to search for events using the custom tag as specified in the NXLog configuration. Navigate to the Logs > Log Explorer page and type tag:<mytag> in the search field.
More advanced searches can be done on other event fields.
For more information, refer to the Loggly search query language documentation.
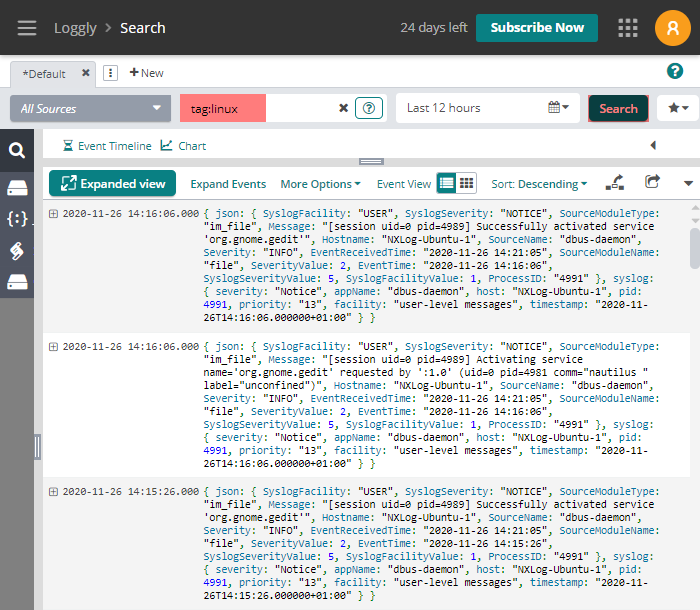
The image below shows events filtered by the linux tag.

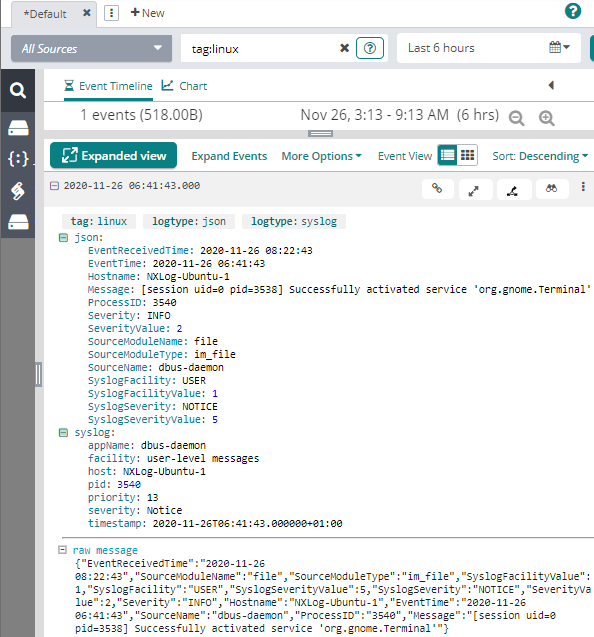
The image below shows a Syslog event in JSON format that was sent to Loggly as a Syslog message over TCP.

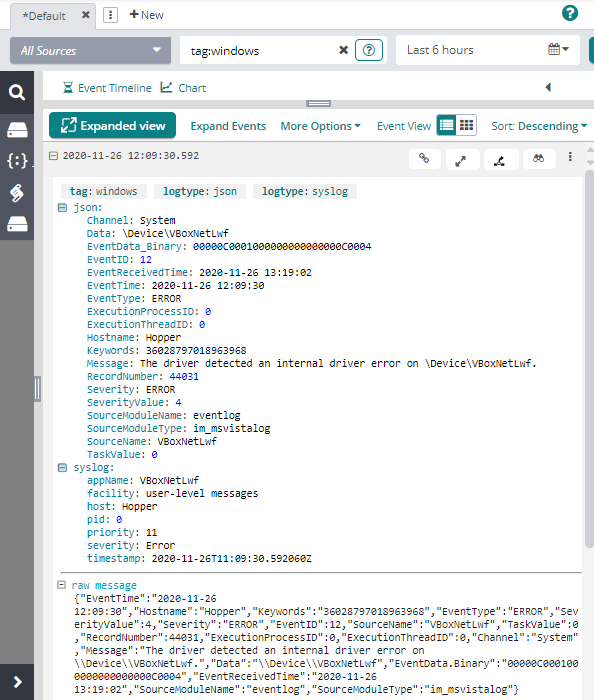
The image below shows a Windows Event Log event in JSON format that was sent to Loggly as a Syslog message.

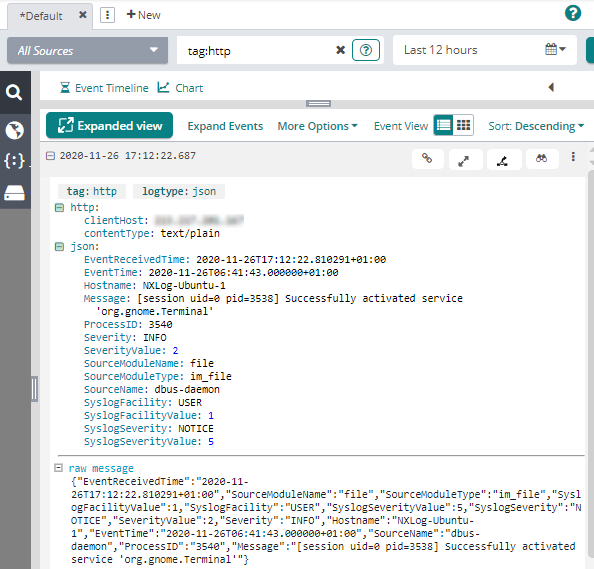
The image below shows a Syslog event in JSON format that was sent to Loggly via HTTPS.

Events can be exported from Loggly in three formats:
-
JSON - all event fields are returned as a JSON object
-
CSV - all event fields are returned as comma-separated values
-
Raw - log data is returned in its original format
The following is a sample Windows Event Log event exported from Loggly in JSON format. The original event was sent to Loggly by NXLog as a Syslog message.
{
  "total_events": 1,
  "page": 0,
  "events": [
    {
      "timestamp": 1606388970592,
      "unparsed": null,
      "event": {
        "syslog": {
          "severity": "Error",
          "facility": "user-level messages",
          "timestamp": "2020-11-26T11:09:30.592060Z",
          "appName": "VBoxNetLwf",
          "pid": 0,
          "priority": "11",
          "host": "Hopper"
        },
        "json": {
          "ExecutionProcessID": 0,
          "EventID": 12,
          "EventTime": "2020-11-26 12:09:30",
          "EventData_Binary": "00000C0001000000000000000C0004",
          "Severity": "ERROR",
          "RecordNumber": 44031,
          "SourceModuleType": "im_msvistalog",
          "SourceName": "VBoxNetLwf",
          "EventType": "ERROR",
          "SourceModuleName": "eventlog",
          "Hostname": "Hopper",
          "ExecutionThreadID": 0,
          "TaskValue": 0,
          "Keywords": "36028797018963968",
          "SeverityValue": 4,
          "Message": "The driver detected an error on \\Device\\VBoxNetLwf.",
          "Data": "\\Device\\VBoxNetLwf",
          "Channel": "System",
          "EventReceivedTime": "2020-11-26 13:19:02"
        }
      }
    }
  ]
}
