We recommend contacting us to schedule a session with one of our engineers to walk you through the migration process.

Prerequisites
Before migrating agents, your environment must meet the following requirements to ensure a smooth migration process.
-
Ensure your NXLog Agent instances are running a supported version. NXLog Platform supports the following versions:
-
NXLog Agent 5.10 or later.
-
NXLog Agent 6.2 or later.
-
-
You must have NXLog Manager version 5.8.6294 or later.
-
Verify network connectivity between the NXLog Agent instances and NXLog Platform. NXLog Platform accepts agent connections on TCP port 5515 by default. You can change NXLog Platform’s agent listening port to keep the same port as NXLog Manager.
-
If you use your own Certificate Authority (CA), ensure you configure NXLog Platform with your CA certificate.
1. Update NXLog Manager templates
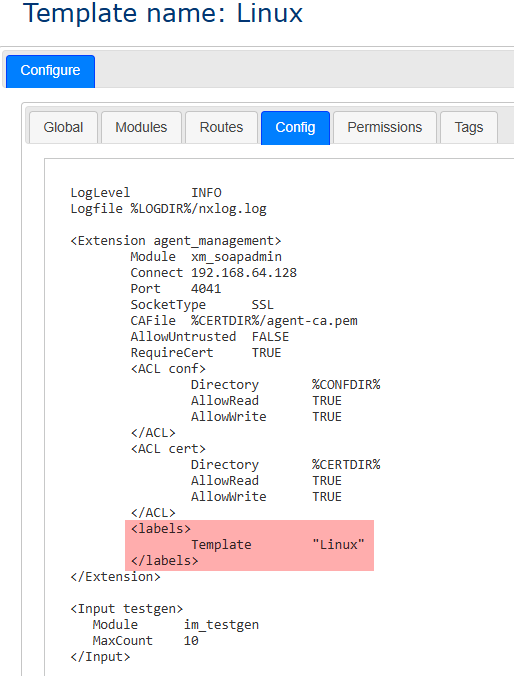
The first step in migrating to NXLog Platform is to update your NXLog Manager configuration templates. Once you save the template, NXLog Manager automatically adds an agent label, which we will use enroll agents to NXLog Platform automatically. You can do this manually via the NXLog Manager UI or CLI.
- Option 1: Manually
-
-
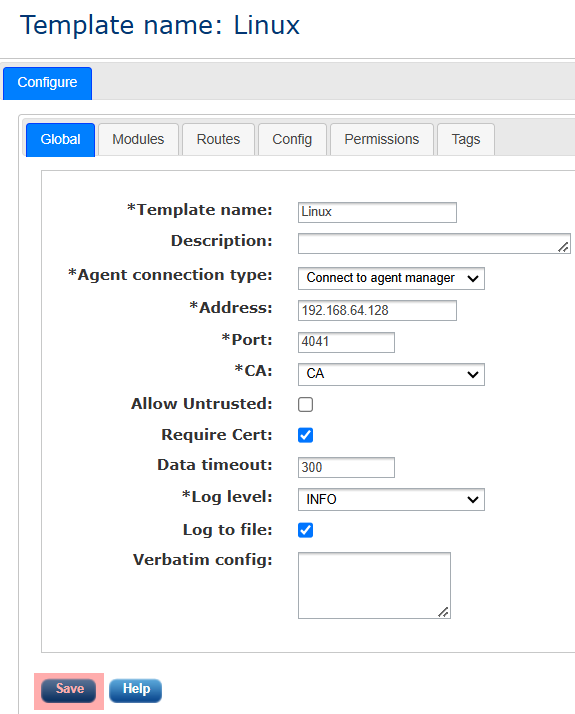
Open NXLog Manager and navigate to Agents > Agent templates.
-
Click on the template name and then click Save.
-
Click on the Config tab and verify that the template now includes an agent label.
-
Repeat the above steps for each template.
-
- Option 2: Via CLI
-
-
Execute the following command to back up the NXLog Manager database. We recommend you do not skip this step.
$ sudo mysqldump -u nxlog-manager5 -p nxlog-manager5 | bzip2 > nxlog-manager-db.sql.bz2The default password is
nxlog-manager5. -
Connect to the database.
$ sudo mysql -u nxlog-manager5 -p nxlog-manager5 -
Execute the following SQL statement to update all the templates:
UPDATE NXAgent
SET global_config =  REPLACE(global_config,'</verbatim>', concat('</verbatim>
    <template-name>', NXAgent.name, '</template-name>'))
WHERE global_config not LIKE '%template-name%' and type = 'TEMPLATE';
-
2. Migrate existing configurations
The next step is to copy your existing configuration templates from NXLog Manager to NXLog Platform. You must perform this step manually.
We recommend validating the exported configuration in a lab setting, as in some instances, you may encounter syntax errors that require adjusting the configuration.
-
Log in to NXLog Platform and navigate to Agents > Configurations.
-
Click the Add configuration button.
-
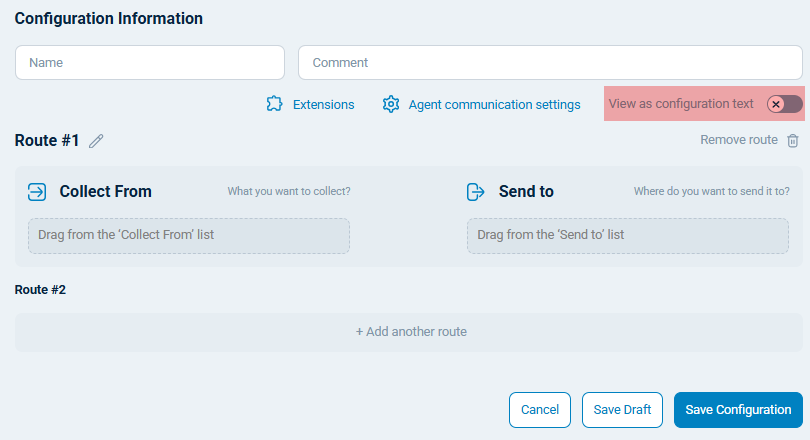
Switch the configuration to text view.
-
Copy the configuration from the NXLog Manager template, excluding the
xm_soapadminmodule instance and the lines above it. -
Give the configuration the same name as the NXLog Manager template and click Save Configuration.
-
Repeat the above steps for each template.
| Watch a demo of migrating templates from NXLog Manager to NXLog Platform in this video. |
3. Create auto-enrollment rules
NXLog Platform auto-enrollment rules automate the process of enrolling and configuring NXLog Agent instances. Using these rules ensures you do not disrupt the log collection process.
-
Open NXLog Platform and navigate to Agents > Auto-enroll.
-
Click the Add Rule button.
-
Create a rule for each template using the
labels/templateproperty. For example, if the NXLog Manager template is named Linux, set the selector tolabels/template == "Linux".
-
Enter a filter name and optional comment.
-
Click the Select configuration button to assign the relevant configuration.
-
Click the Save button to save the rules.
| See Auto-enroll in the NXLog Platform User Guide for more information on auto-enrollment rules. |
4. Update the Agent Manager address
NXLog Platform listens for agent connections on agents.example.com and port 5515 by default, where example.com is the domain you specified when installing NXLog Platform.
You will need to update the NXLog Manager configuration templates again to change the agent connection settings to point to NXLog Platform.
-
Open NXLog Manager and navigate to Agents > Agent templates.
-
Click on the template name to open the template settings.
-
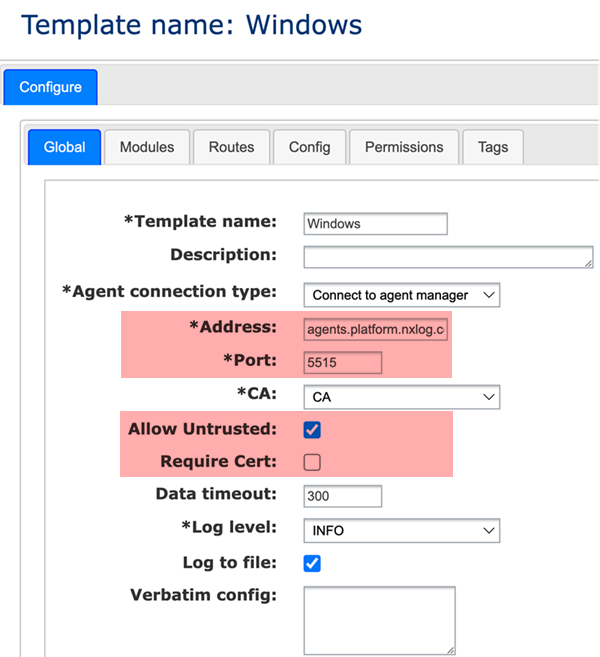
Update the Address and Port fields to your NXLog Platform agent management settings.
-
Activate the Allow Untrusted and deactivate the Require Cert options.
-
Click the Save button to save your changes.
-
Repeat the above steps for each template.
-
Once you have updated the templates, apply the new configuration to your agents. You can do this manually via the NXLog Manager UI or CLI.
- Manually
-
Navigate to Agents, select all agents, and click Agent management > Update config and then Reload.
- Via CLI
-
Execute the following curl command to apply the configuration and restart all agents via the NXLog Manager API.
Replaceadminwith your username andpasswith your password. If the request executes successfully, you will not receive a response from the API.$ curl -H "REST_USER: admin" -H "REST_PASSWORD: pass" "http://localhost:9090/nxlog-manager/mvc/restservice/updateAndReload"This request only affects agents that had their template updated.

